Installing the PrizmDoc® for Java ICN Plugin
Follow the steps below to install and configure the PrizmDoc® for Java ICN Plugin:
-
Obtain the SnowboundVirtualViewerPlugin.jar. If this was not delivered alongside the
virtualviewer.warfile, it can be found in the deployment directory undervirtualviewer/VirtualViewerICNPlugin. -
We recommend that you back up the contents of the IBM Content Navigator directory before installing PrizmDoc® for Java.
-
Copy the JAR to the IBM Content Navigator install directory. For example:
D:\\IBM\\ECMClient\\pluginsor/opt/IBM/ECMClient/plugins/. - Login to ICN Admin.
http://\<your IBM Content Navigator Server\>:\<port\>/navigator/?desktop=admin -
Navigate to Plugins > New Plug-in.
-
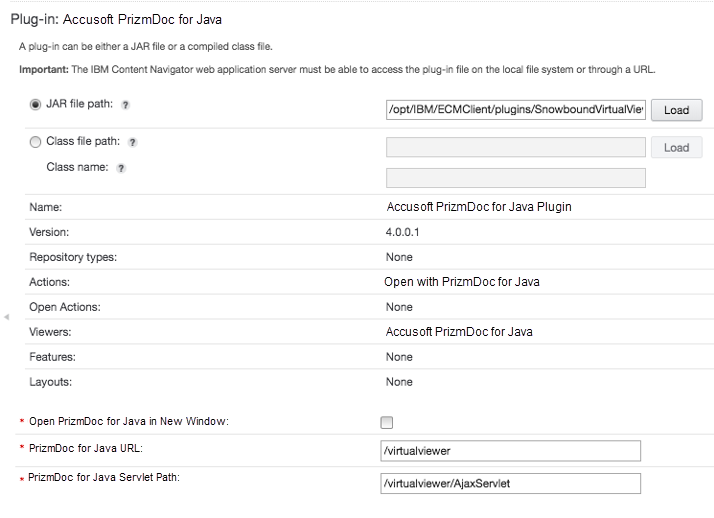
Assign JAR file path. For example:
D:\\IBM\\ECMClient\\plugins\\SnowboundVirtualViewerPlugin.jaror/opt/IBM/ECMClient/plugins/SnowboundVirtualViewerPlugin.jar -
Click Load.
-
Scroll down to assign parameters as shown below:
-
Open PrizmDoc® for Java in New Window.
a. To have PrizmDoc® for Java open in a new Tab within the same browser window as ICN, leave “Open PrizmDoc® for Java in New Window” unchecked.
b. To have PrizmDoc® for Java open in a new browser Window, check the box next to “Open PrizmDoc® for Java in New Window”.
c. Note, this setting determines the behavior for all users.
-
PrizmDoc® for Java URL and PrizmDoc® for Java Servlet Path:
a. For a Single Server deployment with PrizmDoc® for Java in the same WebSphere instance as ICN:
PrizmDoc for Java URL: /virtualviewer
PrizmDoc® for Java servlet path: /virtualviewer/AjaxServlet
b. For a Distributed deployment with PrizmDoc® for Java located in a different Application Server than ICN:
PrizmDoc® for Java URL: `http://*server:port*/virtualviewer` PrizmDoc® for Java servlet path: `http://*server:port*/virtualviewer/AjaxServlet` (Replace *server:port* with the appropriate URL for your PrizmDoc® for Java Server.) - Click Save and Close.
Note: If errors occur try delete the plugin and re-add it.
-
Navigate to Desktops.
-
Select the Desktop where PrizmDoc® for Java will be utilized and click Edit.
-
On the General tab, scroll to the Plug-ins section and expand it if needed.
-
If the radio button next to “Enable all deployed plug-ins for use with this desktop” is selected, then the PrizmDoc® for Java Plugin will be available for that Desktop. Click Close.
-
If the radio button next to “Select the deployed plug-ins to enable for use with this desktop” is selected, select the checkbox next to Snowbound PrizmDoc® for Java Plugin in order to deploy it into the Desktop.
- Logout of ICN Admin.
Have questions, corrections, or concerns about this topic? Please let us know!