Installing PrizmDoc® for Java for ICN on a single server environment
The steps below detail how to install and configure PrizmDoc® for Java using a single server deployment model that includes PrizmDoc® for Java within the same WebSphere instance as ICN.
The PrizmDoc® for Java web application is delivered as a ZIP archive. The zip archive must be reviewed and modified by the target environment user to manage and manipulate the configuration of the web application before and during deployment to the target server.
Deploying PrizmDoc® for Java web application
NOTE: The steps below identify how PrizmDoc® for Java is deployed on WebSphere. Please adjust the steps accordingly based on the Application Server.
-
Copy the updated
virtualviewer.warfile to a location accessible to the application server. - Login to WebSphere Admin Console:
https://\<your-websphere-server\>:\<port\>/ibm/console/logon.jsp -
Select Applications > Application Types > WebSphere enterprise applications.
-
Select the Install button.
-
Browse to the location of
virtualviewer.war, select it and then click Open.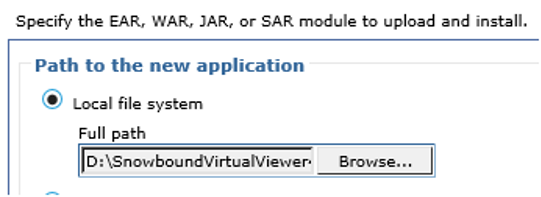
-
Select Next.
-
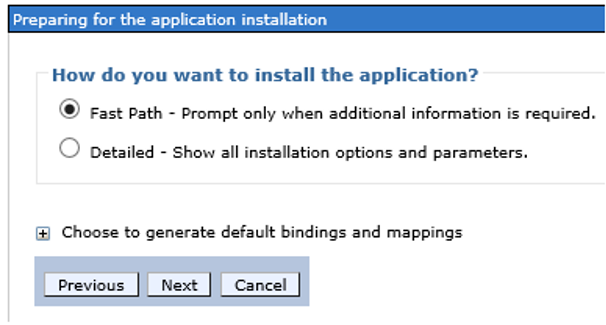
Select Fast Path, select Next.
-
Leave the default values in place on the “Select installation options” screen and click Next.
-
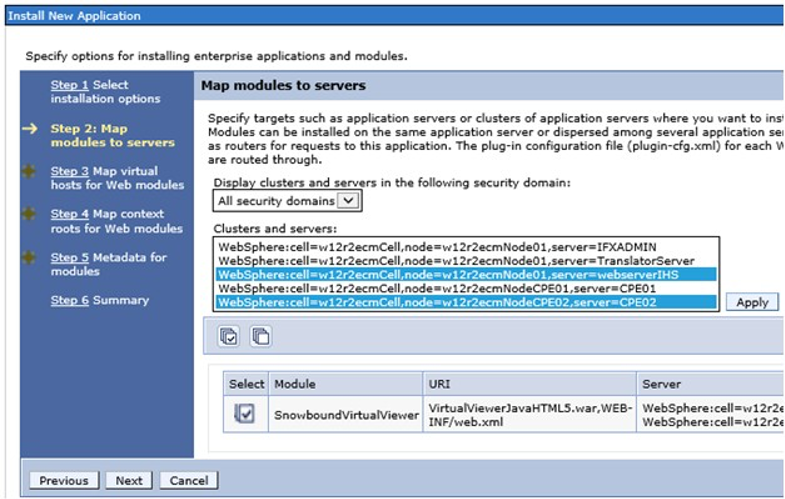
Select the target “Clusters and servers:” and click Apply. Then select the check box for the Virtual Viewer Module and click Next.
-
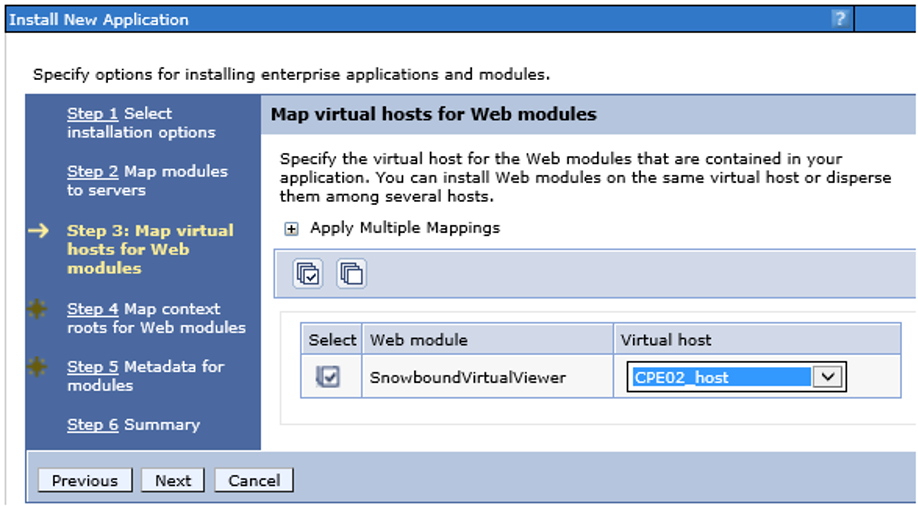
If required, map the appropriate Virtual hosts and click Next.
-
Enter
/virtualvieweras the Context Root and click Next.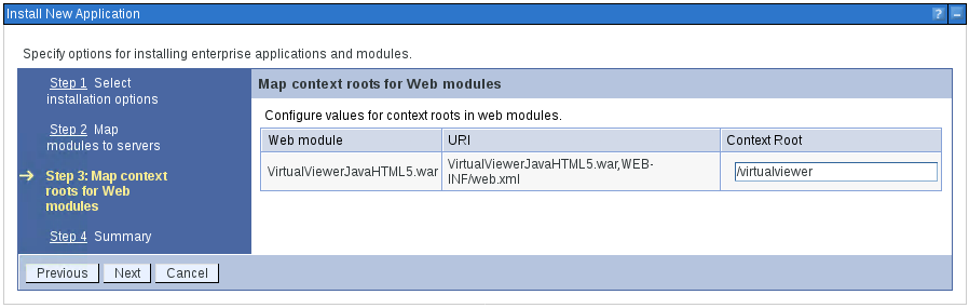
-
Review the Summary and if no changes are required click Finish.
-
Wait for deployment completion. Select Save.
-
On the host, please verify if the application files are copied to all nodes where the deployment was performed.
- Select the virtualviewer_war application checkbox and click the Start button.
Configuring the PrizmDoc® for Java web application
P8ContentHandler.properties
Update the P8ContentHandler.properties file located at /virtualviewer/WEB-INF/classes, following the instructions within the file to set the following properties:
-
CEUri - To locate your CEUri, follow the instructions in the section Where do I find my CEUri?.
-
JaasStanza - To learn more about IBM’s available JaasStanza values, and which to use visit: https://www.ibm.com/support/knowledgecenter/SSNW2F_5.5.0/com.ibm.p8.ce.dev.ce.doc/sec_concepts.htm
-
Admin ID and Password – Both of which are optional
- The PrizmDoc® for Java P8ContentHandler can complete all required tasks to configure P8 to utilize Annotations within PrizmDoc® for Java. To accomplish this, please provide an Admin ID that has been granted appropriate permissions to create a subclass of the Annotations class, as well as the ability to create a custom property. This ID can be removed once the Annotations configuration is complete. To learn more about PrizmDoc® for Java Annotations, please read the section titled “PrizmDoc® for Java Annotations Support”.
web.xml
Update the path for the “tmpDir” parameter to your desired location if it varies from the default value:
-
\<param-name\>tmpDir\</param-name\> -
\<param-value\>/opt/IBM/P8/sbtmp\</param-value\>
config.js
The config.js file, located in /virtualviewer/user-config can be updated to customize the functionality of PrizmDoc® for Java.
If any customizations are required, perform them now. Definitions of the parameters in the config.js file can be found in PrizmDoc® for Java configuration.
SnowboundVirtualViewerPlugin.jar
Copy the SnowboundVirtualViewerPlugin.jar into the ICN Plugins Directory and configure the PrizmDoc® for Java Plugin. Instructions for this step can be found in Installing the PrizmDoc® for Java ICN Connector.
Restart the application
Stop and restart the virtualviewer_war application in the WebSphere Management Console.
Have questions, corrections, or concerns about this topic? Please let us know!