
ImageGear Professional for Windows ActiveX
Using ImageGear ART Component
| ImageGear Professional v18.2 > User Guide > Using ImageGear > Using ImageGear ART Component |
 |
You can only attach one ART component. ART cannot be attached when ARTX is already attached, and vice-versa. |
This section contains a complete description of the IGArtCtl Control ActiveX Control in ImageGear, along with the descriptions of all the related COM objects. For the ART Component ActiveX control and each COM object, there are Properties, Methods, Events, and Enumerations.
Using the ART component, you can annotate any image that your application loads into ImageGear. The annotations are called "ART marks", or "marks" for short. Each time your application creates a new mark, it passes the IGPageDisplay Object for the image to ART. ART internally tracks the marks that are associated with the image, and the ART and IGPageDisplay Object components work together to insure that an ART mark is always displayed on the correct part of the image (even as the image is scrolled, rotated, flipped and zoomed). Your application can save the image with the marks in a separate file with the .ART filename extension. Anytime the image is reloaded, the ART marks can be reloaded with a simple function-call.
The ART component consists of four primary objects:
The IGArtCtl Control ActiveX control helps developers to add redlining and annotation capabilities to any application built with ImageGear. If you have an application that can read, display, and print images, with IGArtCtl Control attached you can add marking capabilities, such as arrows, highlighting, and sticky notes to documents images, and use them as though you were working on printed sheets of paper.
The fundamental "unit" of annotation is called an "ART Mark", or "mark" for short (the original name of IGArtCtl Control was the "Annotation and Redlining Toolkit"). When the end-user uses your application to annotate an image, (s)he is creating marks. Each mark is defined by some geometry ((x,y) position on the image, height and width, etc.), and (for some marks) textual information (a text string, a date, etc.). While the rest of ImageGear typically works with raster (pixel-based) images, IGArtCtl Control marks are vector objects - they can be moved, resized and even deleted.
While the marks are vector objects, they typically are intended to be related to some part of the raster image. For example, one of the marks is a digital version of a "PostIt" note (called an "Attach A Note" mark):
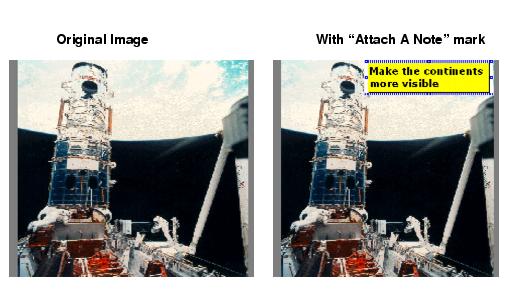
If the user scrolls or zooms the image, it's critical that the mark scrolls or zooms with the image - so that it always appears over the same part of the image. IGArtCtl Control works in conjunction with IGPageDisplay Object to make sure that this happens.
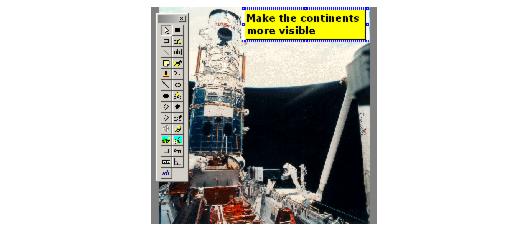
IGArtCtl Control provides a "toolbar" feature that the end-user works with to create and edit the marks. Enabling the toolbar makes adding annotation/redlining capabilities to your application basically trivial.
Once the end-user has created marks for a given image, they need to be saved. IGArtCtl Control marks can be saved in the following ways:
You may also combine these methods. You can, for example, leave classified information in an ART file and "burn in" non-classified information into the image.
As described in "Operational Concepts" (above), you use the IGArtCtl Control ActiveX control by placing it into the UI of your application, using the graphic designer of your development environment. In the code for your application, in the startup sequence, you must associate the control with your IGCoreCtl Control, before calling any of its methods:
|
Copy Code
|
|
|---|---|
IGCoreCtl1.License.SetSolutionName "Accusoft"
IGCoreCtl1.Result.NotificationMode = IG_ERR_NO_ACTION
IGCoreCtl1.AssociateComponent IGArtCtl1.ComponentInterface
|
|
Your application must then create an IGPage Object, and load an image into it. The following example shows the use of LoadPageFromFile Method, but any of the techniques in "Loading and Saving Images" (above) could be used:
|
Copy Code
|
|
|---|---|
Dim page As IGPage
IGCoreCtl1.AssociateComponent IGFormatsCtl1.ComponentInterface
Set page = IGCoreCtl1.CreatePage
IGFormatsCtl1.LoadPageFromFile page, "myfile.jpg", 0
|
|
Next, your application must create an IGPageDisplay Object for the IGPage Object, and then associate the IGPageDisplay Object with the IGPageViewCtl Control in the user interface. This is done as follows:
|
Copy Code
|
|
|---|---|
Dim display As IGPageDisplay Set display = IGDisplayCtl1.CreatePageDisplay(page, True) IGPageViewCtl1.PageDisplay = display |
|
At this point, the image is displayed in the application's user interface. The IGArtCtl Control marks are created and maintained inside of another COM object called an IGArtPage Object. Therefore, the next step is to create an empty IGArtPage Object and associate it with the IGPage Object containing the image. IGArtCtl Control and IGPageDisplay Object need to coordinate with each other, so that the IGArtCtl Control marks automatically "track" with the image as it re-oriented, scrolled, and zoomed. The IGArtPage is created and associated with IGPage Object and IGPageDisplay Object as follows:
|
Copy Code
|
|
|---|---|
Dim art As IGArtPage Set art = IGArtCtl1.CreateArtPage(page, display, IGPageViewCtl.hWnd ) |
|
Then the application will make the IGArtCtl Control toolbar appear, so that the end-user can begin creating the marks:
|
Copy Code
|
|
|---|---|
IGArtCtl1.Toolbar(myForm.hWnd, True, 100, 100) |
|
After the marks have been created, the marks need to be saved somewhere. As described above, your application has 3 choices for this. The first is to save the marks as a separate ART file.