Configuring Support for non-English characters and non-standard fonts
This document explains how to identify and resolve font configuration issues for AFP, PDF and Word documents on Windows and Linux systems.
You may encounter documents that contain non-English or non-ASCII characters that do not view or convert all of those characters properly. This may show up as:
- Characters without diacritics (accents)
- Overlapping characters because they are spaced differently from the original
- Widely spaced characters
- Characters being displayed as rectangular boxes
These behaviors are usually due to font configuration issues. RasterMaster Imaging SDK and VirtualViewer will use the fonts available on the system if the fonts are not embedded in the document. If the font is not available on the system, RasterMaster Imaging SDK and VirtualViewer will make a best effort to find the closest available font. When a substitute font is used, then the issues above may appear.
In the past, many documents would use embedded fonts to ensure that the document could be printed and viewed on systems other than those on which it was created. In recent times, some document creators have been moving away from embedding fonts which puts the burden on the end-user to ensure the fonts are available on his system. If the font specified in the document is not available on the system on which the document is processed, then a fallback font is used. If there is no fallback font that supports the character set, then you will see rectangles instead of characters.
Step 1: Identifying the Fonts
The first step is to find out what fonts you need to properly display the document. Look at the file and identify the places where the characters are not being displayed properly. Then, use the appropriate technique to get the name, type and size of the font.
Identifying AFP Fonts
If your document was created by IBM’s OnDemand, you can ask the document creator to provide you with the font definition files.
Other AFP document creation tools may offer similar font definition features.
If you do not know the document’s creator, you may be able to open the document using an EBCDIC editor and pick out the font names.
Identifying PDF Fonts
If you are having trouble seeing characters displayed in your PDF document, you can follow the steps below to identify the font being used in the PDF document:
- Open up the PDF document in Adobe Acrobat.
- From the main menu, select File > Document Properties… to open the Document Properties dialog box.
- Select the Fonts tab.
- Examine the list of fonts. Any font that does not have (embedded) next to it will need to be installed on the system.
Here is an example of the Document Properties dialog box for a PDF document that has embedded fonts:

Identifying MS Word Fonts
If you are having trouble seeing characters displayed in your MS Word document, you can follow the steps below to identify the font being used in the MS Word document:
- Open your MS Word document and select the text that is not being processed properly.
- From the main menu in MS Word, select Format > Font….
- In the Font dialog box, see the font, style and size currently being used.
- Look carefully at the note at the bottom of the Font Properties dialog. If the font is installed, the bottom of the dialog box will display a message such as: “This is a TrueType font. This font will be used on both printer and screen.” Please see the following example of the Font Properties dialog box:

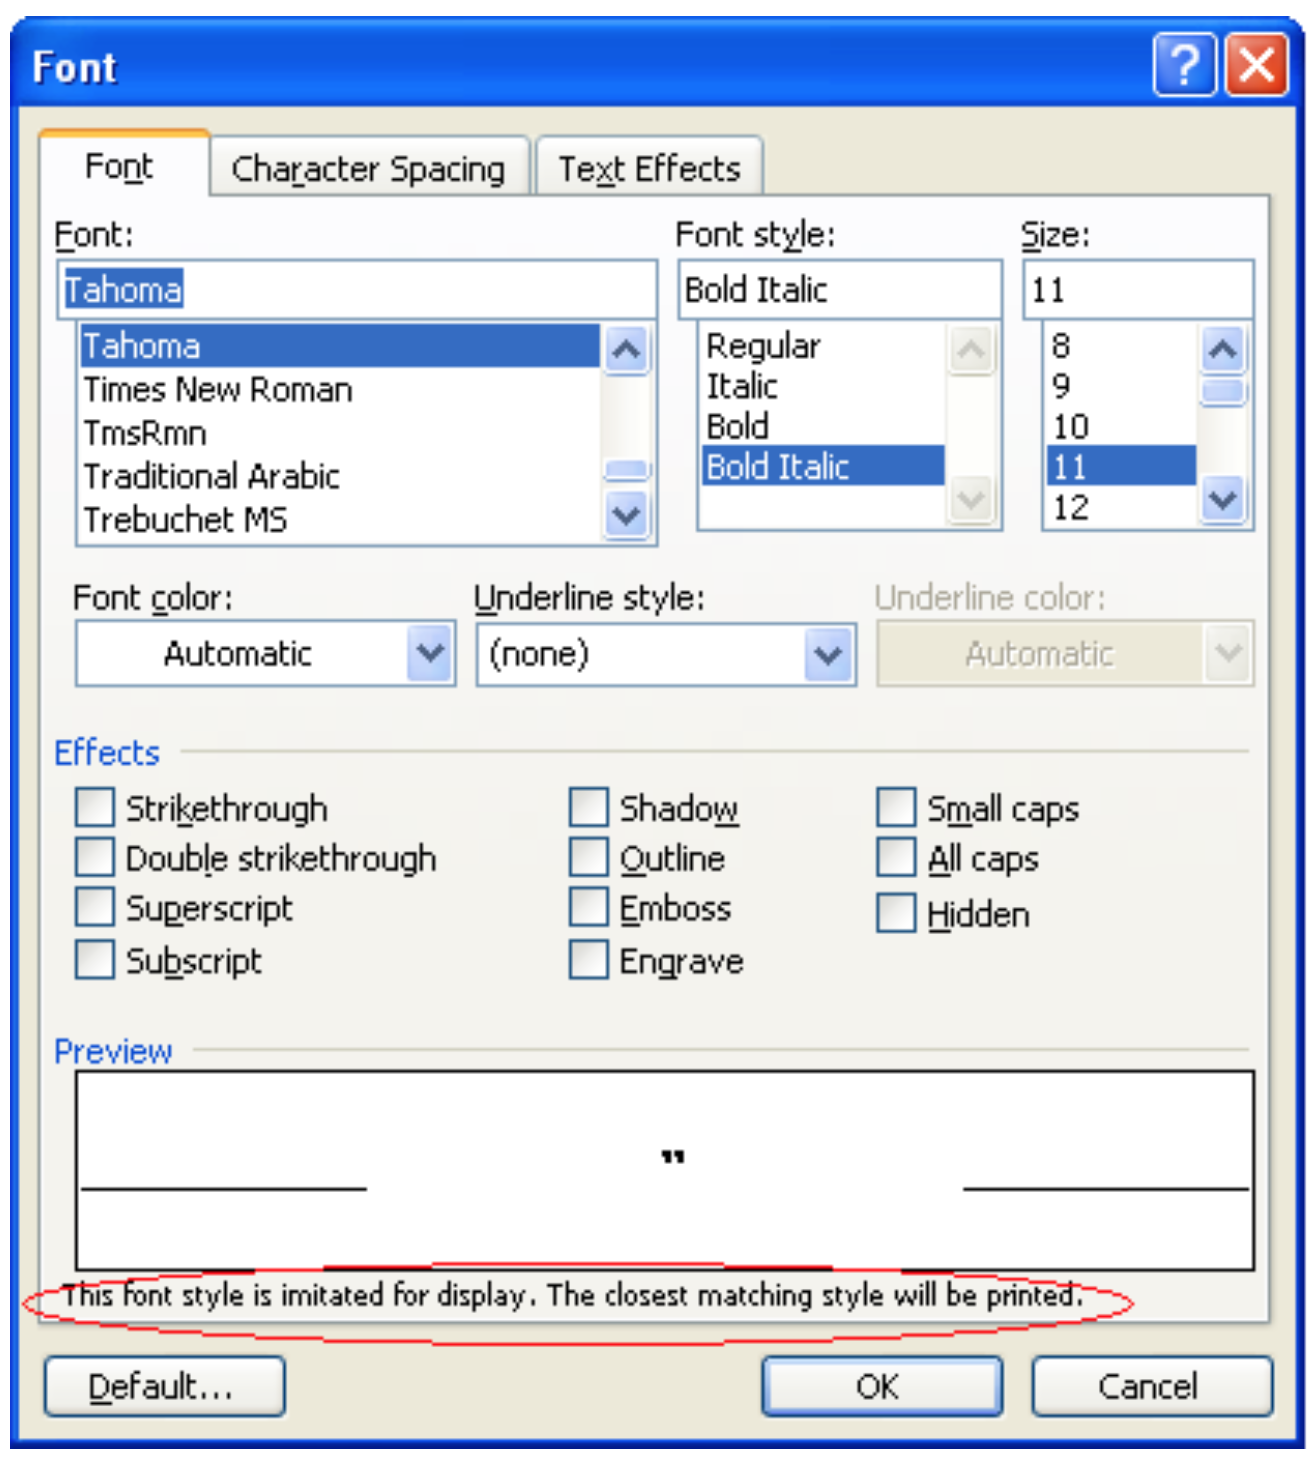
- If the font is not installed, you will see that the font is being imitated as shown in the following example:
Embedding Fonts on Windows
The simplest way to make sure that you can view fonts in your Word document is to have the document creator embed the TrueType fonts into the document. Then, you will not have to install the font on every system where you want to view the document. This will only work for some TrueType fonts.
The document creator should follow these steps to embed the fonts in the document:
- From the Word menu, selecting Tools > Options > Save.
- Under the Save options, select the Embed TrueType Fonts checkbox.
This will make the document size larger. However, the rendering will be more accurate on other Windows systems even if the font is not installed.
Step 2: Finding and Installing the Fonts on Your System
The best case scenario is that the fonts you need are already installed on your system. This section describes how to determine what fonts are installed on your Windows or Linux system.
Windows
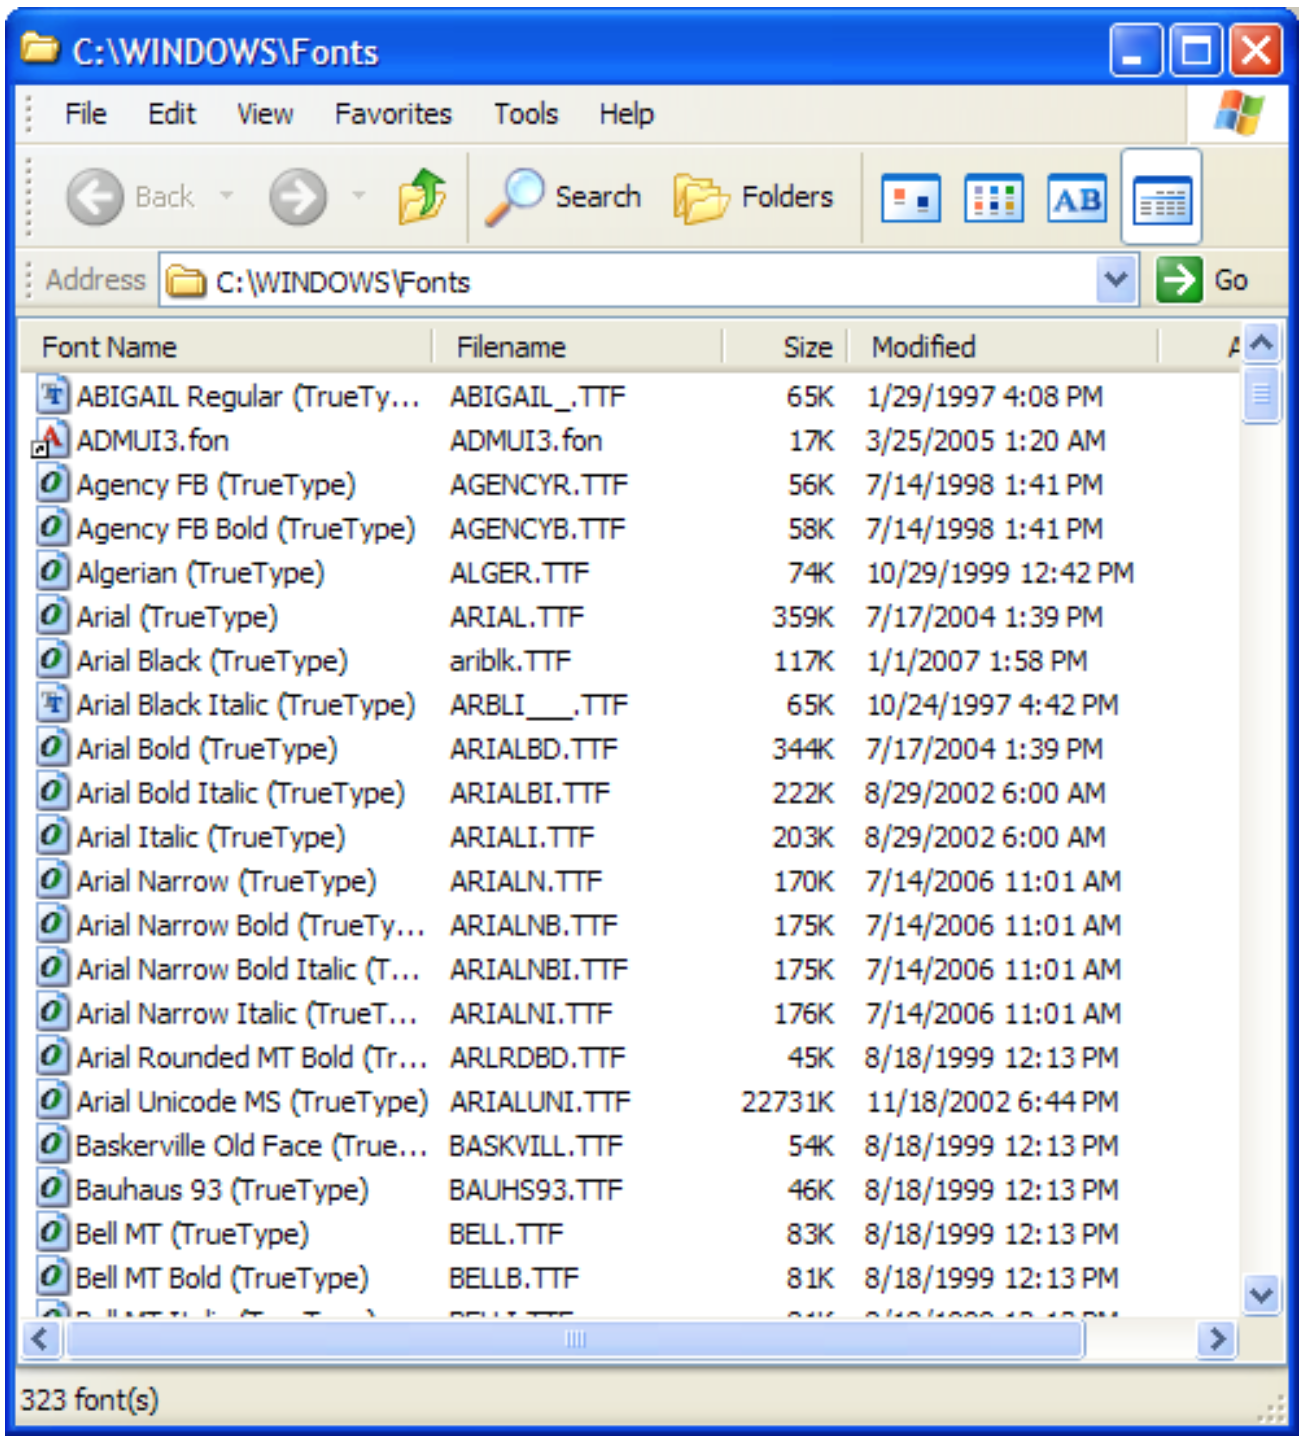
Listing the Available Fonts on Your Windows System
Windows provides a fonts program that will allow you to display the fonts available on your system. Follow the steps below to run the fonts program:
- Select Run… from the Windows Start menu.
- Type fonts at the prompt. You should see all of the fonts available to RasterMaster Imaging SDK, VirtualViewer and other applications on your system as shown in the following example:
If you do not see the font you need listed, then you need to obtain it and install it on your system to see the text in that font accurately. You can check with the document creator to see where they obtained the font or you can search on the font name on the Internet to find the vendor or a package that contains that font.
This Microsoft knowledgebase article describes how to install fonts: http://support.microsoft.com/kb/314960
Ensuring the Font Supports Your Characters
You should ensure that the font you have selected will be able to display the characters in your document. Not all fonts support all character codes. You can use the Character Mapping tool in Windows to look at the representation of each character supported by that font.
To run this tool, follow the steps below:
- From Windows, select Start Menu > All Programs > Accessories > System Tools > Character Map.
- Select the font(s) you are considering and validate that the font contains representations for the characters your documents contain.
Please see the following example of the Character Map:

Listing the available fonts on your unix/linux system
You can use the fc-list command to list all or some of the available fonts on your system.
If you do not see the font you need listed, then you will need to obtain and install that font. Please note that you may need separate fonts to properly display text with attributes like bold or Italic.
Finding the fonts you need if they are not currently on your system
You can check with the document creator to see where they obtained the font or you can search on the font name on the Internet to find the vendor or a package that contains that font.
Some of these fonts can be found on the web free of charge. For example:
- Simplified Chinese fonts http://www.wazu.jp/gallery/Fonts_ChineseSimplified.html
- Traditional Chinese fonts http://www.wazu.jp/gallery/Fonts_ChineseTraditional.html
- Japanese fonts http://www.wazu.jp/gallery/Fonts_Japanese.html
- Korean fonts http://www.wazu.jp/gallery/Fonts_Korean.html
Installing the fonts you need if they are not currently on your system
Installing the Fonts on Windows
If you need and acquire additional fonts, you can install them on your system using the fonts program mentioned in the Listing the Available Fonts on Your Windows System section, or you can refer to this article from Microsoft: http://office.microsoft.com/en-us/help/HA010947421033.aspx
Installing the Fonts on Linux
After you have obtained the font files you may install them on your system using FontConfig. http://www.fontconfig.org/wiki/
The link below describes how to install a TrueType font archive on a Unix system. The details may vary for different distributions http://vietunicode.sourceforge.net/howto/fontlinux.html
Installing the Fonts on Java for both Windows and Linux
Once the font is installed on your system, you need to take some extra steps so that Java applications can see the font. You do this by adding the font to the Java Runtime Library’s font configuration properties.
Your Java Runtime Environment (JRE) should come with a fontconfig.properties.src file. Please see the following example of the location:
<java home path>\lib\fontconfig.properties.src
Follow the steps below to edit the configuration file:
- Make a back up of your default font configuration file. If you have a font configuration file, it is named
fontconfig.properties. - Copy
fontconfig.properties.srctofontconfig.properties to install the new default default configuration file.
You may want to read up on Java font configuration files before proceeding further. This document provides details on how to set up fonts for a variety of situations including tips for improving performance when you are supporting fonts with large character sets: http://java.sun.com/j2se/1.5.0/docs/guide/intl/fontconfig.html
The following steps describe a quick solution to configure your fonts in Java:
- Edit the
fontconfig.propertiesfile. - For Asian character support, modify the following line:
sequence.allfonts=alphabetic/default,dingbats,symbol
to
sequence.allfonts=alphabetic/default,dingbats,symbol,japanese,chinese-ms936,chinese-ms950,Korean
You may want to select a different set of Unicode character subsets for your fonts and use those, if the font supports it.
For Windows, the predefined subset names are:
| alphabetic | arabic | chinese-ms936 |
| chinese-gb18030 | chinese-ms950 | chinese-hkscs |
| cyrillic-iso8859-5 | cyrillic-cp1251 | cyrillic-koi8-r |
| devanagari | dingbats | greek |
| hebrew | japanese | korean |
| latin | symbo | thai |
For Solaris and Linux, the predefined subset names are:
| arabic | chinese-gb2312 | chinese-gbk |
| chinese-gb18030-0 | chinese-gb18030-1 | chinese-cns11643-1 |
| chinese-cns11643-2 | chinese-cns11643-3 | chinese-big5 |
| chinese-hkscs | cyrillic | devanagari |
| dingbats | greek | hebrew |
| japanese-x0201 | japanese-x0208 | japanese-x0212 |
| korean | korean-johan | latin-1 |
| latin-2 | latin-4 | latin-5 |
| latin-7 | latin-9 | symbol |
| thai |
You may need to experiment with creating several logical font definitions, and possibly even several font configuration files if you have a complex set of documents to process. In that case, you should spend some time studying the font configuration guide from Sun and doing some research on the Internet to create a configuration that will work for your situation.
Installing Non-English and Complex Characters on Your System For Window Users
Windows provides language packs for supporting Far Eastern and complex characters. If the documents you process contain Far Eastern characters, it is very helpful to have these language packs installed. To see if these are installed on your system, follow these steps:
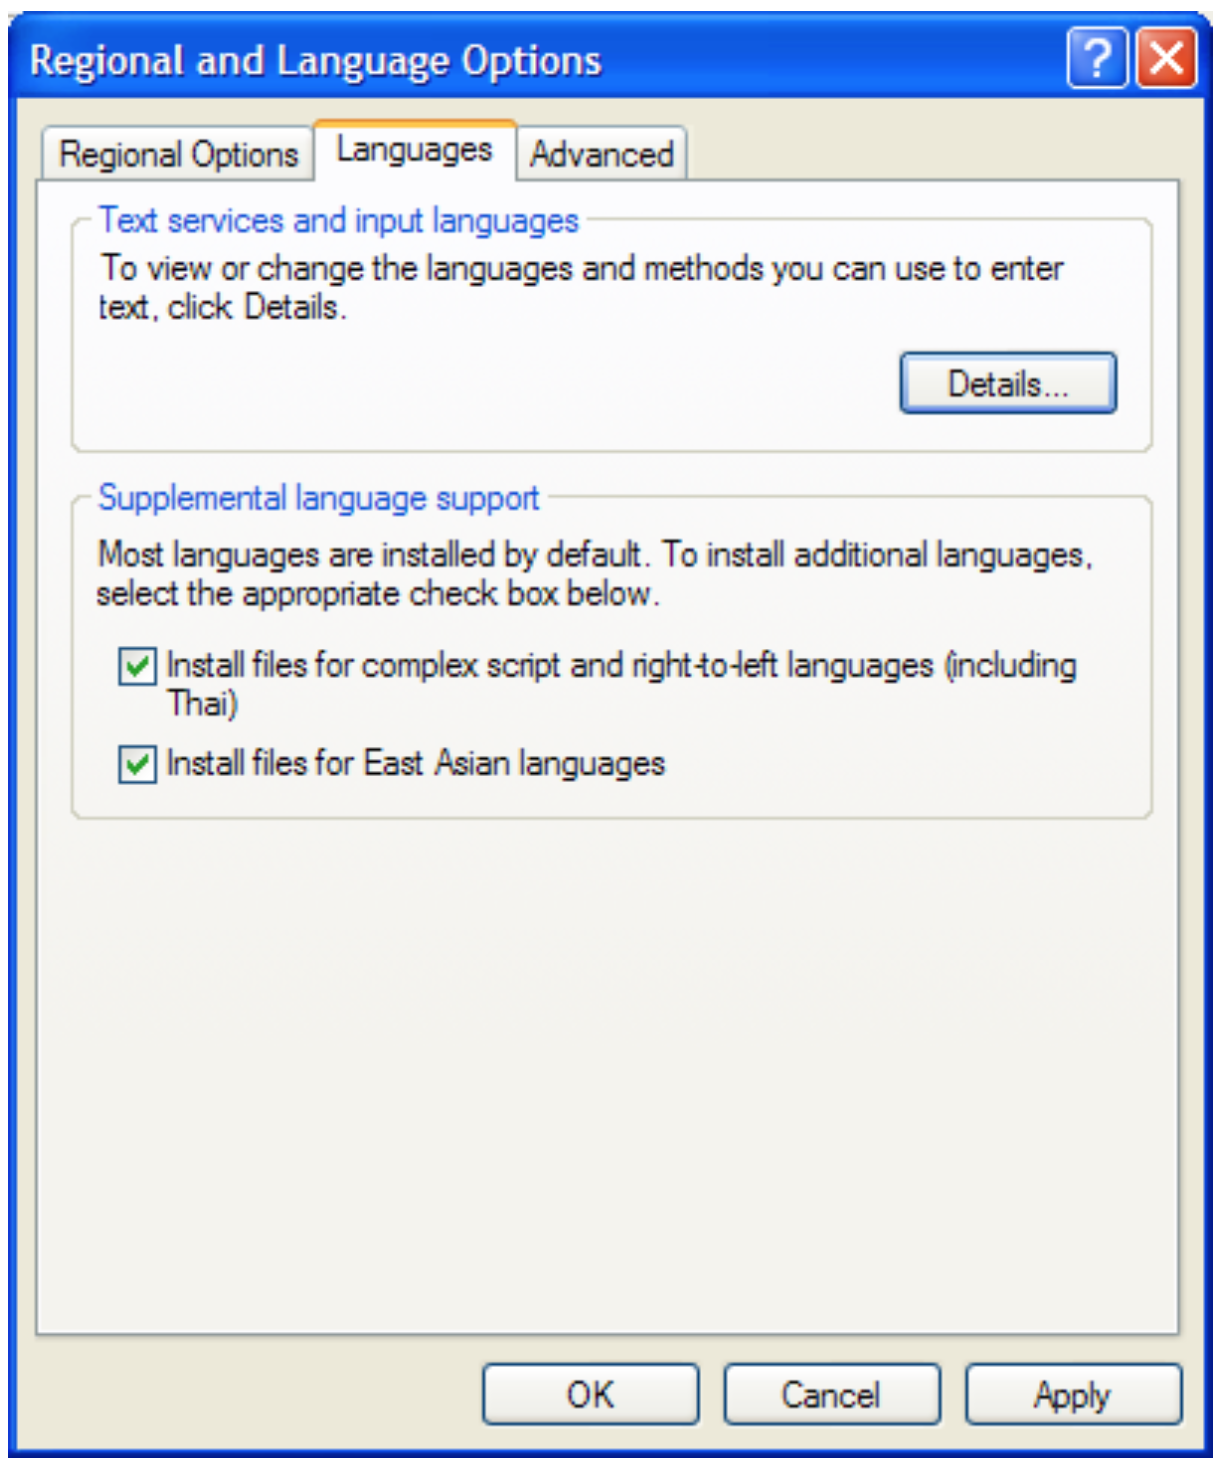
- From Windows, select Start Menu > Settings > Control Panel > Regional & Language Options.
- In the Regional and Language Options dialog box, select the Languages tab.
- Check the Install files for East Asian Languages and the Install files for complex script and right-to-left languages (including Thai) checkboxes (if applicable).
- Select the Apply button. Please see the following example of the Regional and Language dialog box:
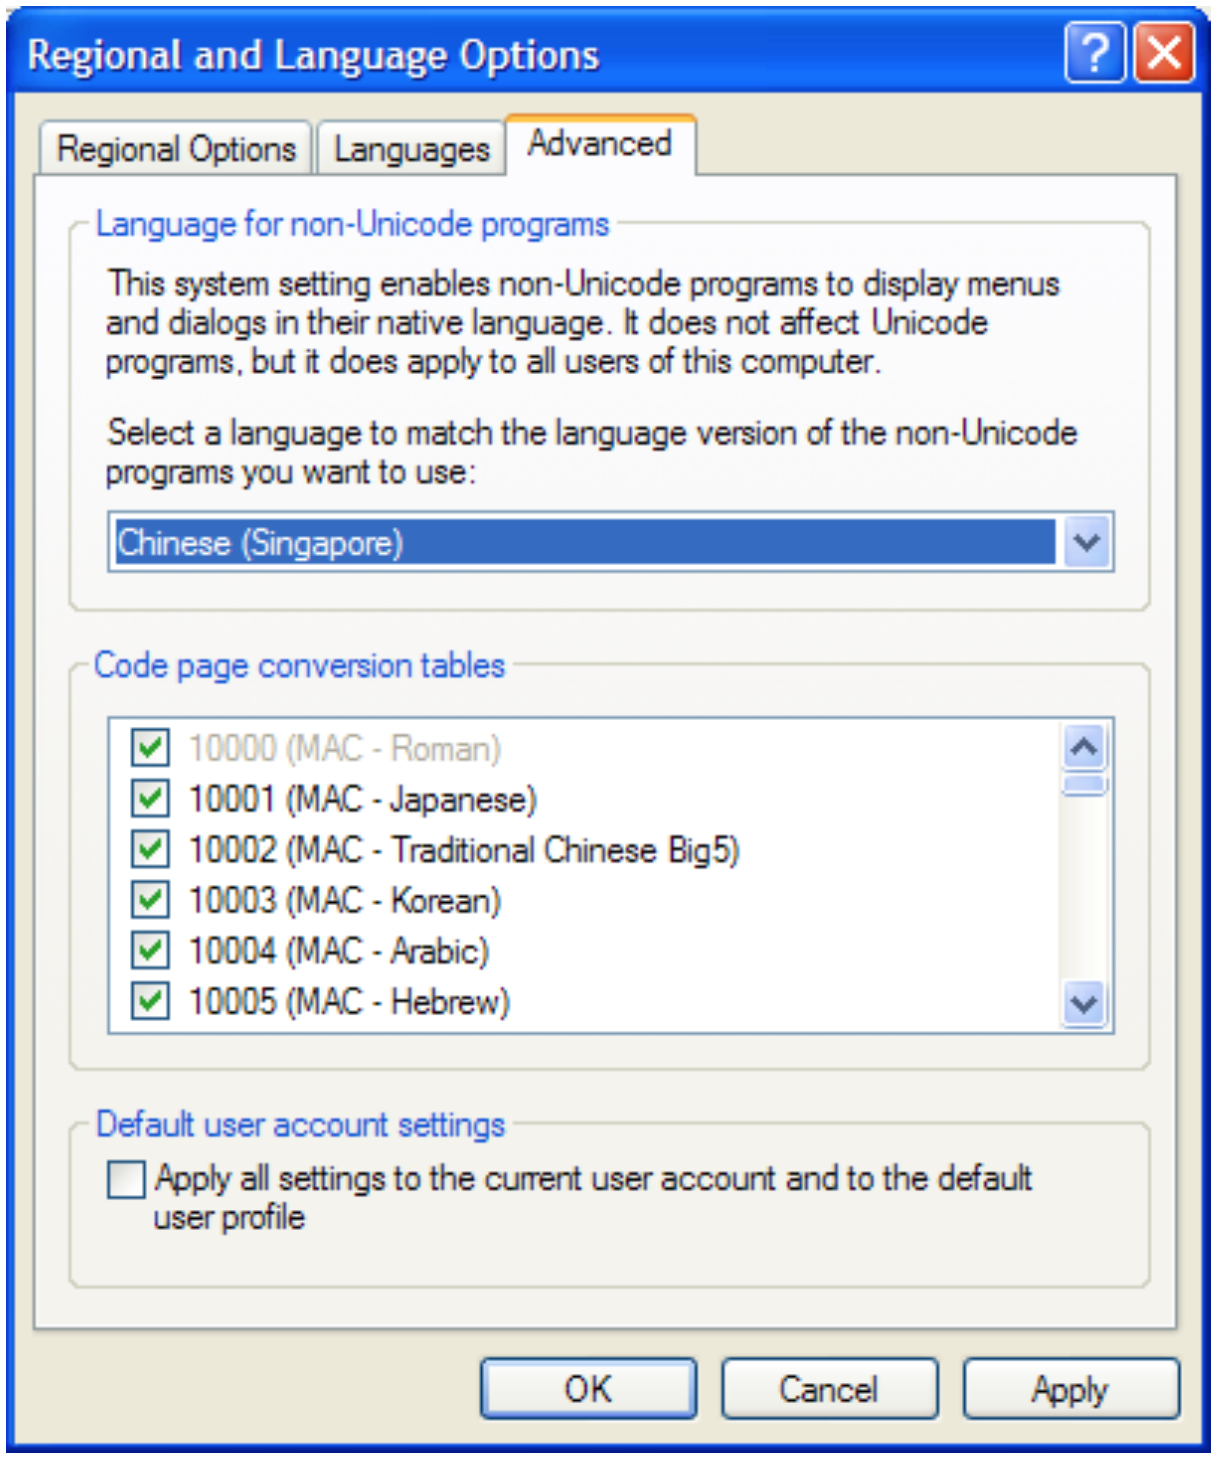
In the Advanced tab, you can add support for additional character mappings which may enable support for the characters in the document if they are in a different language from the Windows system as shown in the following screen:
If you need and acquire additional fonts, you can install them on your system using the fonts program mentioned in the Listing the Available Fonts on Your Windows System section.
Step 3: Making the Fonts Available to RasterMaster
For some formats and platforms you may need to take additional steps to allow RasterMaster to find the fonts that you have installed. This section describes how take the steps to find the font that you have installed.
Processing PDFs on Java platforms
After installing the necessary fonts and regional options on your system, you will need to add the corresponding Character Map (CMAP) resources for those fonts to the Java classpath. The latest versions of RasterMaster Imaging SDK and VirtualViewer include these resources in the CMAP-All.jar file as part of the build. This file can be placed anywhere on your system as long as it is referenced at runtime. This can be done using the -cp or -classpath runtime parameters. For example:
> java -cp C:\path\to\CMAP-All.jar
The CMAP-All.jar can also be referenced via the CLASSPATH environment variable as in the following example:
> set CLASSPATH=%CLASSPATH%;C:\path\to\CMAP-All.jar
Processing Word Documents
You do not need to take any additional steps to find the fonts that you have installed in Word documents.
Processing AFP Documents by Mapping AFP Document Fonts to System Fonts
Font maps enable you to standardize how AFP documents display by overriding the internal font objects with custom fonts and styles. Created as simple ASCII files, AFP font maps can be edited by users to define their own font definitions including font type, point size, color and style.
You should add a font mapping entry to the snbd_map.fnt for each font used by the AFP documents that you process. It may take several attempts to find suitable settings for substitute fonts if you do not have access to the original font definitions.
RasterMaster Imaging SDK automatically loads the snbd_map.fnt file if it is found in one of the following directories: the \Windows directory, the directory into which images are being read, or the directory where your application exists as long as you are not changing directories with a dialog box.
The following methods allow you to set font mapping:
- The
IMGLOW_set_fontmap_path()method sets the path of the font mapping file. - The
IMGLOW_set_fontmap()method programmatically sets the font mapping. See
Format of Font Mapping Data
Any AFP font name can be mapped to the following:
- face name
- point size
- bold attributes
- italic attributes
The snbd_map.fnt file is a simple ASCII text file. Each entry is ended with a carriage return line feed. The following are two sample entries:
C0BC25I3,Courier,10,0,0
C0CGT12S,Arial,14,0,1
Table 1-3 lists a description of the C0BC25I3,Courier,10,0,0 sample entry above.
| Variable | Description |
|---|---|
C0BC25I3 |
Font resource name in the AFP file. |
Courier |
New face name to map to. |
10 |
New size in points or 1/72 of an inch. |
0 |
Bold attribute, 0 - off, 1 - on. |
0 |
Italic attribute 0 - off, 1 - on. |
IMGLOW_set_fontmap_path(String)
This method defines the path where RasterMaster will look for the font mapping file, snbd_map.fnt.
Syntax
int IMGLOW_set_fontmap_path(String path);
Remark
The table below lists the IMGLOW_set_fontmap_path method variable descriptions.
| Variable | Description |
|---|---|
path |
A string pointer to the path to look for the snbd_map.fnt file. The snbd_map.fnt file will be appended to the path name. IMGLOW_set_fontmap_path("c:\\temp"); |
Returns
Returns the status of the path of the font mapping file. A value of 0 indicates success. Returns an OUT_OF_MEMORY error if there is not enough memory to complete the operation. Any value less than zero is a RasterMaster error code.
IMGLOW_set_fontmap(byte[], int)
This method programmatically sets font mapping.
Syntax
int IMGLOW_set_fontmap(byte font_map[], int len);
Remarks
The table below lists the IMGLOW_set_fontmap method variable descriptions.
| Variable | Description |
|---|---|
font_map |
Pointer to font mapping data. This is the whole buffer of data found in the font map file, snbd_map.fnt. This variable overrides existing font mapping in the snbd_map.fnt file. The following are some examples of the data in this variable: C0H400xx90,PrecisionID Postnet L DEMO,12,0,0 C0BPOSBX,CCodePostnet,10,0,0 |
len |
The integer length of font mapping data |
Returns
Returns the status of the font mapping data. A value of 0 indicates success. Returns an OUT_OF_MEMORY error if there is not enough memory to complete the operation. Any value less than zero is a RasterMaster error code. See Appendix I of the RasterMaster for the Java Platform Programmer’s Reference Guide for a list of error codes.
Have questions, corrections, or concerns about this topic? Please let us know!