
PHP
Before you get started, it's helpful to see an application overview of the default PHP sample setup:
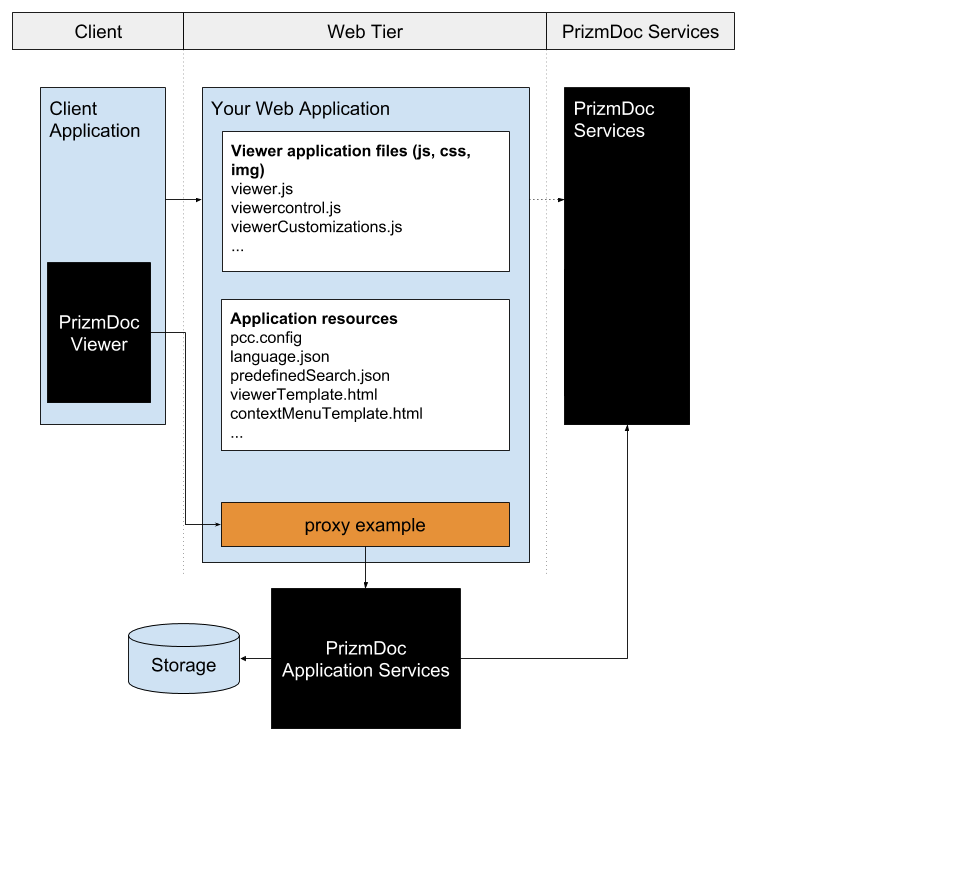
Figure 1: PHP Sample Setup
First Steps
Before integrating with your application environment, a helpful first step is to install one of the provided samples. With a working sample, you will have a proof-of-concept that demonstrates the functionality of the PrizmDoc Server working together with your web server. To get started with setting up a sample, refer to How to Configure php Samples.
Once installed, the sample will load in the following manner (refer to Figure 1 above):
index.phpis called on the web server by a request initiated by a web browser.index.phpexecutes and bundles together various application resources like user interface templates, language files, and predefined search queries.- Once
index.phpis loaded in to the web browser, the Viewer application files (javascript, css, and image resources) are then loaded from the web server. - Upon receiving the files in the web browser, the Viewer application starts and requests a document for display from the web server. This request is routed through
pas.phpas are all other subsequent service requests.pas.phpacts as a router between the Viewer and PrizmDoc Application Services (PAS). Note that this can be configured to work directly through IIS instead of using application logic. Refer to the Configure PrizmDoc Application Services in Your Server's Entry Point 'how-to' topic. - At this stage, the Viewer is fully loaded and displaying a document. It will now respond to user interaction by processing it locally in the browser or, if not possible, by sending service requests to the PrizmDoc Application Services (PAS).
Integration
The Front End
The Viewer loads like most modern web applications: a server script is called, which then presents an HTML page to the browser. The browser loads the linked JavaScript and CSS files, which triggers the front-end web application to initiate. Because the technologies are standard web ones, you can take the js, img, and css folders provided by the sample and plug them in to your existing web platform. The sample places the JavaScript and CSS folders at the same directory level as the application launching index.php. However, the location of these resources can be changed by following the directions in Using a Custom Resource Path.
Also, for details on embedding the Viewer on existing pages, see Embedding the Viewer.
The Back End
An important point to make is that while your web application, PAS, and the PrizmDoc Server can be installed on the same machine, they do not have to be. Because the web server communicates with the other services over RESTful network calls, they can be located anywhere where they can all interact with each other over HTTP. In the sample, the PAS host URL and port are defined in the pcc.config file with several parameters prefixed with PrizmApplicationServices.
Figure 2: The pcc.config file
<?xml version="1.0" encoding="UTF-8"?>
<Config>
  <PrizmApplicationServicesScheme>http</PrizmApplicationServicesScheme>
  <PrizmApplicationServicesHost>localhost</PrizmApplicationServicesHost>
  <PrizmApplicationServicesPort>3000</PrizmApplicationServicesPort>
</Config>
In the default installation, the web tier sample is configured with the default location of the PrizmDoc Application Services (PAS). When deploying to multiple servers, you may need to change the values here to allow the web tier sample to communicate with PAS.
Another important file is pas.php. This acts as a router between the front end Viewer and PrizmDoc Application Services (PAS). So pas.php must be able to receive and respond to requests from the Viewer. The sample places pas.php in the viewer-webtier directory and informs the Viewer of its location via the imageHandlerUrl parameter in index.php:
Figure 3: Example of imageHandlerUrl in plugin options
var pluginOptions = {
  documentID: viewingSessionId,
  language : viewerCustomizations.languages['en-US'],
  annotationsMode: "LayeredAnnotations",
  documentDisplayName: originalDocumentName,
  imageHandlerUrl: "viewer-webtier/pas.php",
  immediateActionMenuMode: "hover",
  predefinedSearch: searchTerms,
  template: viewerCustomizations.template,
  redactionReasons: redactionReasons,
  signatureCategories: "Signature,Initials,Title",
  icons : viewerCustomizations.icons
};

$(document).ready(function(){
  var viewerControl = $("#viewer1").pccViewer(pluginOptions).viewerControl;
});
So, you can easily change the location of pas.php and then adjust the imageHandlerUrl parameter to match. Just be aware that pas.php works together with the rest of the files in the viewer-webtier directory. Those files will need to be moved with pas.php.