
PrizmDoc v12.3 - Updated
Get Started with PrizmDoc
Welcome to PrizmDoc; let's get started! This topic walks you through the steps you need to get PrizmDoc installed, configured, and running. You will also be able to integrate a basic viewer into your web app.
It's important to understand the basic structure of PrizmDoc when it's embedded in your web app. PrizmDoc contains 3 essential pieces:
Example:
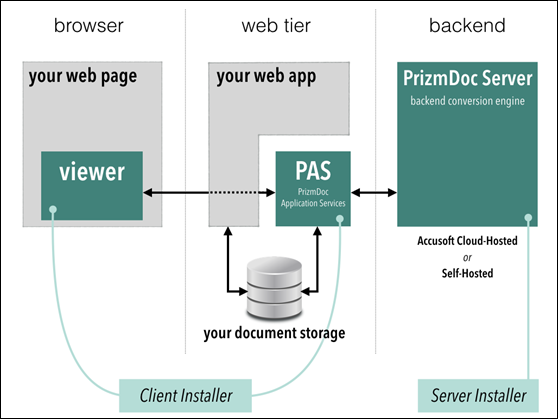
Key for diagram above:
In this step, select the back-end that makes the most sense for your needs. The easiest way to get up and running for an evaluation is to select the Accusoft Cloud-Hosted back-end. You can always start with Accusoft Cloud-Hosted for the evaluation and then move to Self-Hosted later. For more details in determining which hosting solution to use, refer to Server Hosting Options.
This step covers installing the Viewer Assets and PrizmDoc Application Services (PAS). After you complete the installation, you need to verify that the Viewer is connected to the back-end.
http://localhost:18000/PrizmDoc_HTML5_Viewer_NET_WEBFORMS/
The following sections help you create a Viewing Session, embed the Viewer, and integrate your web application with PAS:
The following additional resources are available: