In This Topic
Downloading ImageGear .NET
Use the following links to download ImageGear .NET:
- ImageGear .NET v25.2.7
- ImageGear .NET v25.2.6
- ImageGear .NET v25.2.5
- ImageGear .NET v25.2.4
- ImageGear .NET v25.2.3
- ImageGear .NET v25.2.2
- ImageGear .NET v25.2.1
- ImageGear .NET v25.2
- ImageGear .NET v25.1
- ImageGear .NET v25.0
Before Using ImageGear
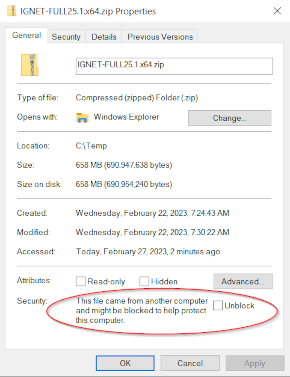
- To avoid additional security warnings when working with product files, unblock the product ZIP folder before extracting it.
- Select the Unblock button on the properties page of the ZIP folder and click OK.
- Make sure that your system complies with the requirements detailed in the System Requirements section.
Unpacking ImageGear
To unpack ImageGear, perform the following steps:
- Download the ImageGear .NET zip file from the above links and extract the zip file to any folder you like - this folder will be referred to as $INSTALLDIR.
- Open $INSTALLDIR\Documentation\SoftwareLicense.pdf. Carefully read the information contained in the License Agreement form before making a decision to accept the terms of the agreement. If you accept the terms of the agreement, you may begin using ImageGear.
Directory Structure
Once extracted, the ImageGear installation zip file has the following directory structure:
| Directory |
Description |
| $INSTALLDIR\Bin\x86 |
32-bit assemblies and dependencies. (Only present in the x86 version.) |
| $INSTALLDIR\Bin\x64 |
64-bit assemblies and dependencies. (Only present in the x64 version.) |
| $INSTALLDIR\Documentation |
Software License Agreement. |
| $INSTALLDIR\Licensing\Deployment |
Deployment utility files. |
| $INSTALLDIR\Licensing\LicenseManager |
Accusoft License Manager. |
| $INSTALLDIR\Resources\Redistributables |
Redistributable binaries for the Captiva Cloud Runtime. |
| $INSTALLDIR\Resources\SchemaDefinitions |
XML schema definition for ART annotations. |
| $INSTALLDIR\Resources\WebResources\HTML5Viewer |
Resources used for HTML5 and web projects. |
What's Next
Now you can complete one of our step-by-step tutorials to create an ImageGear project or you can explore our robust collection of code samples.