
ImageGear .NET - Updated
Create HTML5 Viewer and Deploy with IIS
If you're running into issues while installing and configuring ASP.NET for the first time on a particular system, see the New to ASP.NET? section of Viewing Using ASP.NET.
The following tutorial refers specifically to 64-bit installations; for 32-bit installations:
A sample of this tutorial is provided within the installer of ImageGear .NET. You can have access to it in the following directory: $INSTALLDIR\ImageGear.NET v24\Samples\Source Code\ASP.NET\CSharp\HTML5Viewer\.
Instructions for running the ASP.NET sample using HTTPS can be found in Set up HTTPS for a Web Application.
Before using the ASP.NET samples, a path to the Office components must be added to the registry. See Samples for details.
| packages.config |
Copy Code |
|---|---|
<?xml version="1.0" encoding="utf-8"?> <packages> <package id="Microsoft.AspNet.Mvc" version="4.0.20710.0" targetFramework="net40" /> <package id="Microsoft.AspNet.Razor" version="2.0.20710.0" targetFramework="net40" /> <package id="Microsoft.AspNet.WebApi" version="4.0.20710.0" targetFramework="net40" /> <package id="Microsoft.AspNet.WebApi.Client" version="4.0.20710.0" targetFramework="net40" /> <package id="Microsoft.AspNet.WebApi.Core" version="4.0.20710.0" targetFramework="net40" /> <package id="Microsoft.AspNet.WebApi.WebHost" version="4.0.20710.0" targetFramework="net40" /> <package id="Microsoft.AspNet.WebPages" version="2.0.20710.0" targetFramework="net40" /> <package id="Microsoft.Net.Http" version="2.0.20710.0" targetFramework="net40" /> <package id="Microsoft.Web.Infrastructure" version="1.0.0.0" targetFramework="net40" /> <package id="Newtonsoft.Json" version="4.5.6" targetFramework="net40" /> </packages> | |
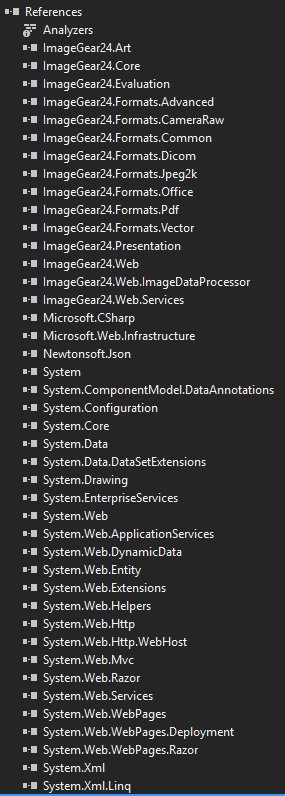
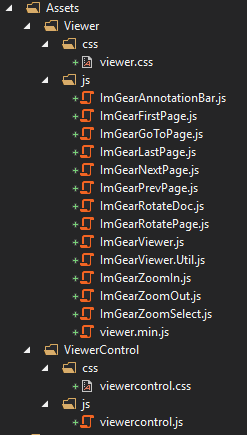
By the time you finish this section your project should contain the references and files needed to build our HTML5 viewer from the ground up. The files that were added to the project contain the javascript necessary to integrate annotations and different kinds of document manipulation into the viewer as well as the backbone for the ImageGear web functionality, the ViewerControl. The content found in the Viewer folder can be modified to fit your specific needs.
Now that we have the backbone of the project we can actually start integrating it all into a single web page. Here we will give you code to copy into your project that will result in a cohesive, functioning page similar to our HTML5 Viewer sample. Throughout this tutorial we will be matching the HTML5 Viewer’s directory structure and file names so it can be more easily referenced.
We will begin by adding some js and css files specific to our project. First we will begin by creating a new folder named Sample inside our Assets folder. Then we will add two new folders inside the Sample folder called css and js. Next we will add the files. Right click the css folder and click Add > New Item. Under the Web options click on Style Sheet. Name the file sample.css and click Add. Do the same process right clicking on the js folder this time making sure to add a JavaScript File named sample.js. Once both files have been created copy the content below into the appropriate file.
| sample.css |
Copy Code |
|---|---|
html, html > body {
    height: 100%;
}
.no-gutters {
    margin-right: 0;
    margin-left: 0;
}
.navbar {
    margin-bottom: 0px;
}
#selectUploadDoc {
    display: none;
}
.btn-container {
    display: inline-block;
    cursor: default;
}
.btn-container+.btn-container {
    padding-left: 20px;
}
.file-upload {
    width: 150px;    height: 150px;
    border-width: 0px;
    background-color: transparent;
    color: #fff;
}
img.upload-btn {
    height: 100%;
    border-radius: 50%;
}
.btn-doc-select:hover {
    background-color: darkorange;
    cursor: pointer;
}
.scroll-x {
    white-space: nowrap;
    overflow-x: auto;
} | |
| sample.js |
Copy Code |
|---|---|
// Use IG.NET Web component to get thumbnail of document function createThumbnailBtn(id, fileName) { var thumbnailImg = "/ImageGearService.svc/Page/q/0/Thumbnail/150/150/Quality/50?DocumentID=u" + fileName var html = '<div class="btn-container" title="' + encodeURIComponent(fileName) + '"><img id="sampleDoc' + id + '" class="btn btn-doc-select" src="' + thumbnailImg + '" /></div>'; $("#thumbnailBtns").append(html); // Bind to click event $("#sampleDoc" + id).on("click", function () { createIGViewer(fileName); }); } // Adjust ViewerControl height to account for the thumbnail list and potential horizontal scrollbar function resizeViewerControl() { var height = $("#thumbnailBtns").height(); $("[data-ipcc-viewer-control]").css("height", "calc(100% - " + (height + 4) + "px)"); } // Use IG.NET Web component to upload document and receive documentId function uploadFile() { var file = document.getElementById('selectUploadDoc').files[0] $.ajax({ url: "/ImageGearService.svc/Document?encoding=binary", type: 'POST', data: file, processData: false, contentType: false, success: function (data, textStatus, jqXHR) { // If upload is a success then the server returns a unique Id for the newly uploaded document // data = documentId createThumbnailBtn(sampleDocuments.length, data); createIGViewer(data); sampleDocuments.push(data); }, error: function (jqXHR, textStatus, errorThrown) { alert('Failed to upload: ' + errorThrown); } }); } function getParamValue(name) { var results = new RegExp('[\?&]' + name + '=([^&#]*)').exec(window.location.href); if (results == null) { return null; } return decodeURI(results[1]) || 0; } // Upon page load, add a window-resize listener for resizeViewerControl(), // download sample thumbnails, and initialize upload button $(function () { $(window).on("resize", resizeViewerControl); // Generate thumbnail buttons for sample document selection for (i = 0; i < sampleDocuments.length; i++) { createThumbnailBtn(i, sampleDocuments[i]) } // Bind file upload to uploadDoc button $('#selectUploadDoc').bind('change', uploadFile); }); | |
Next we will be editing the index.cshtml page that we added to our project in the project creation step. Copy the code below and paste it into the file making sure you overwrite any content that was already in the file.
| index.cshtml |
Copy Code |
|---|---|
<!-- @@copyright Copyright (c) 1996-2018 Accusoft Corporation.  All rights reserved. -->
<!DOCTYPE html>
<html>
<head>
    <meta name="viewport" content="width=device-width, initial-scale=1">
    <!-- External style and script dependencies -->
    <script src="https://code.jquery.com/jquery-3.3.1.min.js" integrity="sha256-FgpCb/KJQlLNfOu91ta32o/NMZxltwRo8QtmkMRdAu8=" crossorigin="anonymous"></script>
    <script src="https://maxcdn.bootstrapcdn.com/bootstrap/4.0.0/js/bootstrap.bundle.min.js"></script>
    <link rel="stylesheet" href="https://maxcdn.bootstrapcdn.com/bootstrap/4.0.0/css/bootstrap.min.css">
    <!-- Include style and script for ViewerControl -->
    <link rel="stylesheet" href="~/Assets/ViewerControl/css/viewercontrol.css">
    <script src="~/Assets/ViewerControl/js/viewercontrol.js"></script>
    <!-- Include style and scripts for IGViewer -->
    <link rel="stylesheet" href="~/Assets/Viewer/css/viewer.css">
    <script src="~/Assets/Viewer/js/ImGearAnnotationBar.js"></script>
    <script src="~/Assets/Viewer/js/ImGearFirstPage.js"></script>
    <script src="~/Assets/Viewer/js/ImGearGoToPage.js"></script>
    <script src="~/Assets/Viewer/js/ImGearLastPage.js"></script>
    <script src="~/Assets/Viewer/js/ImGearNextPage.js"></script>
    <script src="~/Assets/Viewer/js/ImGearPrevPage.js"></script>
    <script src="~/Assets/Viewer/js/ImGearRotateDoc.js"></script>
    <script src="~/Assets/Viewer/js/ImGearRotatePage.js"></script>
    <script src="~/Assets/Viewer/js/ImGearZoomIn.js"></script>
    <script src="~/Assets/Viewer/js/ImGearZoomOut.js"></script>
    <script src="~/Assets/Viewer/js/ImGearZoomSelect.js"></script>
    <script src="~/Assets/Viewer/js/ImGearViewer.js"></script>
    <script src="~/Assets/Viewer/js/ImGearViewer.Util.js"></script>
    <script src="~/Assets/Viewer/js/ImGearAnnotationBar.js"></script>

    <!-- Include style and script for this sample -->
    <link rel="stylesheet" href="~/Assets/Sample/css/sample.css">
    <script src="~/Assets/Sample/js/sample.js"></script>
    <!-- Basic HTML5 Viewer instantiation -->
    <script type="text/javascript">
        var igViewer = null;
        // Default files contained on the server. By default in the "Documents" directory of the website's root
        var sampleDocuments = [
            "AccusoftPegasus.TIF",
            "Balloon.jp2",
            "1040ez.pdf",
            "Japan.jpg",
            "Accusoft_25_Years.docx",
            "Jupiter.png"
        ];
        // Creates an IGViewer.Viewer with the specified document ID
        function createIGViewer(documentID) {
            // Instantiate new viewer with the specified documentID but same selector. This will destroy
            //  any existing viewer that has been created with that element and create a new one to display the
            //  a different document.
            igViewer = new IGViewer.Viewer("#viewer", {
                documentID: documentID,
                imageHandlerUrl: "/ImageGearService.svc",
                viewerIconsPath: "/Assets/Viewer/icons"
            });
        }
        // On document ready, instantiate the viewer
        $(function () {
            // Create a viewer to display the first sample file
            var docId = getParamValue("documentId");
            createIGViewer(docId != null ? docId : sampleDocuments[0]);
        });
    </script>
</head>
<body>
    <main>
        <!-- Here is where the thumbnails will be displayed -->
        <div class="row no-gutters bg-dark justify-content-center">
            <div id="thumbnailBtns" class="scroll-x">
                <div class="btn-container">
                    <label for="selectUploadDoc" class="file-upload">
                        <!-- Upload button must be written to page using javascript to resolve base URL -->
                        <script type="text/javascript">
                            document.write('<img class="btn btn-doc-select upload-btn" src="/Assets/Viewer/icons/upload.svg" />');
                        </script>
                    </label>
                    <input name="selectUploadDoc" id="selectUploadDoc" type="file" />
                </div>
                <!-- Thumbnails will be dynamically added here, refer to "~/Assets/Sample/js/sample.js" -->
            </div>
        </div>
        <!-- Element that the viewer will be instantiated in -->
        <div id="viewer" class="bg-dark"></div>
    </main>
</body>
</html> | |
Next we will update the Web.config file.
| Web.config |
Copy Code |
|---|---|
<?xml version="1.0"?> <!-- For more information on how to configure your ASP.NET application, please visit http://go.microsoft.com/fwlink/?LinkId=169433 --> <configuration> <configSections> <section name="ImageGear.Web.DataProviders.ImageProvider" type="ImageGear.Web.DataProviders.ImageDataProviderConfiguration,ImageGear24.Web.Services"/> </configSections> <appSettings> <add key="igSolutionName" value="Accusoft"/> <add key="igSolutionKey" value=""/> <add key="igLicenseKey" value=""/> <add key="igComponent" value="~\bin\ImageGear24.Web.ImageDataProcessor.dll"/> <add key="igOfficeCoreDir" value=""/> <add key="igPdfResources" value=""/> <add key="igBinaries" value=""/> <add key="maxThreadsPerControl" value="4"/> <add key="igVerifyDocuments" value="true"/> <add key="igDisableFormats" value="dcraw, dcrawHeaderless"/> </appSettings> <ImageGear.Web.DataProviders.ImageProvider default="MarkupFileImageDataProvider" parseToken="!"> <providers> <add name="MarkupFileImageDataProvider" type="ImageGear.Web.DataProviders.MarkupFileImageDataProvider,ImageGear24.Web.Services" storageRootPath="~/Documents/" maxImageSizeToCache="512" cachingTimeLimit="50" cachingEnable="false"/> </providers> </ImageGear.Web.DataProviders.ImageProvider> <system.serviceModel> <services> <service name="ImageGear.Web.ImGearService"> <endpoint binding="webHttpBinding" bindingConfiguration="UploadStream" name="UploadStream" contract="ImageGear.Web.IImGearService"/> <host> <timeouts closeTimeout="00:00:30"/> </host> </service> </services> <bindings> <webHttpBinding> <binding name="UploadStream" maxBufferSize="104857600" maxBufferPoolSize="104857600" maxReceivedMessageSize="104857600" transferMode="StreamedRequest"> <readerQuotas maxStringContentLength="104857600" maxArrayLength="104857600" maxBytesPerRead="104857600"/> </binding> </webHttpBinding> </bindings> <serviceHostingEnvironment aspNetCompatibilityEnabled="true"/> </system.serviceModel> <system.diagnostics> <sharedListeners> <add name="imageGearListener" type="System.Diagnostics.TextWriterTraceListener"/> </sharedListeners> <switches> <add name="imageGearSwitch" value="Off"/> </switches> <sources> <source name="ImageGear.Web" switchName="imageGearSwitch"> <listeners> <add name="imageGearListener" traceOutputOptions="DateTime" type="System.Diagnostics.TextWriterTraceListener" initializeData="ImageGear.Web.log"/> </listeners> </source> </sources> </system.diagnostics> <system.webServer> <validation validateIntegratedModeConfiguration="false"/> <handlers> </handlers> <security> <requestFiltering> <requestLimits maxAllowedContentLength="104857600"/> </requestFiltering> </security> </system.webServer> <system.web> <compilation debug="true" targetFramework="4.0"> <assemblies> <add assembly="System.Transactions, Version=4.0.0.0, Culture=neutral, PublicKeyToken=B77A5C561934E089"/> <add assembly="System.Design, Version=4.0.0.0, Culture=neutral, PublicKeyToken=B03F5F7F11D50A3A"/> <add assembly="System.Windows.Forms, Version=4.0.0.0, Culture=neutral, PublicKeyToken=B77A5C561934E089"/> <add assembly="PresentationFramework, Version=4.0.0.0, Culture=neutral, PublicKeyToken=31BF3856AD364E35"/> <add assembly="System.Xaml, Version=4.0.0.0, Culture=neutral, PublicKeyToken=B77A5C561934E089"/> <add assembly="PresentationCore, Version=4.0.0.0, Culture=neutral, PublicKeyToken=31BF3856AD364E35"/> <add assembly="WindowsBase, Version=4.0.0.0, Culture=neutral, PublicKeyToken=31BF3856AD364E35"/> </assemblies> </compilation> <pages controlRenderingCompatibilityVersion="4.0"> <namespaces> <add namespace="System.Web.Helpers"/> <add namespace="System.Web.Mvc"/> <add namespace="System.Web.Mvc.Ajax"/> <add namespace="System.Web.Mvc.Html"/> <add namespace="System.Web.Routing"/> <add namespace="System.Web.WebPages"/> </namespaces> </pages> </system.web> </configuration> | |
Before running your project right click your project in the Solution Explorer and go to Properties. Go to Web and under Start Action click Specific Page and browse to your index.cshtml page. You will also need to change the Platform Target of your project to x64 and will need to make a change to the settings for IIS Express to run the project with the 64-bit version of it instead of the 32-bit. Once this is done your project should build and run without any problems.
ImageGear's ASP.NET includes server-side logging to help you identify problems. To turn on this logging, you need to configure Web.config. The section that would need to be updated is
|
Copy Code | |
|---|---|
<switches>
      <add name="imageGearSwitch" value="Off"/>
</switches> | |
You can adjust the amount of information that ImageGear places into the log file by switching the value between "Off", "Critical", "Error", "Warning", "Information", or "Verbose". These values are documented in MSDN for the System.Diagnostics.TraceLevel enumeration. The amount of information logged typically increases going from "Critical" towards "Verbose".
By default, IIS runs web sites in a 32-bit process on a 32-bit operating system and in a 64-bit process on a 64-bit operating system. If you wish to run the 32-bit version of ImageGear on a 64-bit machine, you should create a new Application Pool using the IIS Manager. After you create it, you should edit its Advanced Settings to enable 32-bit applications.