When you save a list file using the List File with Original Images option, exact copies of the original image files are saved along with a list file that references the saved image files. If you made any modifications to the image files prior to saving, such as changes to the scale or rotation, these changes will not exist in the saved image files. Also, if any of the image files you choose to save are multi-page image files, then the entire image file will be saved even if you specify only one page to save.
Saving Tips
- The Save dialog box is used to name the saved list file. If the chosen list file already exists, it will be overwritten with the new saved list file (although none of the files referenced by the overwritten list file will be changed or deleted).
- The image files that are created during the save process are given names that are unique within the folder into which they are being saved. If a file already exists with the image file name (within the specified folder), a number will be appended to the file name to make it unique.
- Default names for the list file and image files, as well as other parameters, can be specified in the source list file. Refer to the Admin Tools Help File for more information on these parameters.
- When a list file is saved from a licensed web site, the list file will also be licensed for use with the images.
To save image data to a file, you can select the Save... option from either of two locations:
- The Main Toolbar:
 or,
or,
- Right-click the image to display the context menu:

- Choose Save/Save As... to open the Save Pages dialog box.
- In the Save in: drop-down list, browse to find the location where you want to save the image.
- In the File name: drop-down list, type in the name for the new file you are creating.
- In the Save as type: drop-down list, verify that you want to save your image as List File with Original Images (*.prizm).
-
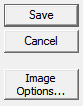
Click the Image Options button:
-
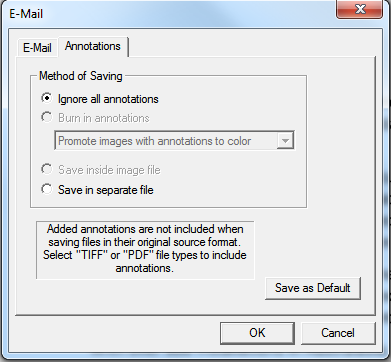
The E-Mail dialog box opens:
-
Under the Annotations tab, you can select different options for saving annotations to the new file:
- Ignore all annotations - the file will be saved without any annotations
- Save in separate file - save the annotations to a separate file
 |
To set the current settings of a tab as the default settings, click Save as Default.
|
-
Click OK to return to the Save Pages dialog box.
-
In the Page range group box, select which pages you want to save:
- All - all pages will be saved
- Current page - only the current page selected will be saved
- Pages - the pages specified in the text box will be saved. Page numbers should be separated by commas and a range of pages can be specified using a hyphen. For example, you can enter 1,3,5-8,10 to save pages 1, 3, 5, 6, 7, 8, and 10.
-
To finish, click Save. The file is saved with the specified options.
Notes & Tips
When Internet Explorer is Running in Protected Mode on Windows Vista or Windows 7
If Internet Explorer is running in protected mode on Windows Vista or Windows 7 and you save a file(s), Internet Explorer will relocate the saved file(s) and display a warning dialog box: "For your computer's security, this file was saved to the Temporary Internet Files folder. Do you want to open this folder?" The file(s) will be saved to the Microsoft Windows Temporary Internet Files Virtualized folder. For example, if you save a file as C:\output.tif, the file will be saved to the location below:
C:\Users\%userprofile%\AppData\Local\Microsoft\Windows\Temporary Internet Files\Virtualized\C\output.tif
If you specify that a website is "trusted" in Internet Explorer, and protected mode is not enabled for trusted sites (which is the default setting), the warning dialog box will not display when you save files from that website, and the files will not be relocated.
See Also