
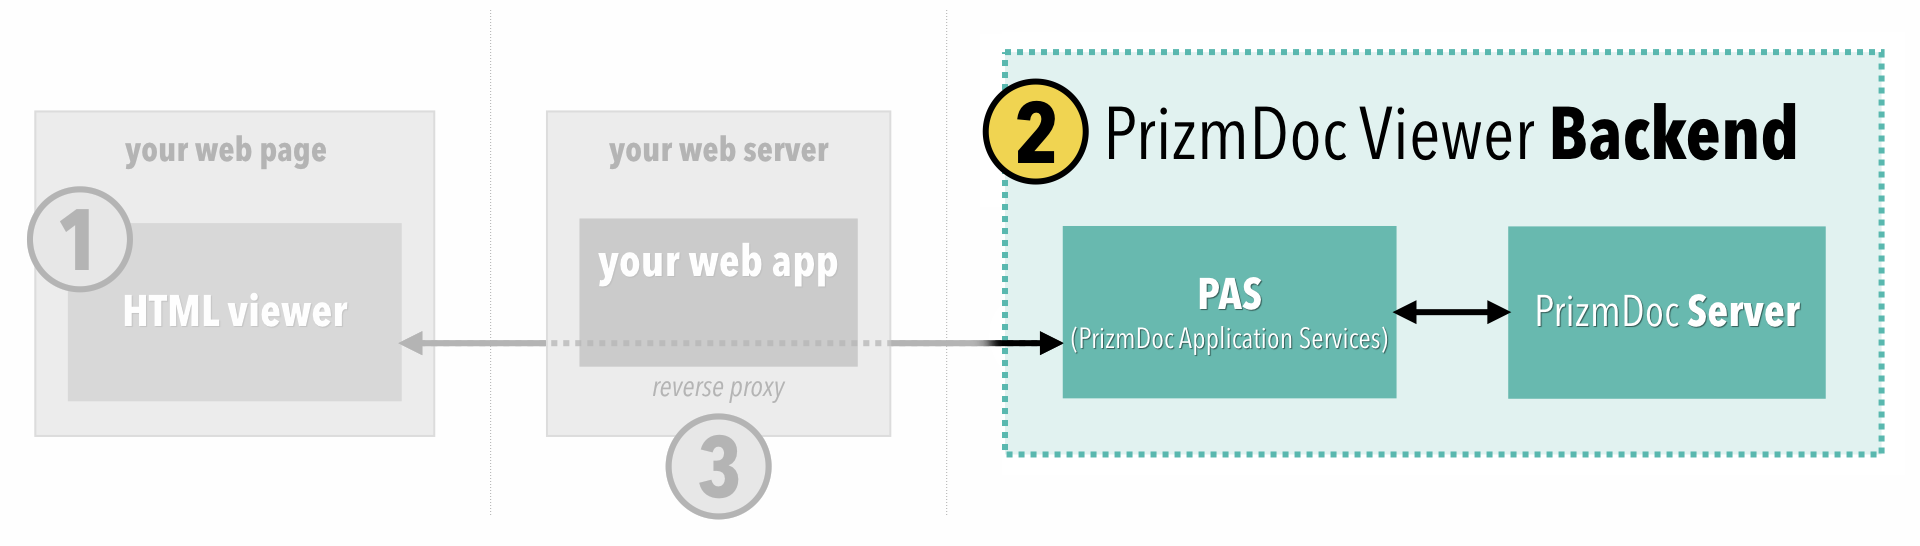
2. Choosing a Backend and Creating a Viewing Session
Next, we need to work with the backend to create a viewing session: the “thing” on the backend that is responsible for converting the document and the “thing” the viewer will ask for converted SVG.
In order to do that, we need access to a running backend:
In this section, we will explain:
- the options you have for hosting a backend
- how to create a new viewing session
- how to connect a viewer to an associated viewing session
- how to provide the source document to the viewing session
By the end of this section, the viewer will begin to show a loading indicator (though document content won’t load quite yet).
Choosing a Backend Hosting Option
You have several options for hosting the backend:
-
PrizmDoc Cloud. Accusoft fully-manages a backend which is shared by multiple customers. You pay only for transactions which you use (e.g. documents viewed or processed). This is the easiest way to get started.
-
Private Cloud. Accusoft deploys a backend for your dedicated use in the cloud and then fully-manages the backend for you. You pay annually for the average number of servers we run for you. This is another easy way to get started. If you’re interested in this option, contact Sales.
-
Self-Hosted. You deploy and manage the backend yourself on your own hardware. Data never leaves your network. You pay annually based on the number of machines you run PrizmDoc Server on.
If you’re new to setting up a backend, PrizmDoc Cloud is the easiest way to get started. Just sign up, get your API key, and you’re done. Your backend is ready. You can always switch to a private cloud or self-hosted option later if you need to.
About Viewing Sessions
Every viewer instance running in a browser must be associated with a backend viewing session. In other words, any time you create a new viewer, you must first create a new backend viewing session.
The viewing session is the “thing” on the backend that is responsible for converting the original document to SVG for viewing in the browser, and it is the “thing” the viewer talks to in order to ask for document content (“Hey backend, I need page 9 for viewing session XYZ…”).
This is why, at the end of part 1, the viewer was giving us an error:

That error is the viewer’s way of saying “Hey, you forgot to give me the id of my viewing session! I have no way to ask the backend for content.”
Let’s fix this.
Creating the Viewing Session
Before rendering HTML with the viewer and sending it to the browser, your web application must first send a POST request to PAS to create a new viewing session:
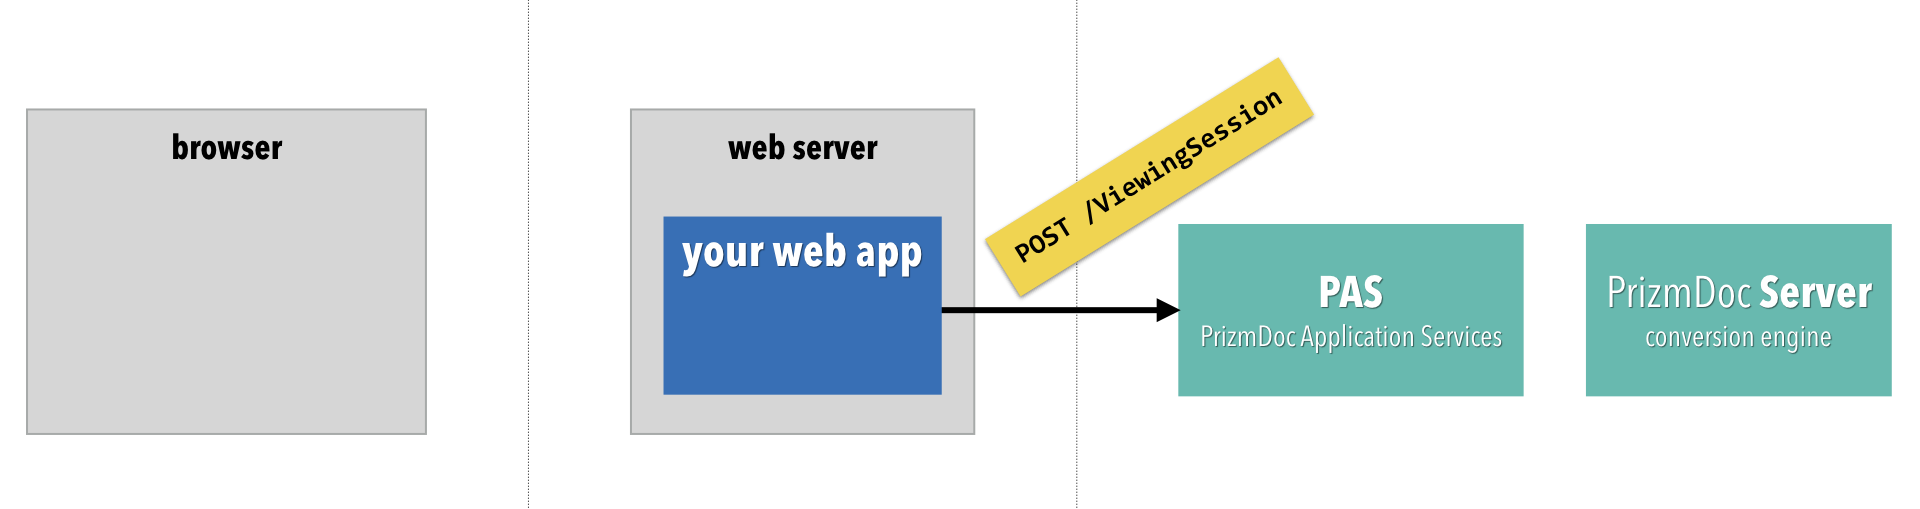
If you’re using PrizmDoc Cloud, the HTTP request to create a viewing session looks like this:
POST https://api.accusoft.com/prizmdoc/ViewingSession
Acs-Api-Key: YOUR_API_KEY
Content-Type: application/json

{
    "source": {
        "type": "upload",
        "displayName": "UNIQUE_NAME_OF_THE_DOCUMENT_TO_BE_VIEWED"
    }
}
NOTE: If you’re using a self-hosted backend:
- Replace
https://api.accusoft.com/prizmdocwith your actual PAS base URL (such ashttp://localhost:3000)- Omit the
Acs-Api-Keyrequest header (needed for PrizmDoc Cloud)
Let’s break this down:
-
The
sourceobject tells PAS information about the original source document. -
source.typetells PAS how you intend to provide the source document. The value of"upload"means that you will be uploading the source document to PAS in a subsequent HTTP request, associating it with this viewing session (there are other options available, but"upload"is the one we recommend almost all of the time). -
Finally,
source.displayNameis a required option whensource.typeis set to"upload", and it must be a unique name for the document.
NOTE: To optimize backend performance,
source.displayNamemust be unique for the binary contents of the document you will upload. You should NEVER use the same"displayName"value for two different source documents.
PAS will create a new viewing session and reply with its viewingSessionId:
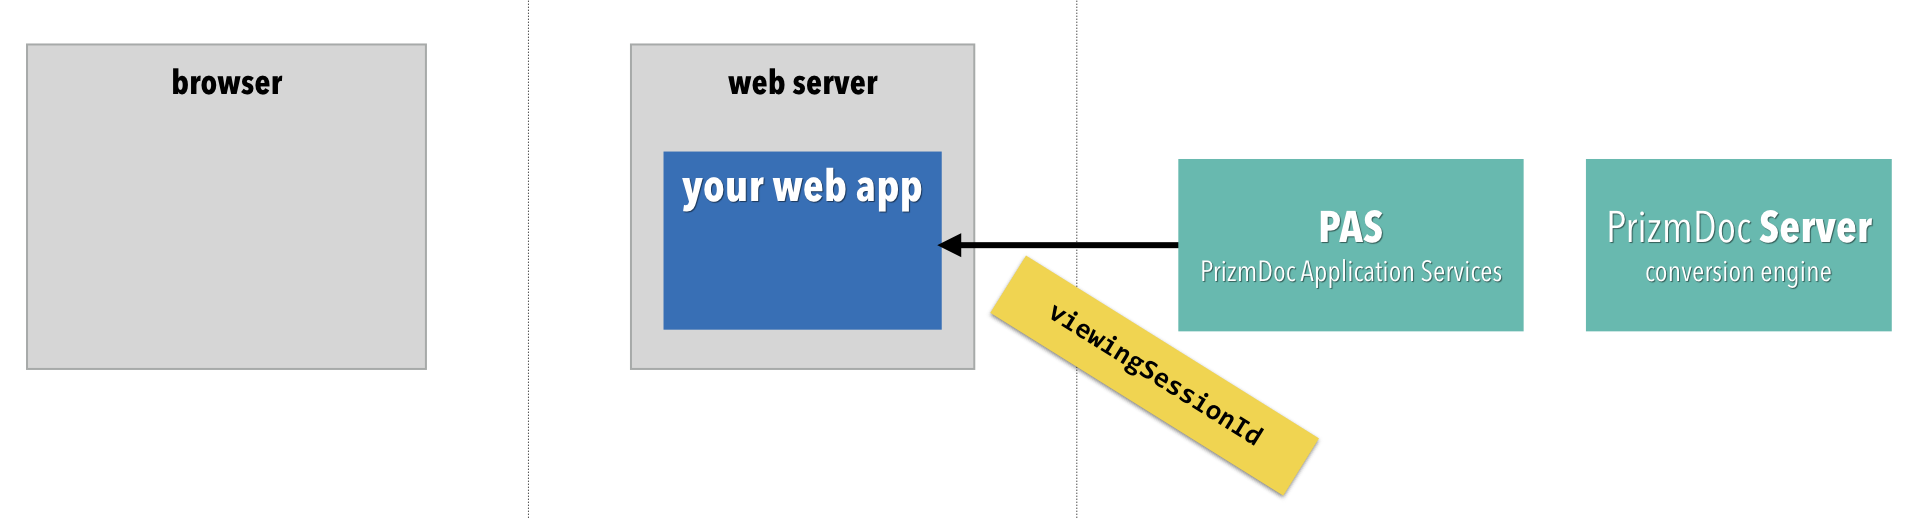
HTTP/1.1 200 OK
Content-Type: application/json

{
    "viewingSessionId": "XYZ..."
}
Connecting the Viewer to the Viewing Session
At this point, we’ve created a new “empty” viewing session and we have its unique viewingSessionId. PAS is still waiting on us to upload the source document. However, before we do that, we can go ahead and render the HTML with a viewer, configuring it to use this new viewingSessionId:
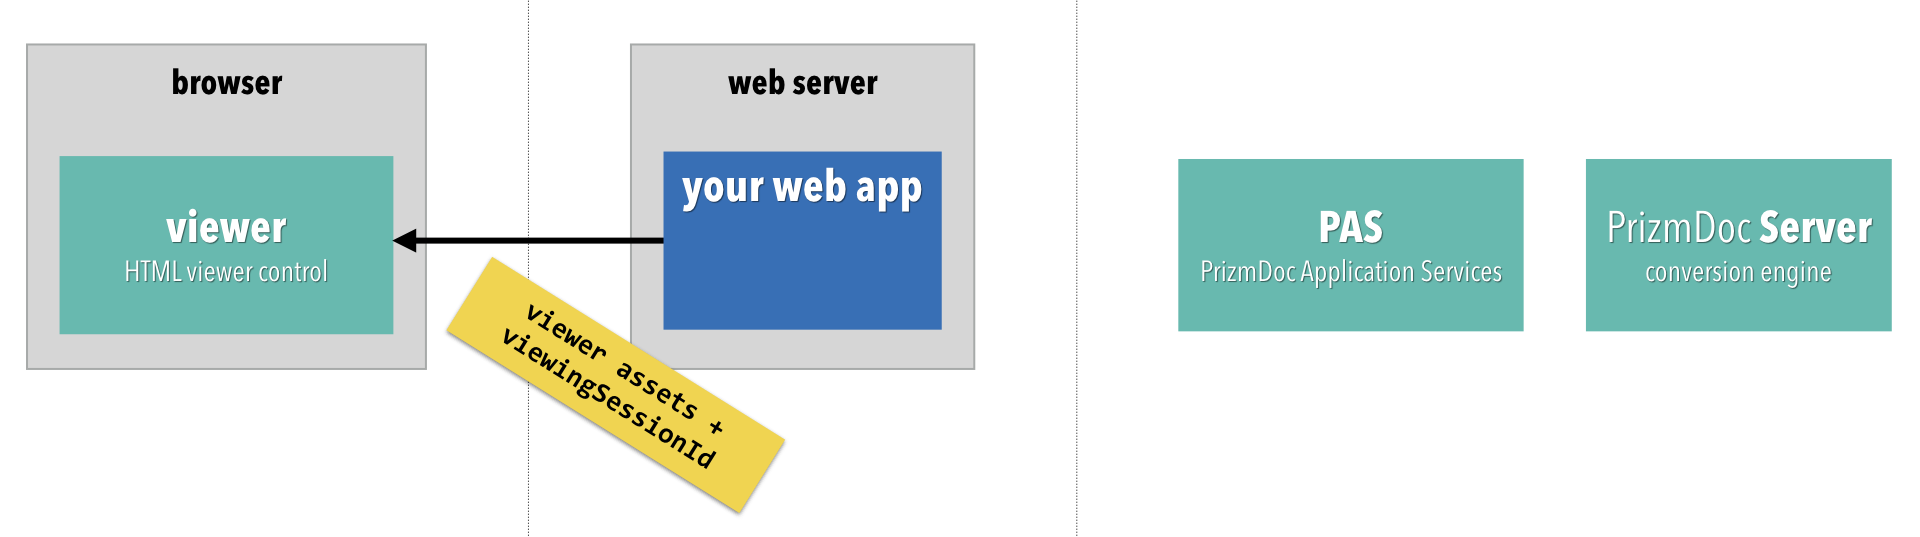
We construct the viewer just as we did before in part 1, but this time we will provide a value for the required documentID property which the viewer was complaining about (the viewer API calls it documentID and the PAS REST API calls it viewingSessionId, but they are the same thing):
<script type="text/javascript">
  $(function() {
    $('#viewerContainer').pccViewer({
      documentID:       'XYZ...',
      imageHandlerUrl:  '/pas-proxy'
      viewerAssetsPath: 'viewer-assets',
      resourcePath:     'viewer-assets/img',
      language: viewerCustomizations.languages['en-US'],
      template: viewerCustomizations.template,
      icons:    viewerCustomizations.icons,
      annotationsMode: "LayeredAnnotations"
    });
  });
</script>
Uploading the Source Document to Begin Document Conversion
Finally, after rendering the HTML and sending it to the browser, your web application needs to actually upload the source document to PAS, associating it with the viewing session.
If you’re using PrizmDoc Cloud, the HTTP request to upload the source document looks like this:
PUT https://api.accusoft.com/prizmdoc/ViewingSession/u{viewingSessionId}/SourceFile
Acs-Api-Key: YOUR_PRIZMDOC_CLOUD_API_KEY

<<file bytes>>
NOTE: If you’re using a self-hosted backend:
- Replace
https://api.accusoft.com/prizmdocwith your actual PAS base URL (such ashttp://localhost:3000)- Omit the
Acs-Api-Keyrequest header (needed for PrizmDoc Cloud)- Add the required
Accusoft-Secretheader with the value of your PASsecretKey
If your document is accepted, PAS will reply right away with a simple 200 OK:
HTTP/1.1 200 OK
This just means that your document has been accepted and the conversion process has begun.
What We Have So Far
The viewer has a real viewingSessionId, and the backend is actually converting the document for viewing in the browser. And the viewer is now trying to ask the backend for converted document content.
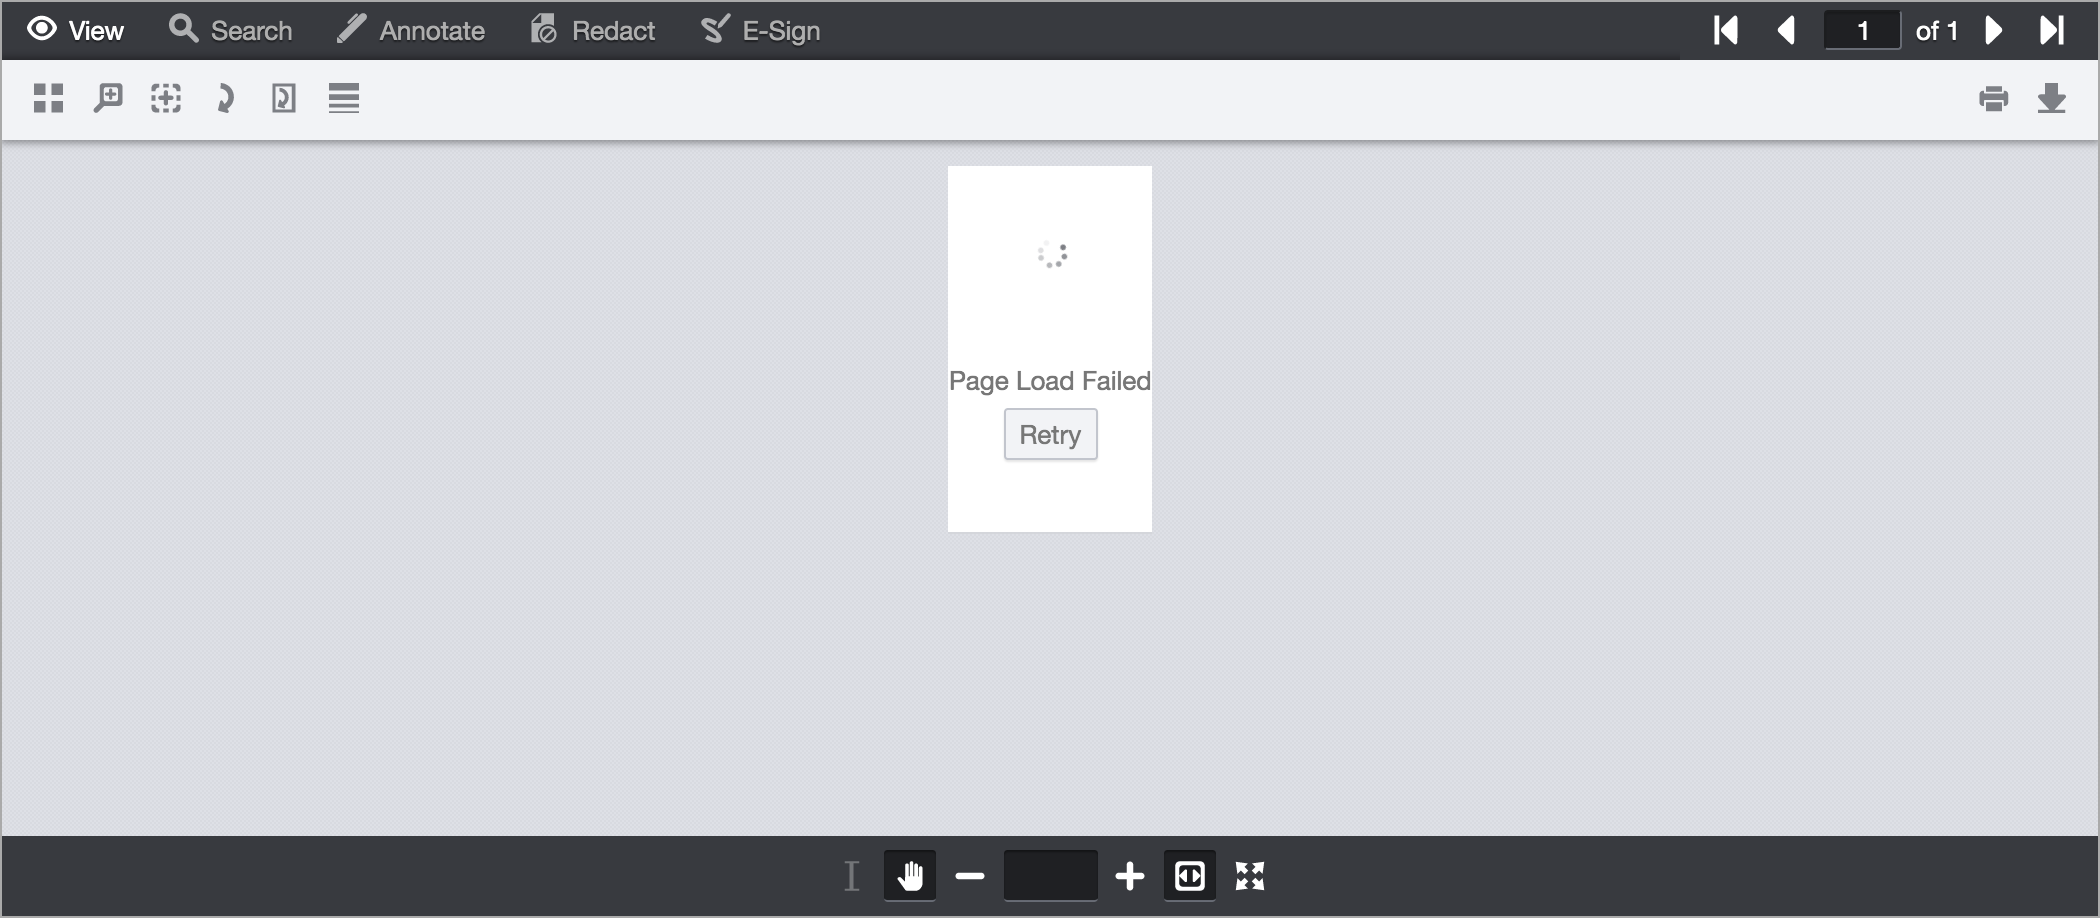
If you run your web application now, the viewer should show a loading indicator. However, you’ll also notice a “Page Load Failed” message and no content actually appears:
That’s because the viewer's requests to the backend aren’t actually getting through yet. We’ll fix that next in part 3.