Welcome to PrizmDoc - let's get started!
This topic walks you through the steps you need to get PrizmDoc installed, configured, and running. You will also be able to integrate a basic viewer into your web app.
Recommendation: The easiest way to get up and running for an evaluation is to select the Accusoft Cloud-Hosted evaluation license. You can always start with Accusoft Cloud-Hosted for the evaluation and then
move to Self-Hosted later.
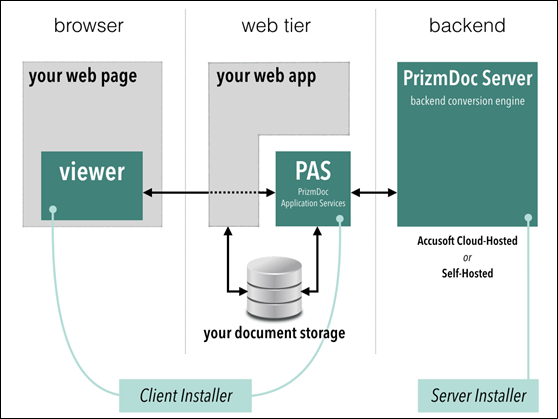
It's important to understand the basic structure of PrizmDoc when it's embedded in your web app. PrizmDoc contains 3 essential pieces:
- PrizmDoc Server - Self-Hosted or Accusoft Cloud-Hosted - the back-end conversion engine
- PrizmDoc Application Services (PAS) - the connection point between the Viewer and the Server
- PrizmDoc Viewer - the HTML viewer component
Example:

Key for diagram above:
- Gray = Your browser, website, and data
- Teal = PrizmDoc components
Step 1 - Get an Evaluation License
Accusoft Cloud-Hosted
Select this option if you want to host your back-end server with Accusoft:
Self-Hosted
Select this option if you want to host your back-end server on premise:
Step 2 - Set up a Back-end
Accusoft Cloud-Hosted
- Since you are choosing to host the back-end with Accusoft, you can skip this step and go to Step 3 below.
Self-Hosted
In this step, you will install PrizmDoc Server to set up the back-end:
Step 3 - Install Viewer Assets & PAS
This step covers installing the Viewer Assets and PrizmDoc Application Services (PAS). After you complete the installation, you need to verify that the Viewer is connected to the back-end.
Accusoft Cloud-Hosted
Self-Hosted
Now, try out a sample:
- If you are on Windows, you can now run our sample .NET web application:
http://localhost:18000/PrizmDoc_HTML5_Viewer_NET_WEBFORMS/
- If you are Linux, you can use our PHP and JSP samples which you can optionally configure.
Step 4 - Integrate the Viewer with Your Application
The following sections help you create a Viewing Session, embed the Viewer, and integrate your web application with PAS:
Step 5 - Implement & Configure our Top Features
This section will help you implement our top features quickly based on your role:
Resources
The following additional resources are available:
Support


