How to Create a Redacted PDF
With PrizmDoc Server, creating a redacted PDF is a two-step process:
First, you must create a markup JSON file which defines the redactions which should be applied. There are different ways to do this:
A person can visually and manually select regions of text or content to be redacted using the PrizmDoc Viewer viewer control in a browser. When they save their work, it will be persisted as a markup JSON file containing all of their redaction definitions.
An application can automatically create redaction definitions using PrizmDoc Server and a set of regular expressions defining the kinds of text in a document that should be redacted. The output of this will be a markup JSON file containing all of the automatically-generated redaction definitions. This is the approach we will take in the guide below.
Second, you use PrizmDoc Server to burn the markup JSON into a document, producing a new PDF where the content has actually been redacted.
This guide explains how to 1) automatically generate a markup JSON file with redaction definitions for a given document and a set of regular expressions defining text patterns in that document that should be redacted and 2) burn the markup JSON into the original document, producing a new redacted PDF.
A Visual Example
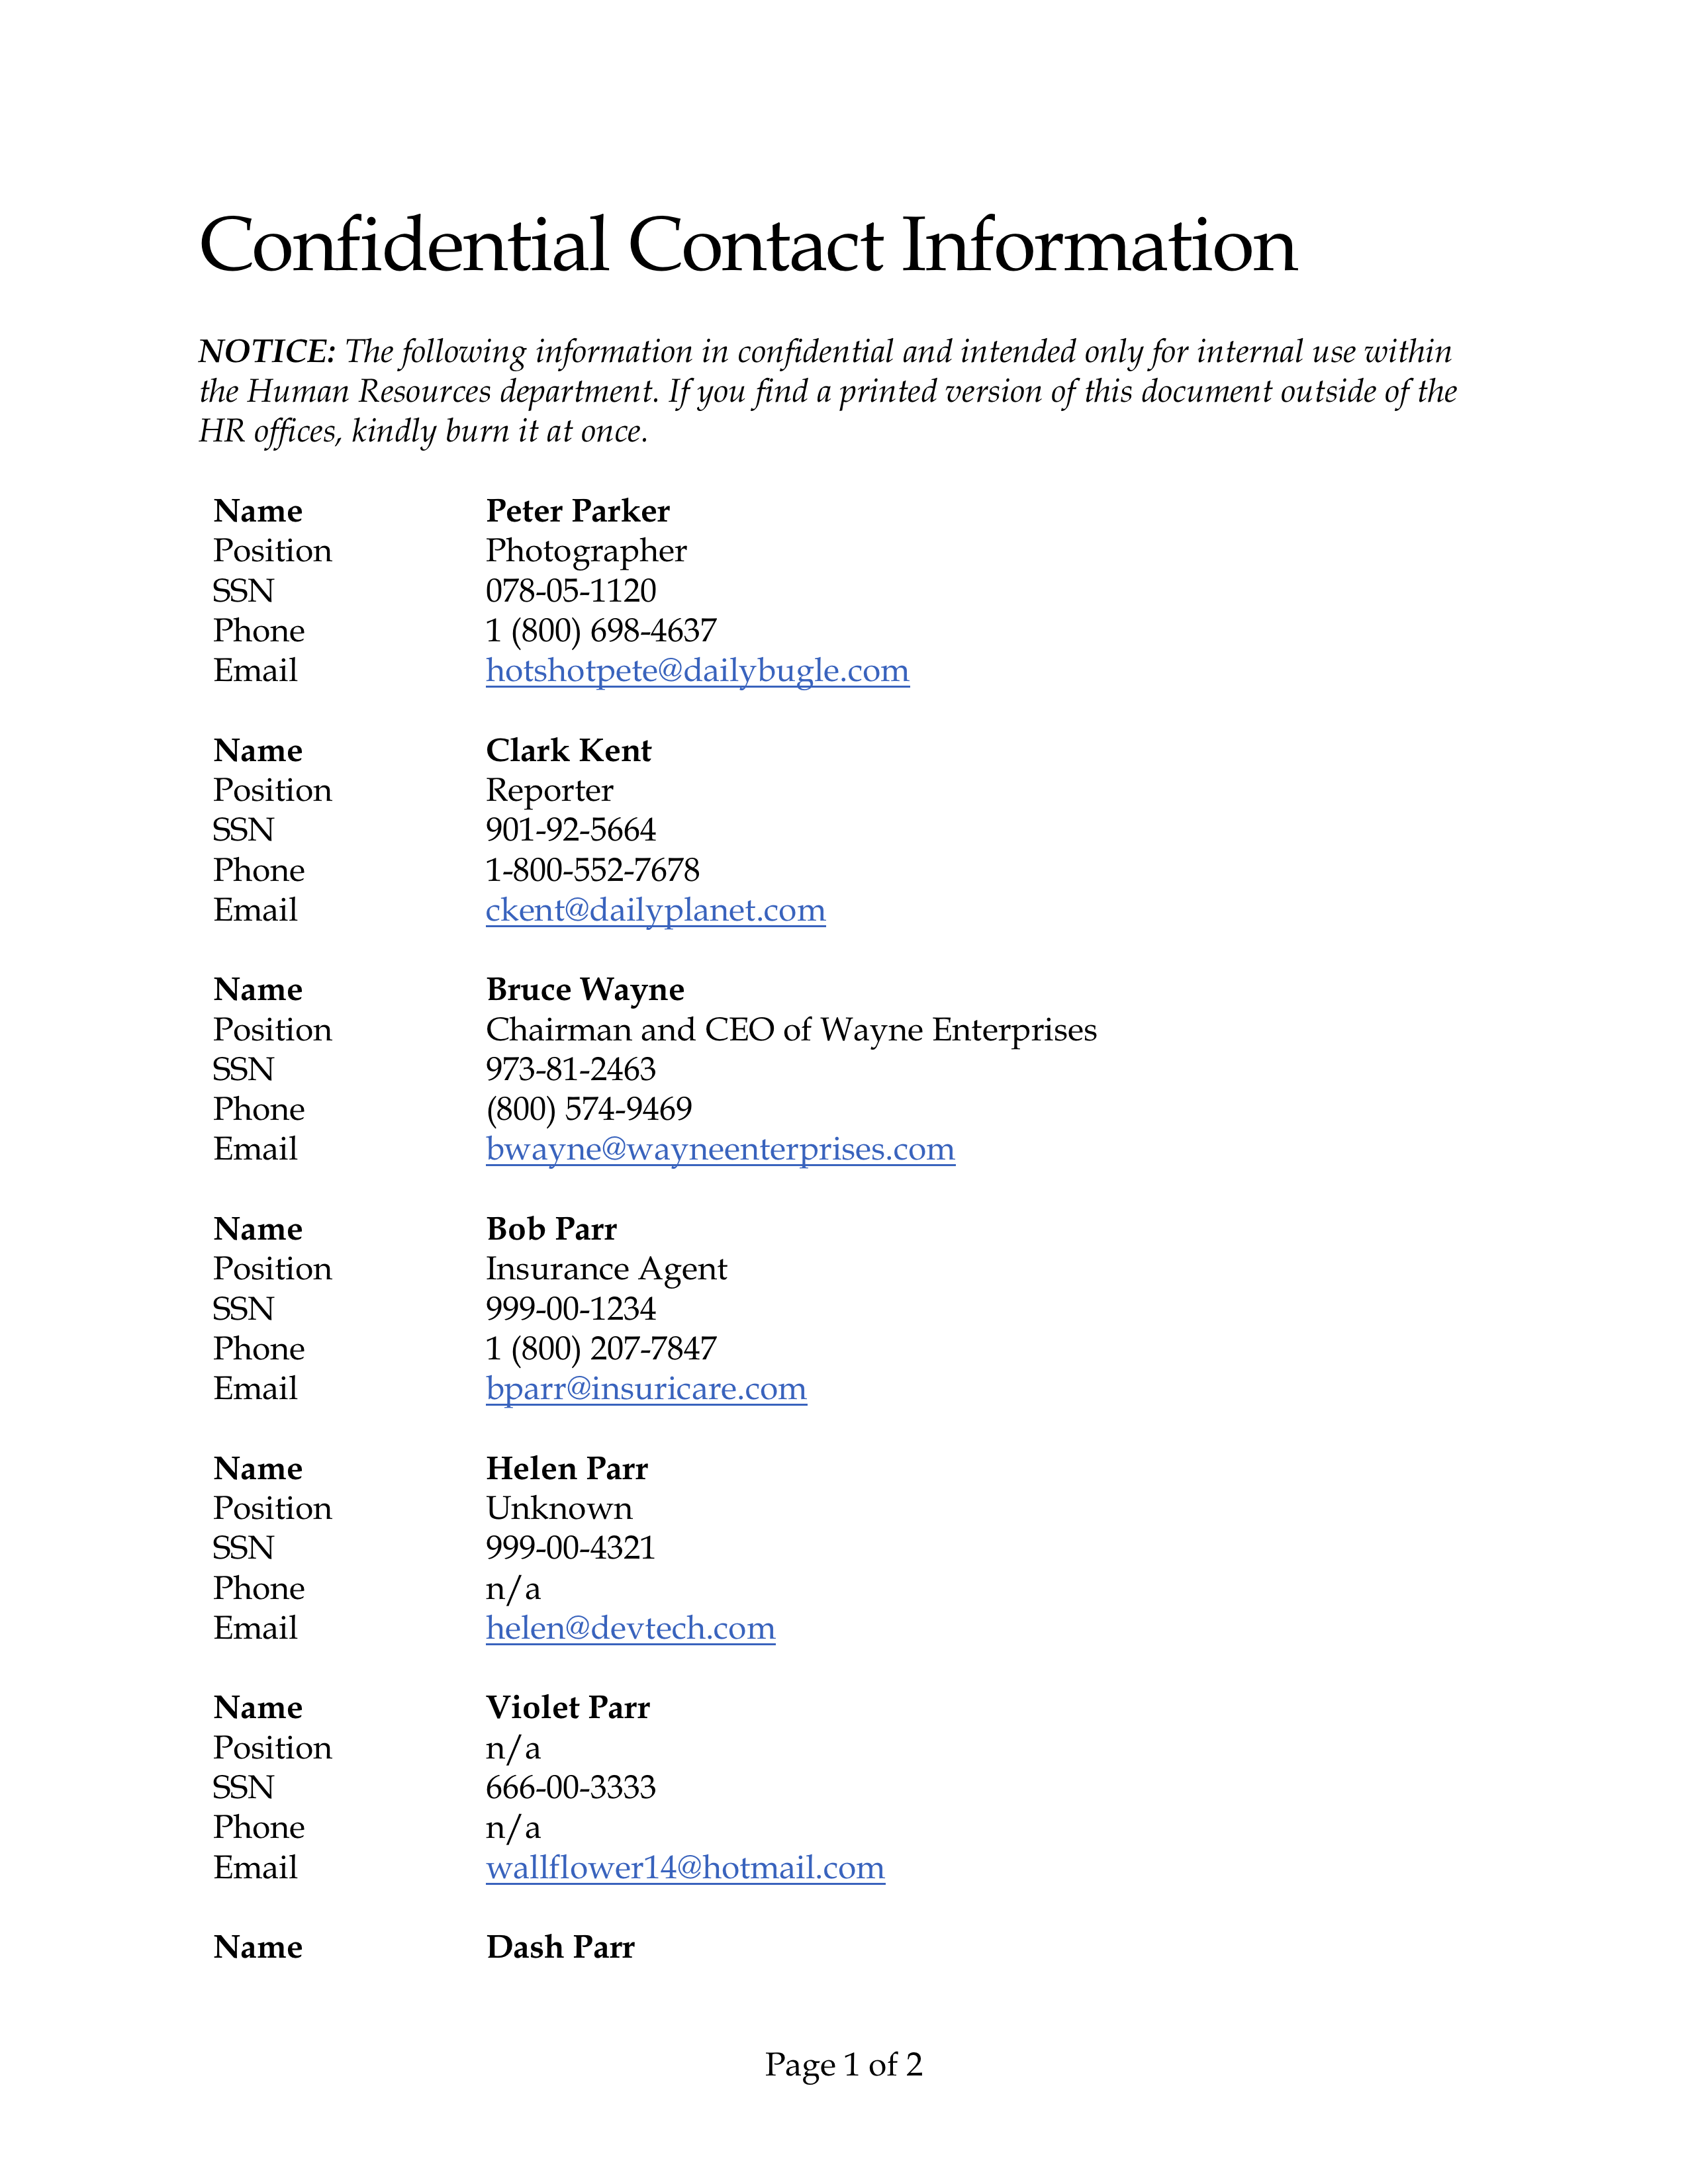
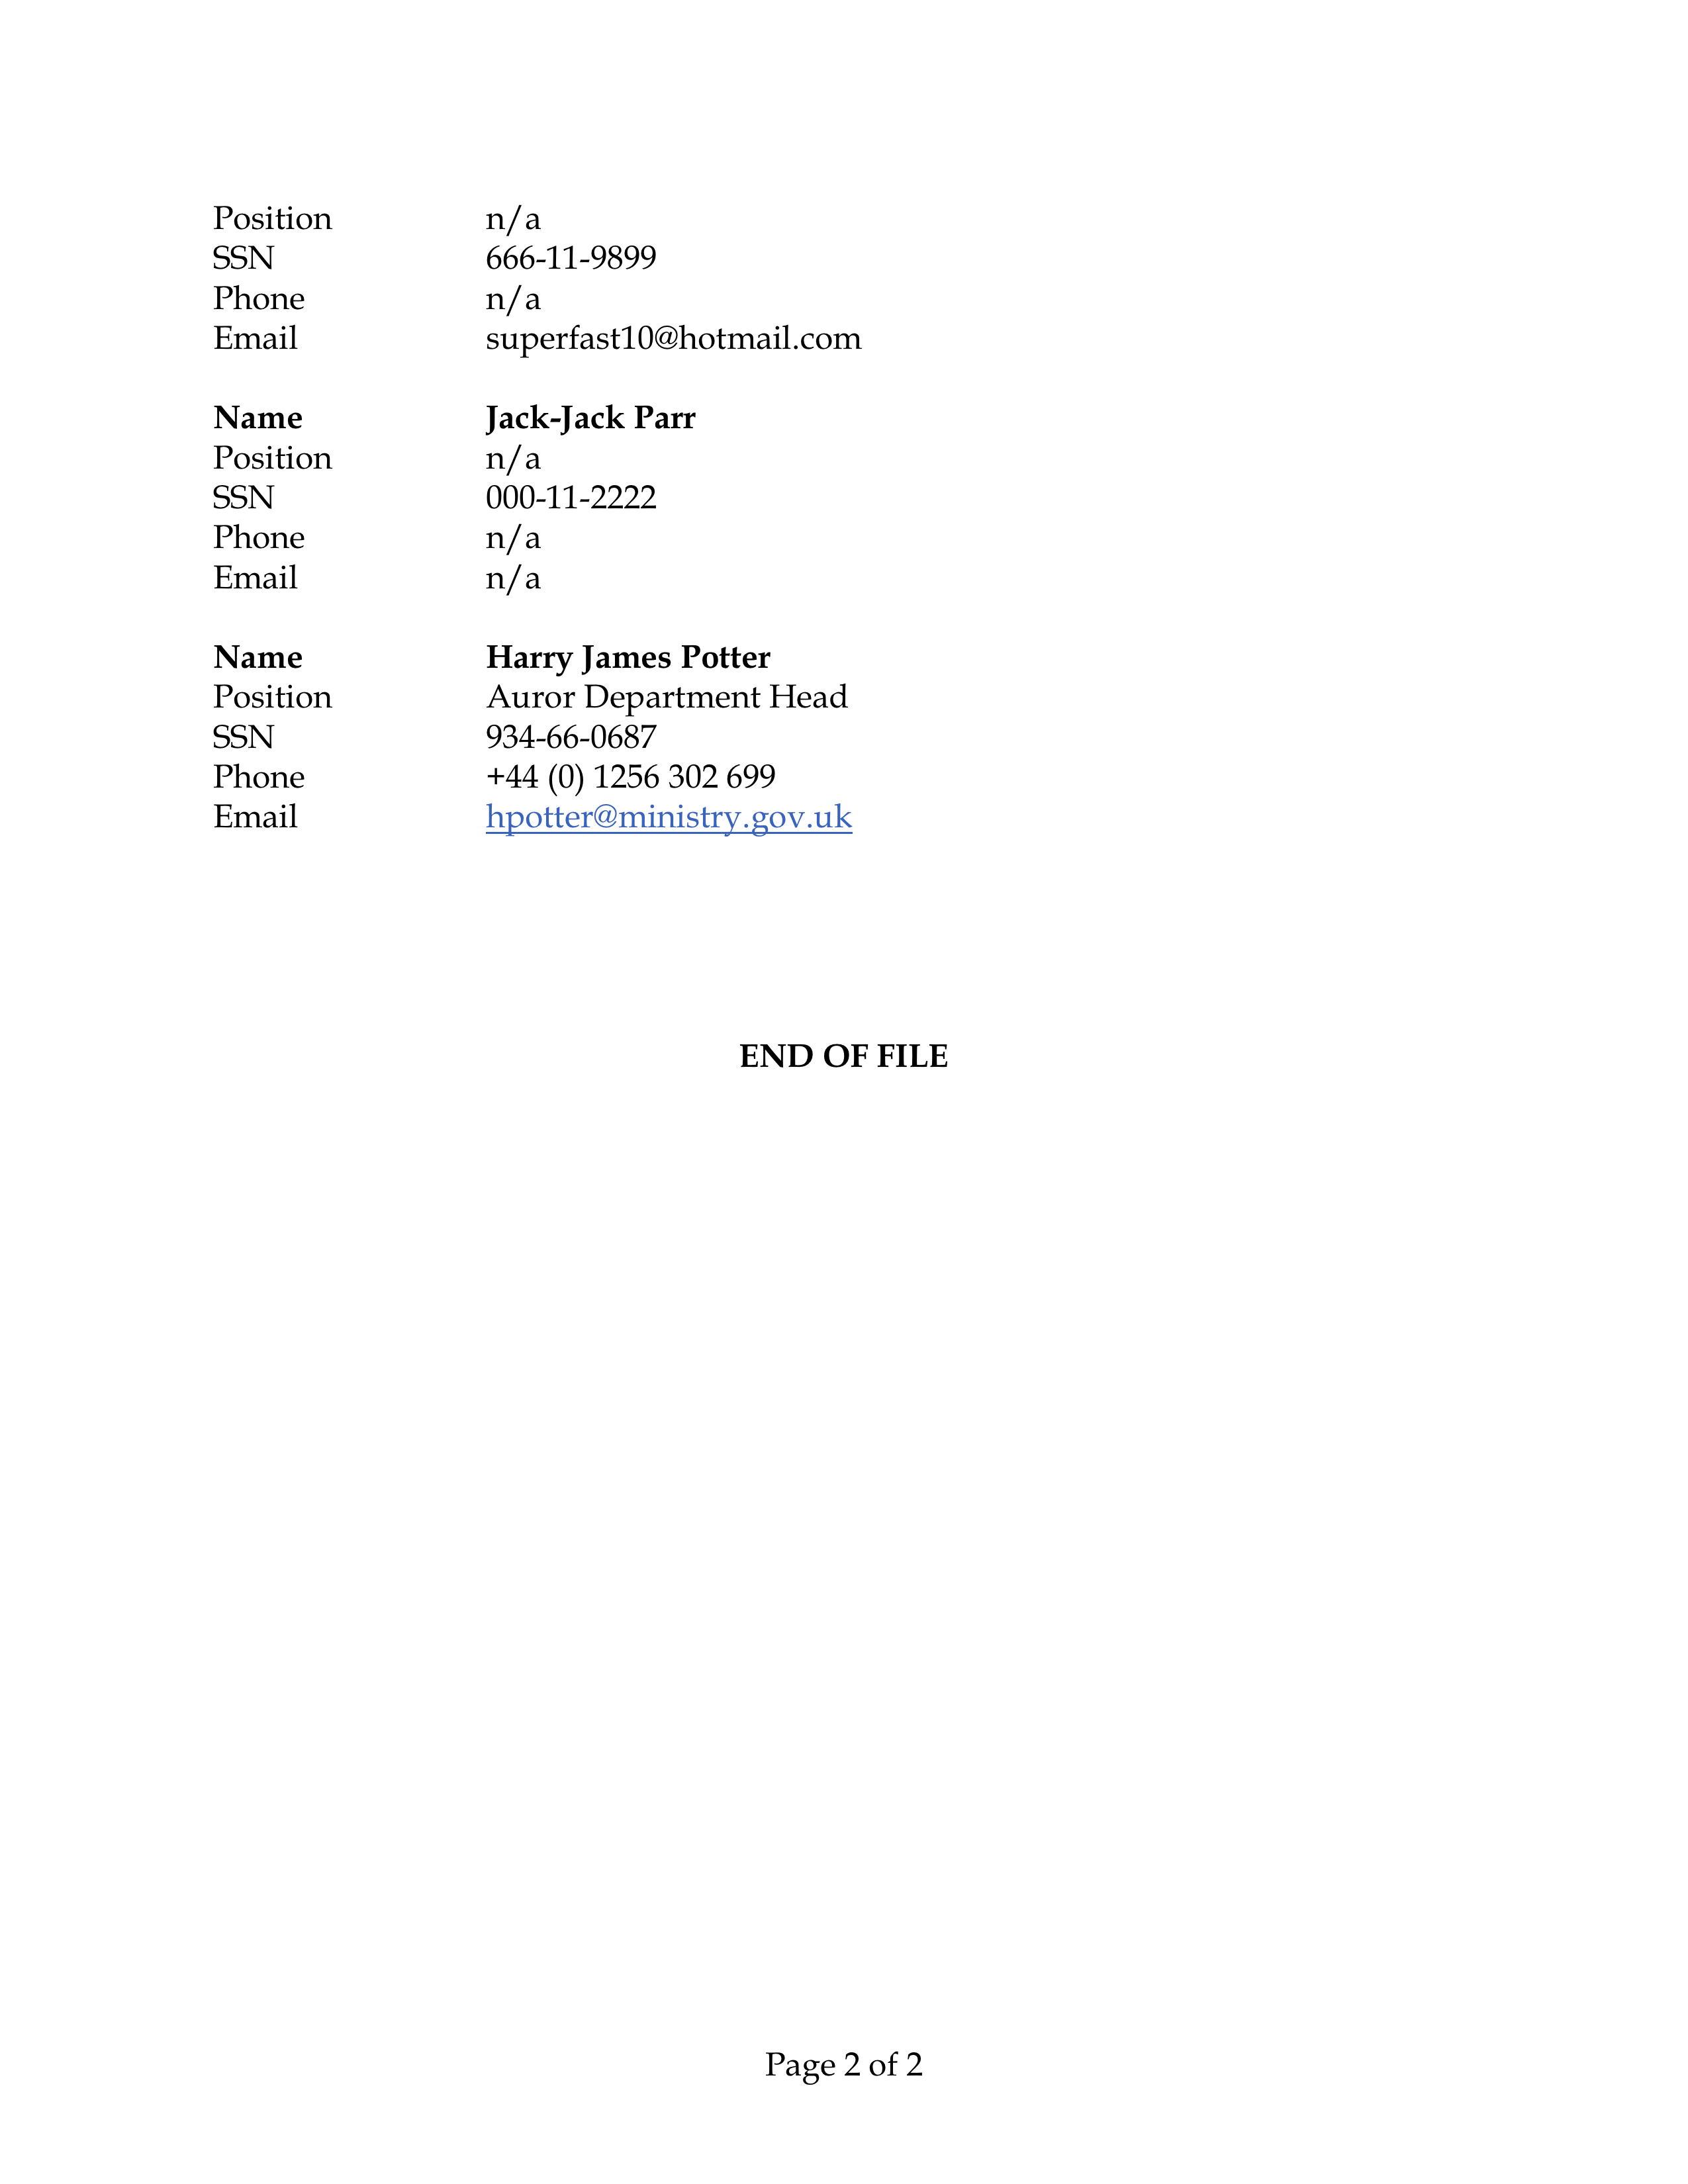
Original Document
For this guide, imagine our original document is a two-page PDF with some confidential contact information:


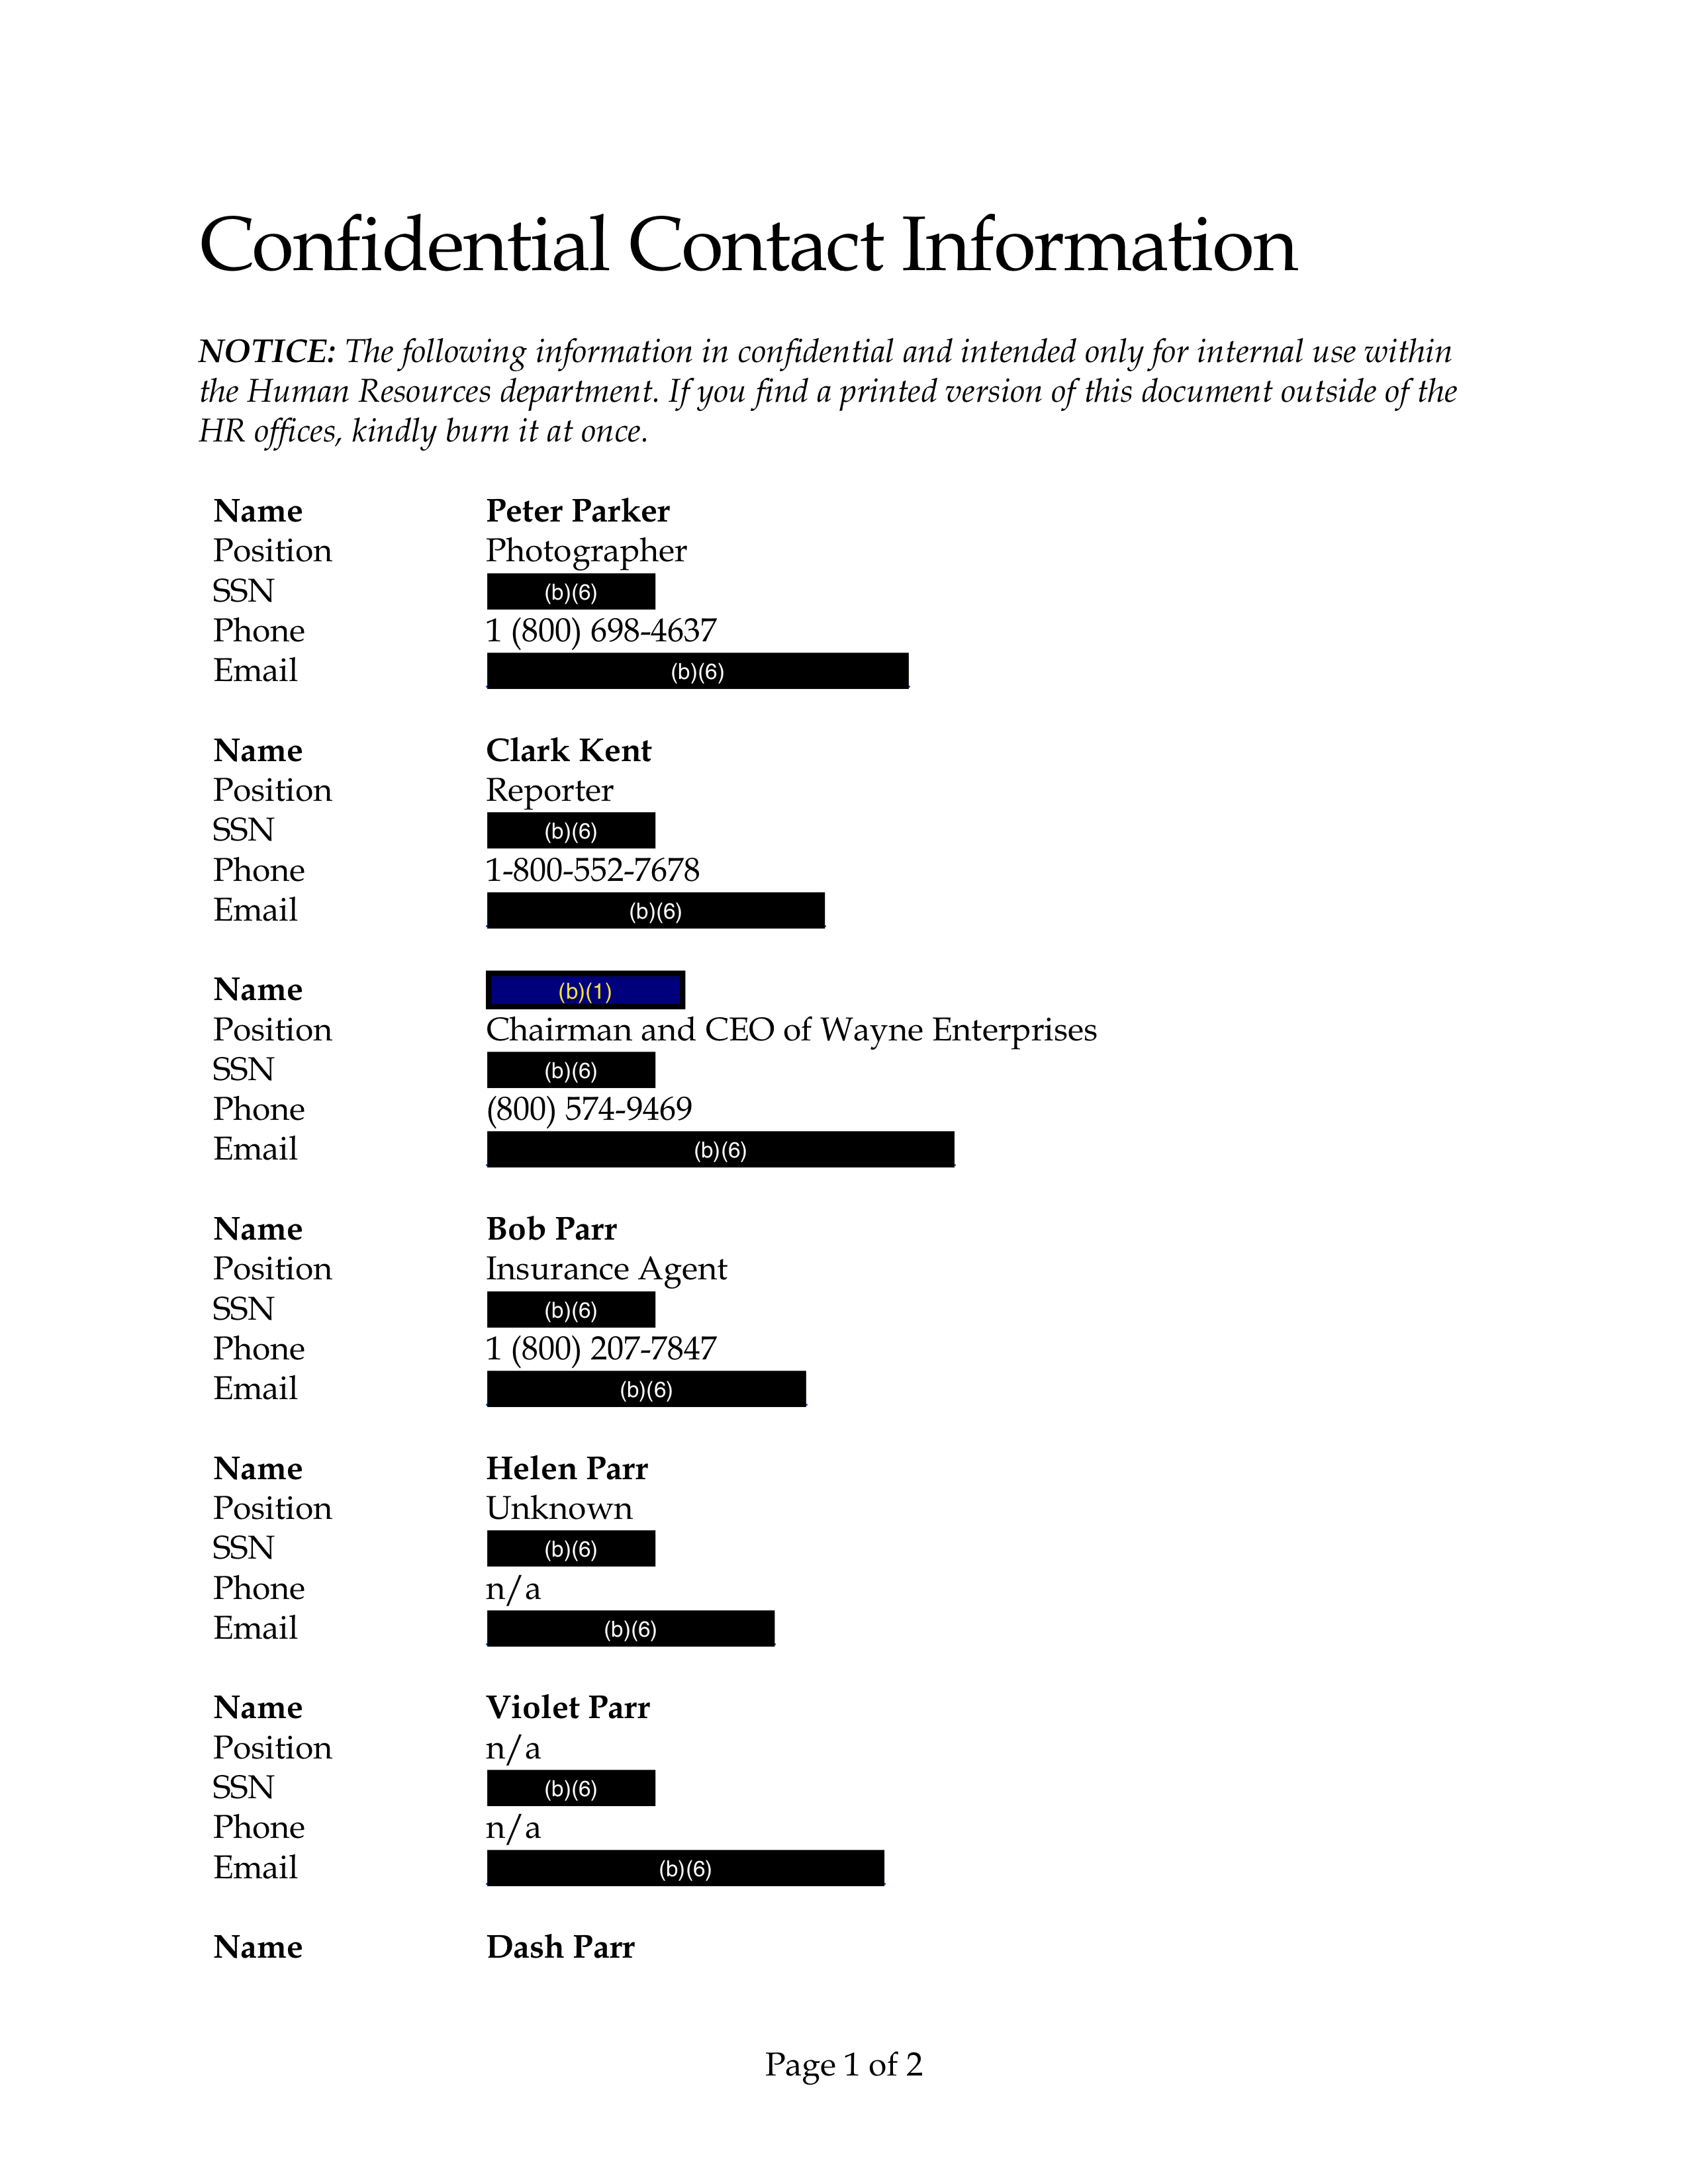
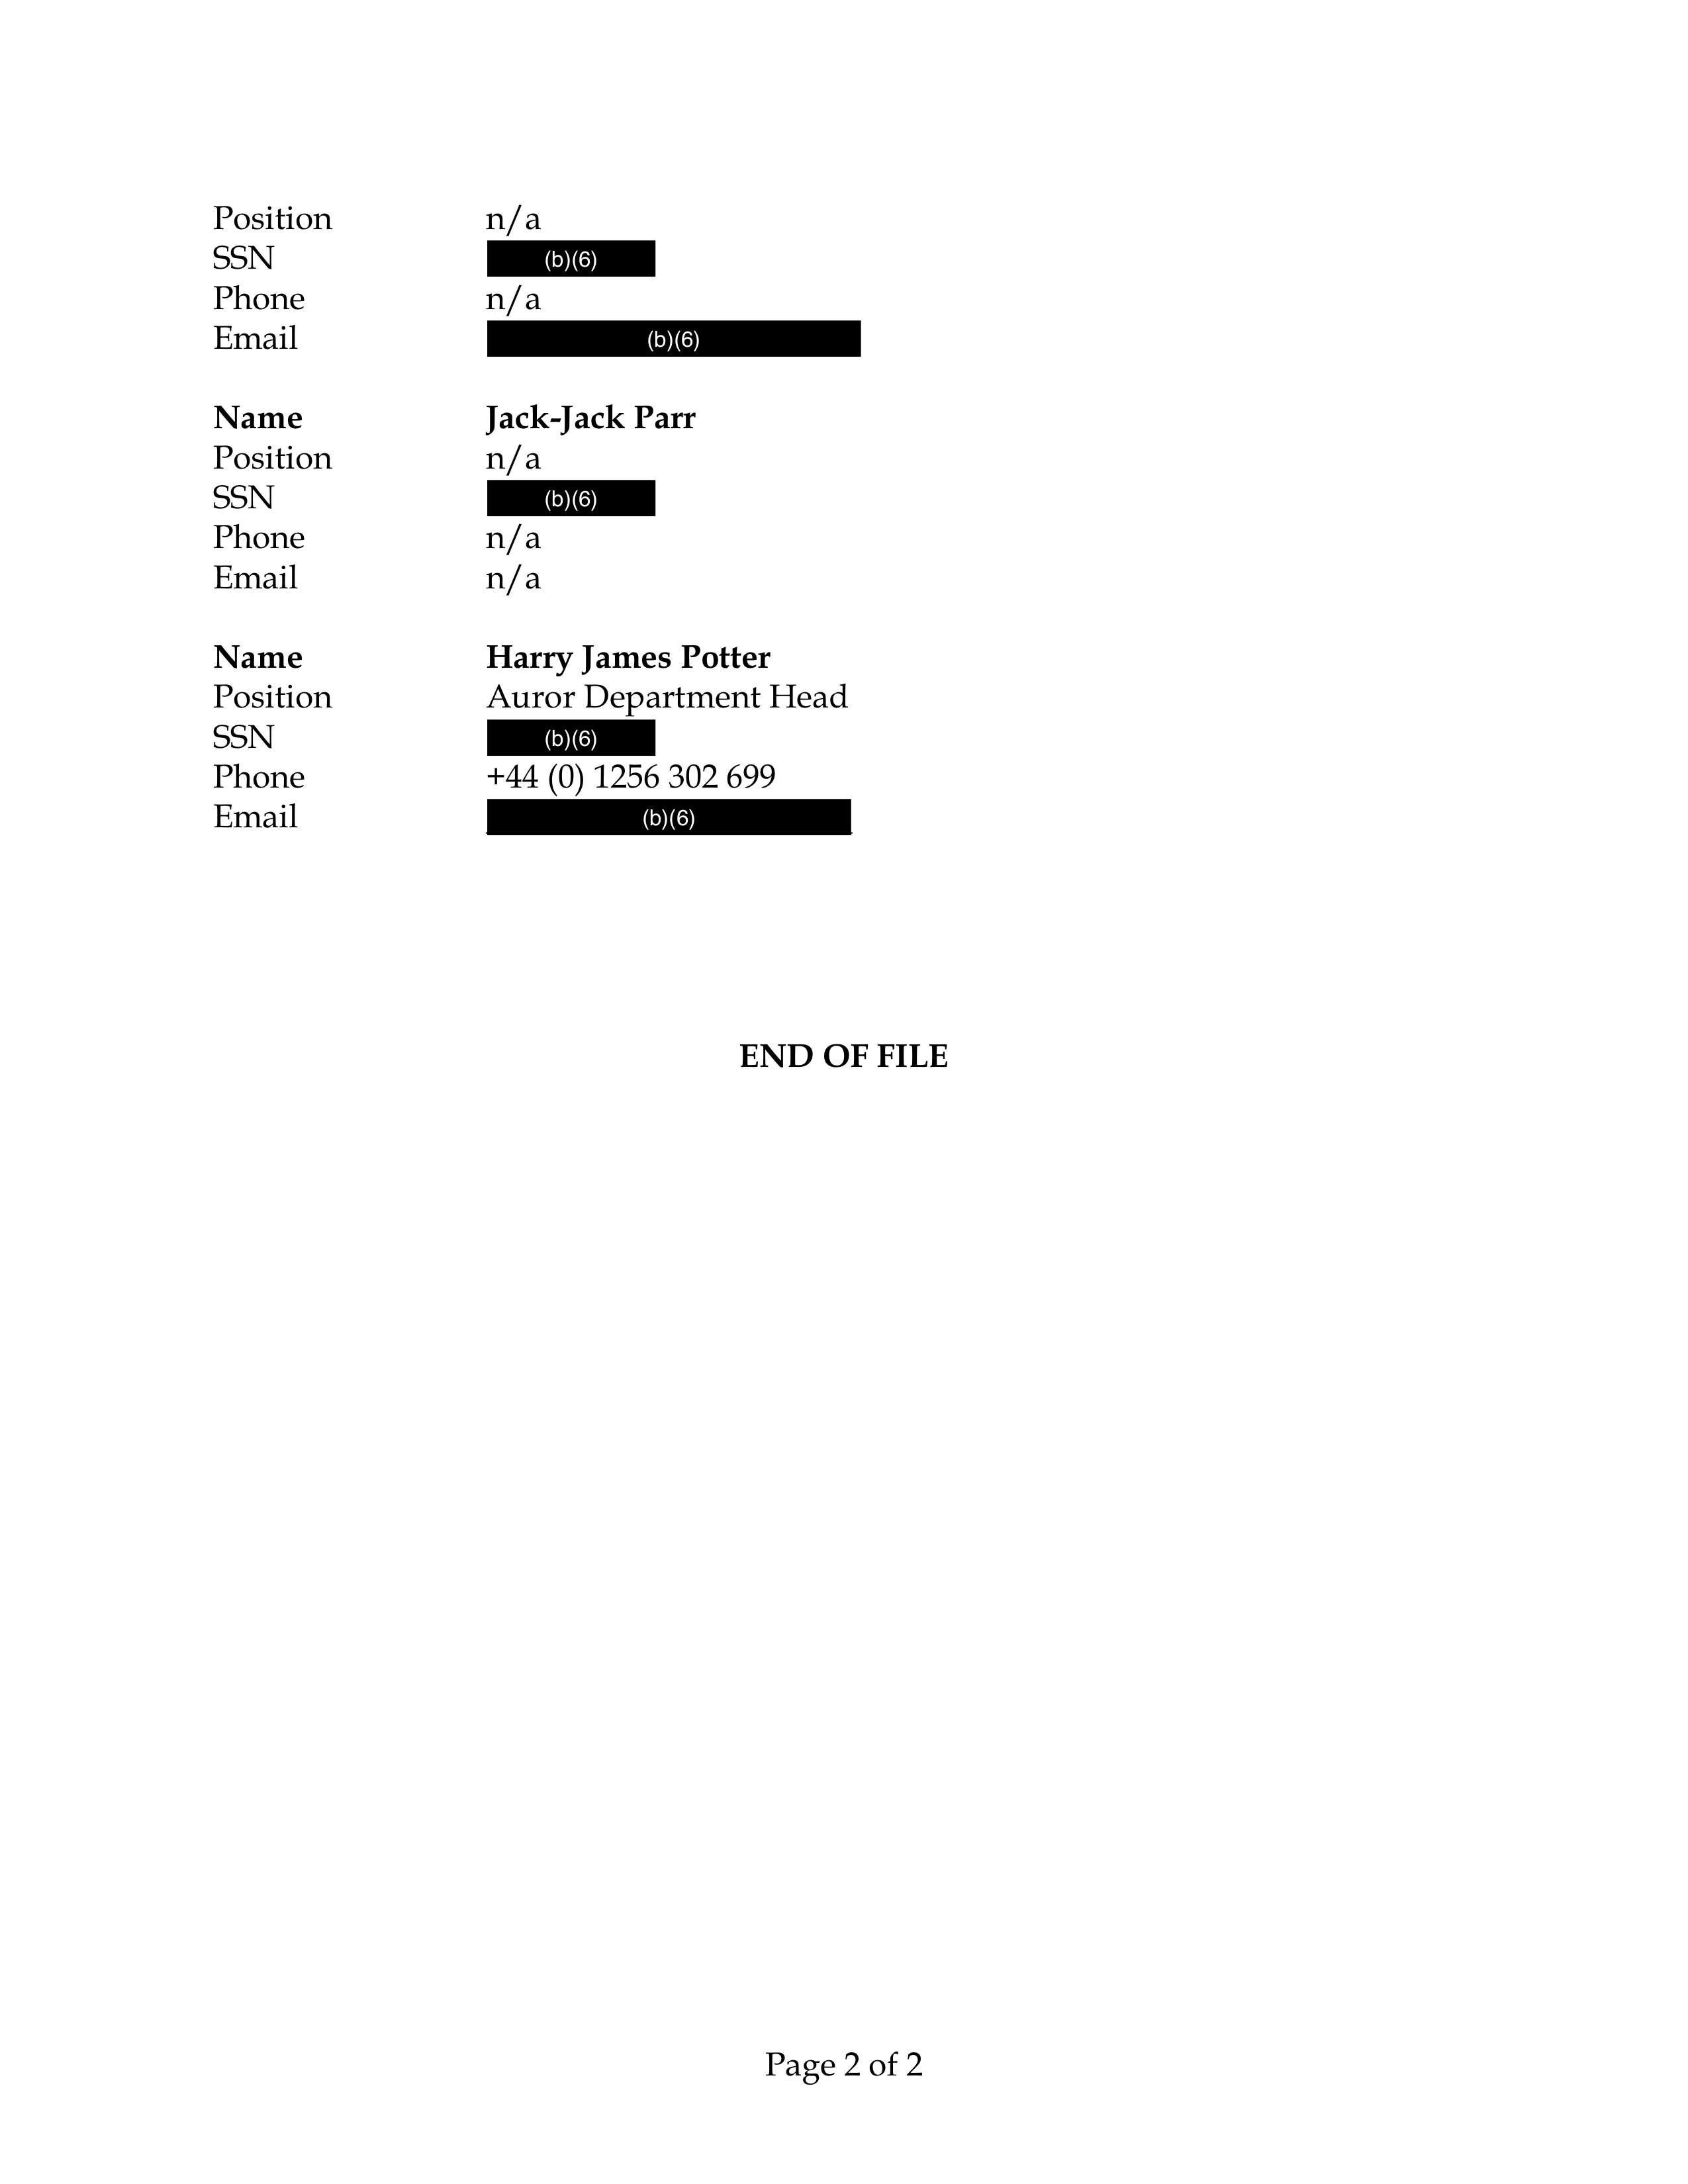
Example Output
Then, imagine we want to redact all Social Security Numbers, email addresses, and the name "Bruce Wayne" in the original document, producing a redacted PDF whose pages look like this:


Step 1: Creating a Markup JSON File Defining What Should Be Redacted
You can use the CreateRedactionsAsync method to automatically create a markup JSON file for a document and a set of regular expression rules defining what kinds of text should be redacted.
A Simple Example: Finding the Static Text "John Doe"
First, create a PrizmDocServerClient:
var prizmDocServer = new PrizmDocServerClient(/* your connection info */);
Then, call CreateRedactionsAsync providing 1) the source document and 2) a collection of one or more RegexRedactionMatchRule instances which define the kind of text to search for and, when found, how it should be redacted. The result of this operation will be a new RemoteWorkFile containing the markup JSON.
Here is a simple example which creates redactions for every occurrence of the
text "John Doe" for a local file "my-document.docx":
RemoteWorkFile markupJson = await prizmDocServer.CreateRedactionsAsync("my-document.docx", new[] { new RegexRedactionMatchRule(@"John Doe") });
This will upload the file to PrizmDoc Server, ask PrizmDoc Server to create a
new markup JSON file containing a redaction definition for every occurrence of
the text "John Doe", and then return once the process is complete.
The returned RemoteWorkFile is just metadata about the output markup JSON
file; it has not actually been downloaded yet. To download the markup JSON
file, call SaveAsync on the returned RemoteWorkFile:
await markupJson.SaveAsync("markup.json");
A More Dynamic Example: Finding Social Security Numbers
Let's say you wanted to create redaction definitions for all occurrences of text which looked like a Social Security Number. The string you pass in to the constructor of the RegexRedactionMatchRule is actually a regular expression, so this is easy to achieve, like so:
var ssnRule = new RegexRedactionMatchRule(@"\d\d\d-\d\d-\d\d\d\d");
You could then use this rule to create the redactions:
RemoteWorkFile markupJson = await prizmDocServer.CreateRedactionsAsync("my-document.docx", new[] { ssnRule });
await markupJson.SaveAsync("markup.json");
Using Multiple Rules
Of course, you're not limited to using a single regular expression rule. You can pass in as many different rules as you need, like so:
var johnDoeRule = new RegexRedactionMatchRule(@"John Doe");
var ssnRule = new RegexRedactionMatchRule(@"\d\d\d-\d\d-\d\d\d\d");
var emailRule = new RegexRedactionMatchRule(@"\S+@\S+\.\S+");

var rules = new[] { johnDoeRule, ssnRule, emailRule };

RemoteWorkFile markupJson = await prizmDocServer.CreateRedactionsAsync("my-document.docx", rules);
await markupJson.SaveAsync("markup.json");
Customizing Redaction Creation Options
When defining a redaction match rule, you can optionally set the RedactWith
property to an instance of RedactionCreationOptions, allowing you more control
over the appearance of the redactions created by this specific rule.
Redaction Reason
It is common to display some sort of phrase in the middle of a redaction box explaining why the content was redacted. We call this the redaction reason, and you can set it like so:
var projectXRule = new RegexRedactionMatchRule(@"Project X")
{
    RedactWith = new RedactionCreationOptions()
    {
        Reason = "CONFIDENTIAL",
    },
};
Each rule you define can have its own Reason. All redaction definitions
created by that rule will use the same reason text. For example, you might use
different legal codes as the redaction reason for different regular expression
rules:
var johnDoeRule = new RegexRedactionMatchRule(@"John Doe")
{
    RedactWith = new RedactionCreationOptions()
    {
        Reason = "(b)(1)",
    },
};

var ssnRule = new RegexRedactionMatchRule(@"\d\d\d-\d\d-\d\d\d\d")
{
    RedactWith = new RedactionCreationOptions()
    {
        Reason = "(b)(6)",
    },
};
Redaction Appearance
In addition to the Reason, the RedactionCreationOptions class allows you to set other
properties, such as FontColor, FillColor, BorderColor, and
BorderThickness. Here is an example:
var bruceWayneRule = new RegexRedactionMatchRule(@"Bruce Wayne")
{
    RedactWith = new RedactionCreationOptions()
    {
        Reason = "(b)(1)",
        FontColor = "#FDE311", // Use "batman yellow" color for the reason text.
        FillColor = "#000080", // Use a dark blue fill color.
        BorderColor = "#000000", // Use pure black border color.
        BorderThickness = 2 // Make the border 2-pixels thick.
    },
};
See the RedactionCreationOptions class for more information.
Attaching Arbitrary Data
Finally, you can use the Data property of RedactionCreationOptions to define
your own set of key/value string pairs which will be attached to every redaction
definition in the output markup JSON. For example, if you define a rule like
this:
var johnDoeRule = new RegexRedactionMatchRule(@"John Doe")
{
    RedactWith = new RedactionCreationOptions()
    {
        Data = new Dictionary<string, string>
        {
            { "user-id", "jdoe" },
            { "age", "32" },
        },
    },
};
Then, when inspecting the output markup JSON, you would find that every
redaction created by this rule would contain a data property with the given
user-id and age.
Step 2: Burning In the Markup, Producing a Redacted PDF
To burn your redactions into a document, simply call BurnMarkupAsync providing 1) the original document and 2) the markup JSON file which defines the areas to be redacted:
RemoteWorkFile result = await prizmDocServer.BurnMarkupAsync("original.pdf", markupJson);
This will ask PrizmDoc Server to burn the markup into the document, producing a new redacted PDF, and then return once the burning process is complete.
The returned result is just metadata about the output; the actual redacted PDF
has not been downloaded yet. To actually download the redacted PDF from PrizmDoc
Server, call SaveAsync on the returned result:
await result.RemoteWorkFile.SaveAsync("redacted.pdf");
Or, if you'd prefer instead to download the bytes to a stream, call
result.RemoteWorkFile.CopyToAsync:
await result.RemoteWorkFile.CopyToAsync(myStream);
Complete Example
Here is a complete example:
using System;
using System.Collections.Generic;
using System.IO;
using System.Threading.Tasks;
using Accusoft.PrizmDocServer;
using Accusoft.PrizmDocServer.Redaction;

namespace Demos
{
    class Program
    {
        static void Main(string[] args)
        {
            MainAsync().GetAwaiter().GetResult();
        }

        static async Task MainAsync()
        {
            var prizmDocServer = new PrizmDocServerClient(/* your connection info */);

            var ssnRule = new RegexRedactionMatchRule(@"\d\d\d-\d\d-\d\d\d\d")
            {
                RedactWith = new RedactionCreationOptions()
                {
                    Reason = "(b)(6)",
                    Data = new Dictionary<string, string>
                    {
                        { "Generated By", "Acme Redactor Application" },
                    },
                },
            };

            var emailRule = new RegexRedactionMatchRule(@"\S+@\S+\.\S+")
            {
                RedactWith = new RedactionCreationOptions()
                {
                    Reason = "(b)(6)",
                    Data = new Dictionary<string, string>
                    {
                        { "Generated By", "Acme Redactor Application" },
                    },
                },
            };

            var bruceWayneRule = new RegexRedactionMatchRule(@"Bruce Wayne")
            {
                RedactWith = new RedactionCreationOptions()
                {
                    Reason = "(b)(1)",
                    FontColor = "#FDE311",
                    FillColor = "#000080",
                    BorderColor = "#000000",
                    BorderThickness = 2,
                    Data = new Dictionary<string, string>
                    {
                        { "Generated By", "Acme Redactor Application" },
                        { "alias", "The Dark Knight" },
                        { "isBatman", "true" },
                    },
                },
            };

            var rules = new[] { ssnRule, emailRule, bruceWayneRule };

            // Automatically create markup JSON using the rules above.
            RemoteWorkFile markupJson = await prizmDocServer.CreateRedactionsAsync("original.pdf", rules);

            // Burn the redactions defined in the markup JSON into the document, producing a new redacted PDF.
            RemoteWorkFile redactedPdf = await prizmDocServer.BurnMarkupAsync("original.pdf", markupJson);

            // Download and save the redacted PDF
            await redactedPdf.SaveAsync("redacted.pdf");
        }
    }
}
Markup JSON Specification
For the full markup JSON specification, see https://help.accusoft.com/PrizmDoc/latest/HTML/webframe.html#markup-json-specification.html.