


Once the base of the tutorial application is completed, you can extend it with Printing support using the following steps:
- First, you need to add references to the System.Windows.Controls Assembly.
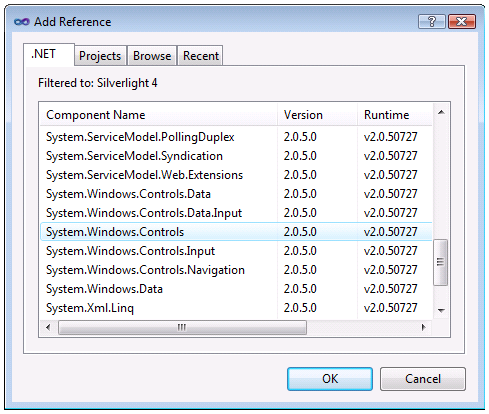
- In the Solution Explorer, right-click on References, and choose Add Reference.
- Choose the .NET tab, select System.Windows.Controls assembly, and click OK.
You should now have this assembly listed under References in the Solution Explorer.
 A
A - Add a StackPanel element with horizontal orientation into the grid, and move buttonOpen and loadText elements inside it. Now your XAML should look like this:
XAML  Copy Code
<StackPanel Orientation="Horizontal" Grid.Row="0">
    <Button Content="Open" Width="100" Margin="8,4,8,4" HorizontalAlignment="Left" x:Name="buttonOpen"/>
    <TextBox Height="25" Margin="116,4,8,4" VerticalAlignment="Bottom" Text="Please wait while license is retrieved..." x:Name="loadText"/>
</StackPanel>
- Before the 'TextBox' element, add the following lines:
XAML Copy Code<Button Content="Print" Width="100" Margin="8,4,8,4" HorizontalAlignment="Left" x:Name="buttonPrint" Click="buttonPrint_Click" />
- Review your XAML code. It should look like the following:
XAML Copy Code<UserControl x:Class="SilverlightTutorial.Page" xmlns="http://schemas.microsoft.com/winfx/2006/xaml/presentation" xmlns:x="http://schemas.microsoft.com/winfx/2006/xaml" xmlns:IGWC="clr-namespace:ImageGear.Windows.Controls;assembly=ImageGear20.Windows.Controls" Width="800" Height="600" xmlns:d="http://schemas.microsoft.com/expression/blend/2008" xmlns:mc="http://schemas.openxmlformats.org/markup-compatibility/2006" mc:Ignorable="d"> <Grid x:Name="LayoutRoot" Background="White"> <Grid.RowDefinitions> <RowDefinition Height="auto"/> <RowDefinition Height="*"/> </Grid.RowDefinitions> <StackPanel Orientation="Horizontal" Grid.Row="0"> <Button Content="Open" Width="100" Margin="8,4,8,4" HorizontalAlignment="Left" x:Name="buttonOpen"/> <TextBox Height="25" Margin="116,4,8,4" VerticalAlignment="Bottom" Text="Please wait while license is retrieved..." x:Name="loadText"/> <Button Content="Print" Width="100" Margin="8,4,8,4" HorizontalAlignment="Left" x:Name="buttonPrint" Click="buttonPrint_Click" /> </StackPanel> <IGWC:PageView Grid.Row="1" x:Name="pageView"/> </Grid> </UserControl>
In Design View, you should see this:

- Open MainPage.xaml.cs and add the following using statements at the top:
C# Copy Codeusing System.Windows.Printing; using ImageGear.Printing;
- Add the following handler for the "Print" button:
C# Copy Codeprivate void buttonPrint_Click(object sender, RoutedEventArgs e) { ImGearPage currentPage = pageView.Display.Page; // Create a document for the current page ImGearDocument document = currentPage.Document; if (document == null) { document = new ImGearDocument(); document.Pages.Add(currentPage); } // Create a PrintJob object and set the reference to the Document PrintJob printJob = new PrintJob(); printJob.Document = document; // Create a PrintDocument instance PrintDocument pd = new PrintDocument(); // Add BeginPrint event handler pd.BeginPrint += (s, args) => { printJob.BeginPrint(); }; // Add PrintPage event handler pd.PrintPage += (s, args) => { args.PageVisual = printJob.RenderPage(args.PrintableArea, args.PageMargins); args.HasMorePages = printJob.HasMorePages(); }; // Add EndPrint event handler pd.EndPrint += (s, args) => { printJob.EndPrint(); }; // Start the printing pd.Print("Test document");
- The sample is now complete. Right-click SilverlighttutorialTestPage.html in the Solution Explorer and set it as the start up project, then press F5 to launch the sample.