ImageGear .NET v25.1 - Updated
Windows Forms Application
User Guide > How to Work with... > CAD > Getting Started with ImageGear CAD > Tutorial: Create Your First CAD Project > Windows Forms Application

In this tutorial, you will configure a C# or VB.NET project for a Windows Forms application and use ImageGear .NET CAD capabilities. You will also learn how to open a DWG, DXF, or DGN file, display it on the screen, manipulate it, rasterize it, and save it as an image.

The following tutorial refers specifically to 64-bit installations; for 32-bit installations:

Using the desired version of Visual Studio (2010 or later):

  1. Create a new "Windows Form App" project, using C# or VB.NET, and name the project: my_first_CAD_WINFORMS_project
  2. If you installed ImageGear .NET 64-bit, using the Configuration Manager, create a new project platform (if you don't have one already) for x64. Make sure your project is set to compile targeting Debug and x64. Confirm you now have $YOURLOCALPROJ\bin\x64\Debug\, and if it's not there, create it.
  3. Add references and required resources into your projects in one of the following ways:
    • Copy all files (and folders) inside $INSTALLDIR\ImageGear .NET v24 64-bit\Bin\ to your local output bin directory in your project (i.e., $YOURLOCALPROJ\bin\x64\Debug\ ).
    • Add the following references to your project from $YOURLOCALPROJ\bin\x64\Debug\:
      • ImageGear.Core.dll
      • ImageGear.Evaluation.dll
      • ImageGear.Formats.Common.dll
      • ImageGear.Formats.Vector.dll
      • ImageGear.Windows.Forms.dll
    Your output target directory should be set to $YOURLOCALPROJ\bin\x64\Debug\ .
  4. Next, add the ImageGear Windows Forms tools to use in your GUI:       
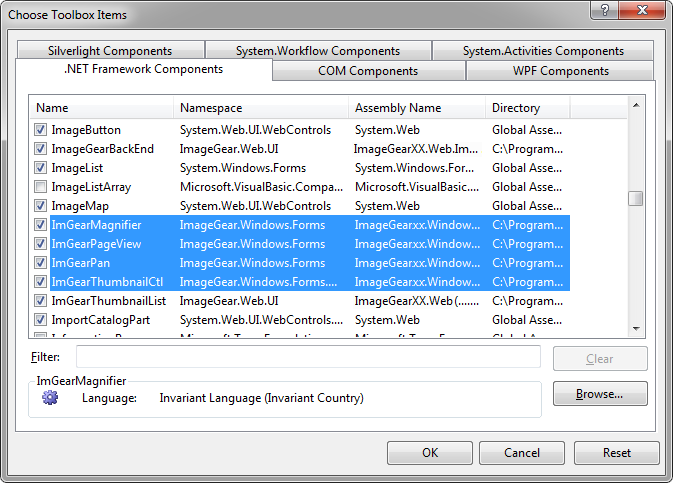
    1. In Visual Studio, go to Tools > Choose Toolbox Items...
    2. In the .NET Framework Components tab, click Browse and navigate to $INSTALLDIR\ImageGear .NET v24\Bin\, select ImageGear.Windows.Forms.dll, and click Open.
    3. You will see the ImGearMagnifier, ImGearPageView, ImGearPan, and ImGearThumbnailCtl controls added to the list of components. Make sure they are checked and click OK.

    Next, you will add some pertinent controls to your form. For this tutorial, keep the default names for the controls.

  5. First, create the menu on the form. From the Windows Forms toolbox, drag a MenuStrip control onto the form. Create a menu called File. Under File, add Load and Save.

  6. Second, also from the toolbox, drag the ImGearPageView control onto the form. This control will be used to display the CAD file. Set the Dock (in the Layout group) property of the imGearPageView1 control to Fill. This will cause the control to resize as the form resizes.

  7. Double-click each added menu item to create a handler.

  8. At this point your project is ready for some code. The following code can be used to load a CAD file, view it using an ImGearPageView control, and save it as an image. In the next step, we will go over some important areas of this sample code.

    C#
    Copy Code
    using System;
    using System.IO;
    using System.Windows.Forms;
    using ImageGear.Core;
    using ImageGear.Display;
    using ImageGear.Formats;
    using ImageGear.Formats.CAD;
    using ImageGear.Evaluation;
    
    namespace my_first_CAD_WINFORMS_project
    {
        public partial class Form1 : Form
        {
            // Create empty IG CAD page object.
            private ImGearCADPage page = null;
            private int currentPageIndex = 0;
    
            public Form1()
            {
                // Initialize evaluation license.
                ImGearEvaluationManager.Initialize();
                ImGearEvaluationManager.Mode = ImGearEvaluationMode.TrialDialog;
                // Add support for CAD files.
                ImGearCommonFormats.Initialize();
                ImGearFileFormats.Filters.Insert(0, ImGearCAD.CreateDWGFormat());
                ImGearFileFormats.Filters.Insert(0, ImGearCAD.CreateDGNFormat());
                ImGearFileFormats.Filters.Insert(0, ImGearCAD.CreateDXFFormat());
                InitializeComponent();
            }
            // Open file dialog. For this sample, just allow DWG, DXF, and DGN files.
            private void LoadToolStripMenuItem_Click(object sender, EventArgs e)
            {
                OpenFileDialog openDialog = new OpenFileDialog();
                openDialog.Filter = "CAD files (*.dwg, *.dxf, *.dgn)|*.dwg;*.dxf;*.dgn|AutoCAD files (*.dwg, *.dxf)|*.dwg;*.dxf|MicroStation files (*.dgn)|*.dgn";
                if (openDialog.ShowDialog() == System.Windows.Forms.DialogResult.OK)
                {
                    // Load a CAD file as an ImGearCADPage
                    using (FileStream fs = new FileStream(fileName, FileMode.Open, FileAccess.Read))
                    {
                        page = (ImGearCADPage)ImGearFileFormats.LoadPage(fs, 0);
                    }
                }
            }
    
            // Save file dialog. For this sample, just allow Bitmap, PNG, JPEG, and TIFF files.
            private void SaveToolStripMenuItem_Click(object sender, EventArgs e)
            {
                SaveFileDialog saveDialog = new SaveFileDialog();
                saveDialog.FileName = currentFile;
                saveDialog.Filter = "Bitmap file (*.bmp)|*.bmp|PNG file (*.png)|*.png|JPEG file (*.jpeg)|*.jpeg|TIFF file (*.tif)|*.tif";
    
                if (saveDialog.ShowDialog() != DialogResult.OK) return;
    
                ImGearSavingFormats formatOut = ImGearSavingFormats.PNG;
                switch (Path.GetExtension(saveDialog.FileName).ToLower())
                {
                    case ".png":
                        formatOut = ImGearSavingFormats.PNG;
                        break;
                    case ".bmp":
                        formatOut = ImGearSavingFormats.BMP_UNCOMP;
                        break;
                    case ".jpeg":
                        formatOut = ImGearSavingFormats.JPG;
                        break;
                    case ".tif":
                        formatOut = ImGearSavingFormats.TIF_UNCOMP;
                        break;
                }
                // The save operation is performed here.
                using (Stream stream = saveDialog.OpenFile())
                {
                    ImGearFileFormats.SavePage(page, stream, formatOut);
                }
            }
            private void renderPage(int pageNumber)
            {
                try
                {
                    if (page != null)
                    {
                        // Create a new page display to prepare the page for being displayed.
                        ImGearPageDisplay igPageDisplay = new ImGearPageDisplay(page);
                        // Associate the page display with the page view.
                        imGearPageView1.Display = igPageDisplay;
                        // Cause the page view to repaint.
                        imGearPageView1.Invalidate();
                    }
                }
    
                catch (ImGearException ex)
                {
                    // Perform error handling.
                    MessageBox.Show(ex.Message);
                }
            }
        }
    }
    VB.NET
    Copy Code
    Imports System
    Imports System.IO
    Imports System.Windows.Forms
    Imports ImageGear.Core
    Imports ImageGear.Display
    Imports ImageGear.Formats
    Imports ImageGear.Formats.CAD
    Imports ImageGear.Evaluation
    Namespace my_first_CAD_WINFORMS_project
        Public Partial Class Form1
             Inherits Form
             Private page As ImGearCADPage = Nothing
             Private currentPageIndex As Integer = 0
             Public Sub New()
                 ImGearEvaluationManager.Initialize()
                 ImGearEvaluationManager.Mode = ImGearEvaluationMode.TrialDialog
                 ImGearCommonFormats.Initialize()
                 ImGearFileFormats.Filters.Insert(0, ImGearCAD.CreateDWGFormat())
                 ImGearFileFormats.Filters.Insert(0, ImGearCAD.CreateDGNFormat())
                 ImGearFileFormats.Filters.Insert(0, ImGearCAD.CreateDXFFormat())
                 InitializeComponent()
             End Sub
            Private Sub LoadToolStripMenuItem_Click(ByVal sender As Object, ByVal e As EventArgs)
                 Dim openDialog As OpenFileDialog = New OpenFileDialog()
                 openDialog.Filter = "CAD files (*.dwg, *.dxf, *.dgn)|*.dwg;*.dxf;*.dgn|AutoCAD files (*.dwg, *.dxf)|*.dwg;*.dxf|MicroStation files (*.dgn)|*.dgn"
                 If openDialog.ShowDialog() = System.Windows.Forms.DialogResult.OK Then
                     Using fs As FileStream = New FileStream(fileName, FileMode.Open, FileAccess.Read)
                         page = CType(ImGearFileFormats.LoadPage(fs, 0), ImGearCADPage)
                     End Using
                 End If
             End Sub
            Private Sub SaveToolStripMenuItem_Click(ByVal sender As Object, ByVal e As EventArgs)
                 Dim saveDialog As SaveFileDialog = New SaveFileDialog()
                 saveDialog.FileName = currentFile
                 saveDialog.Filter = "Bitmap file (*.bmp)|*.bmp|PNG file (*.png)|*.png|JPEG file (*.jpeg)|*.jpeg|TIFF file (*.tif)|*.tif"
                 If saveDialog.ShowDialog() <> DialogResult.OK Then Return
                 Dim formatOut As ImGearSavingFormats = ImGearSavingFormats.PNG
                 Select Case Path.GetExtension(saveDialog.FileName).ToLower()
                     Case ".png"
                         formatOut = ImGearSavingFormats.PNG
                     Case ".bmp"
                         formatOut = ImGearSavingFormats.BMP_UNCOMP
                     Case ".jpeg"
                         formatOut = ImGearSavingFormats.JPG
                     Case ".tif"
                         formatOut = ImGearSavingFormats.TIF_UNCOMP
                 End Select
                Using stream As Stream = saveDialog.OpenFile()
                     ImGearFileFormats.SavePage(page, stream, formatOut)
                 End Using
             End Sub
            Private Sub renderPage(ByVal pageNumber As Integer)
                 Try
                     If page IsNot Nothing Then
                         Dim igPageDisplay As ImGearPageDisplay = New ImGearPageDisplay(page)
                         imGearPageView1.Display = igPageDisplay
                         imGearPageView1.Invalidate()
                     End If
                 Catch ex As ImGearException
                     MessageBox.Show(ex.Message)
                End Try
             End Sub
         End Class
     End Namespace
  9. Now, let's go over some of the important areas in the sample code with more detail. To initialize and support processing of DWG, DXF, and DGN files we need:
    C#
    Copy Code
    // Initialize evaluation license.
    ImGearEvaluationManager.Initialize();
    ImGearEvaluationManager.Mode = ImGearEvaluationMode.TrialDialog;
    
    // Add support for CAD files.
    ImGearCommonFormats.Initialize();
    ImGearFileFormats.Filters.Insert(0, ImGearCAD.CreateDWGFormat());
    ImGearFileFormats.Filters.Insert(0, ImGearCAD.CreateDGNFormat());
    ImGearFileFormats.Filters.Insert(0, ImGearCAD.CreateDXFFormat());
    VB.NET
    Copy Code
    ‘ Initialize evaluation license.
    ImGearEvaluationManager.Initialize()
    ImGearEvaluationManager.Mode = ImGearEvaluationMode.TrialDialog
    ‘ Add support for CAD files.
    ImGearCommonFormats.Initialize()
    ImGearFileFormats.Filters.Insert(0, ImGearCAD.CreateDWGFormat())
    ImGearFileFormats.Filters.Insert(0, ImGearCAD.CreateDGNFormat())
    ImGearFileFormats.Filters.Insert(0, ImGearCAD.CreateDXFFormat())
       
  10. We load the document using:
    C#
    Copy Code
    page = (ImGearCADPage)ImGearFileFormats.LoadPage(fs, 0);
    VB.NET
    Copy Code
    page = CType(ImGearFileFormats.LoadPage(fs, 0), ImGearCADPage)
  11. Lastly, we will go over the code to render a page with the ImGearPageView control:
    C#
    Copy Code
    private void renderPage(int pageNumber)
     {
                try
                {
                    if (page != null)
                    {
                        // Create a new page display to prepare the page for being displayed.
                        ImGearPageDisplay igPageDisplay = new ImGearPageDisplay(page);
                        // Associate the page display with the page view.
                        imGearPageView1.Display = igPageDisplay;
                        // Cause the page view to repaint.
                        imGearPageView1.Invalidate();
                    }
                }
    
                catch (ImGearException ex)
                {
                    // Perform error handling.
                    MessageBox.Show(ex.Message);
                }
    }
    VB.NET
    Copy Code
    Private Sub renderPage(ByVal pageNumber As Integer)
                 Try
                     If page IsNot Nothing Then
                         Dim igPageDisplay As ImGearPageDisplay = New ImGearPageDisplay(page)
                         imGearPageView1.Display = igPageDisplay
                         imGearPageView1.Invalidate()
                     End If
                 Catch ex As ImGearException
                     MessageBox.Show(ex.Message)
                 End Try
             End Sub
       
       
  12. To render a page, we need to first create an ImGearPageDisplay object that can be directly loaded into an ImGearPageView control:
    C#
    Copy Code
    // Create a new page display to prepare the page for being displayed.
    ImGearPageDisplay igPageDisplay = new ImGearPageDisplay(page);
    VB.NET
    Copy Code
    Dim igPageDisplay As ImGearPageDisplay = New ImGearPageDisplay(page)
        
This sample project was created as a simple introduction to using the CAD functionality in ImageGear. For systems designed for production environments, you need to configure your projects more efficiently by only adding the resources that you need. For more information, refer to Deploying Your Product.