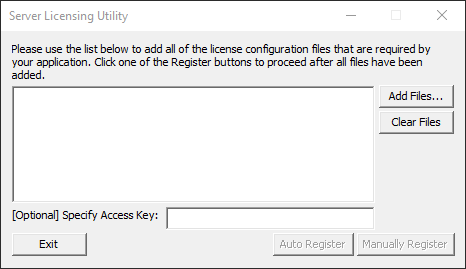
The Server Licensing Utility is a simple Windows application that uses License Configuration Files to request a license key from the purchased Runtime licenses. The SLU registers that Runtime license on the system where your application will be running. This utility can be used by developers for testing, by your deployment team, or by your end users to register their Runtime license.
When running the SLU.exe (C:\Users\Public\Documents\Accusoft\ImageGear.NET v24\Licensing\Deployment\x86\SLU.exe or C:\Users\Public\Documents\Accusoft\ImageGear.NET v24\Licensing\Deployment\x64\SLU.exe, depending on the bit architecture of your OS), right-click and choose Run as administrator. This will ensure that the licensing information is successfully added to the system’s registry.

To Deploy the License
1. Generate license configuration file
- Go to my.accusoft.com to access the Accusoft Customer Portal.
- Log in to your account by entering your email and password. Alternatively, you can enter the order number to see only a specific order.
- Click the products tab to see the products purchased.
- Click on the required product name, version number, deployment.
- Click the license button to display the drop down of Standard Deployment Licensing Instructions.
Note: The Solution Name and Solution Keys are also listed here. These are (later) used to unlock the Accusoft products and enable all licensed features at runtime.
- Scroll down to click the license pool button.
- For the required product, click the Generate Config File button to create the text file used to license the machine (i.e., the License Configuration file).
- Notice the .txt file in the download bar.
- Save the text file and note its location, as you have to access it again.
2. Register runtime license for your system using the SLU
- Copy SLU.exe from Deployment Resources to your runtime machine.
Note: Read the readme.txt found in the same directory as SLU.exe for additional steps necessary before running the SLU.
- On your runtime machine, double-click the SLU application.
- In the Server Licensing Utility dialog, add your License Configuration file(s) as follows:
- Click Add and navigate to your License Configuration file(s).
Tip: The License Configuration File is the .txt file downloaded earlier.
- Select the appropriate License Configuration file(s) and click Open.
- When registering an annual license, you need to provide the access key in the [Optional] Specify Access Key text box.
- After all applicable License Configuration files have been added, click Auto Register (if you are connected to the Internet).
Note: If not connected to the Internet, follow the instructions in Manually Register Toolkit (Disconnected from the Internet).
The license information along with the system’s hardware information is transmitted to the Accusoft licensing web service. If an unused license is available, a new license key containing information for the system is generated, returned, and is then automatically installed by the SLU.
A message displays informing you whether the licensing was successful or not. Take notice of this message. The message, 'The product has successfully been licensed' is displayed if successful.
3. Add runtime licensing deployment information to your application to unlock the Accusoft product and enable all licensed features at runtime
You have to add the runtime licensing deployment information to your application to unlock the Accusoft product and enable all licensed features at runtime:
- Place the licensing function calls in your application to trigger the license
component.
- Call the functions <Set Solution Name> and <Set Solution Key> at the start of your application. The Accusoft product checks that there is a valid license before it lets you use any of the key functionality.
Note: In the samples provided with our SDK, these function calls have been included for your convenience, but are commented out. To use these commented out function calls, locate them by searching the sample code. (Tip: You can use Ctrl+F and enter the search term "solution" to easily locate these functions).
- Copy parameters from the Accusoft Customer Portal to the functions.
- Copy the Solution Name from the portal and paste into the placeholder string of SetSolutionName function. Uncomment that function.
- Similarly, copy the appropriate Solution Key (based on your programming language) and paste into the placeholder value of the SetSolutionKey function. Uncomment that function.
- SetOEMLicenseKey (this will be provided only if OEM license is purchased from our Sales department).
- Compile and run your application.
Automatic Registration (Connected to Internet)
Automatic registration works in much the same way as connected Toolkit registration and requires an Internet connection on the system where your application software will be deployed.
The license information along with the system’s hardware information is sent over the Internet to the Accusoft licensing web service. If an unused license is available, a new license key containing information for the system is generated, returned, and is then automatically installed by the SLU.
Manual Registration (Disconnected from Internet)
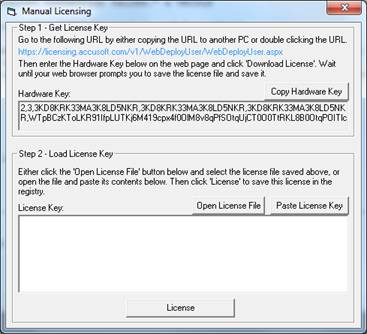
Manual registration is used when the system where your application software will be deployed is not connected to the Internet and therefore cannot be registered automatically. This operation is similar to Disconnected Registration with the License Manager.

- Copy the Hardware Key and URL to a removable media device, such as a thumb drive, and then take it to a system that is connected to the Internet.
- From the connected system, paste the URL into a browser. A page will appear that contains a field into which you enter the hardware key.
- After this hardware key is entered, a license file with the license key is downloaded, which you then save to the removable media device.
- Return to the offline system with the removable media device onto which you have saved the license file.
- Click Open License File and navigate to the license file. Click OK in the file selection dialog.
Alternatively, you can open the license file with a text editor, copy the license key to the clipboard, and click Paste License Key to paste the new license key into the License Key field.
- Click the License button; the new license will be installed.


