


Once the base of the tutorial application is completed, you can extend it with Office support using the following steps:
- First, you need to add a reference to the ImageGear for .NET Office Assembly.
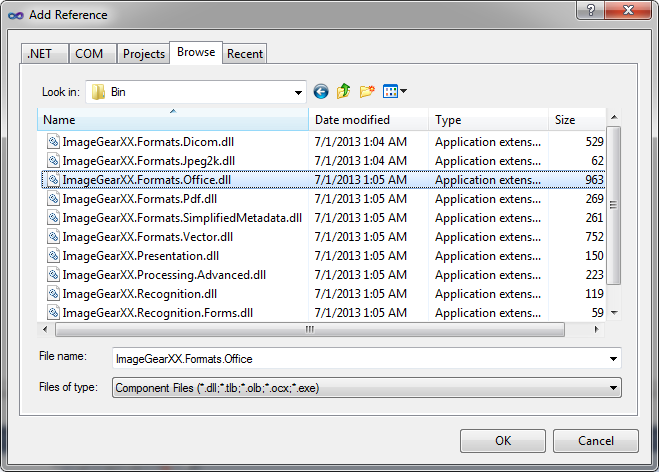
- In the Solution Explorer, right-click on References, and choose Add Reference.
- Choose the Browse tab and navigate to "ImageGear for .NET v21\Bin" directory.
- Select ImageGear21.Formats.Office.dll, and click OK.
You should now have the ImageGear21.Formats.Office assembly listed under References in the Solution Explorer.
- Next, add the Office using statement. Open the code for MainWindow.xaml.cs. At the top of the code add the following statement:
C# Example  Copy Code
using ImageGear.Formats.Office; - Add the following statements in MainWindow constructor:
C# Example Copy Code// Add support for Word files ImGearFileFormats.Filters.Add(ImGearOffice.CreateWordFormat()); - Add the following fields to MainWindow class:
C# Example Copy Codeprivate ImGearDocument igDocument; private int currPageNumber = -1;
- Add the following method to MainWindow class:
C# Example Copy Codeprivate void UpdateView() { imGearPageView1.Page = igPage; imGearPageView1.Update(); }
- In OpenExecuted find the following code:
C# Example Copy CodeigPage = ImGearFileFormats.LoadPage(fileContent, 0);
and replace it with:
C# Example Copy CodeigDocument = ImGearFileFormats.LoadDocument(fileContent, 0, -1); igPageDisplay = new ImGearPresentationPageDisplay(); imGearPageView1.Display = igPageDisplay; currPageNumber = 0; igPage = igDocument.Pages[currPageNumber];Also replace the following code:
C# Example Copy Codeif (null != igPage && null != igPage.DIB && !igPage.DIB.IsEmpty()) { // Create a new page display igPageDisplay = new ImGearPresentationPageDisplay(igPage); // Associate the page display with the page view imGearPageView1.Display = igPageDisplay; // Cause the page view to update imGearPageView1.Update(); }
with:
C# Example Copy Codeif (igPage != null) { UpdateView(); }
- To enable navigation between Office document pages do the following:
- Declare the public static RoutedCommands required for the navigation in the .xaml.cs file. Open MainWindow.xaml.cs and add the following within the body of MainWindow class:
C# Example Copy Codepublic static RoutedCommand FirstPageCmd = new RoutedCommand(); public static RoutedCommand PreviousPageCmd = new RoutedCommand(); public static RoutedCommand NextPageCmd = new RoutedCommand(); public static RoutedCommand LastPageCmd = new RoutedCommand();
- Also add the following method to the MainWindow class:
C# Example Copy Codeprivate void CanExecuteDocAvailable(object sender, CanExecuteRoutedEventArgs e) { e.CanExecute = (null != igPage && null != igDocument && null != igPageDisplay); }
- Now add the Command Bindings for the RoutedCommands created above. Each will have its own handler for 'Executed', but they will share a single handler for 'CanExecute'. Right-click over each entry and click 'Navigate to Even Handler' to add the C# handler to the MainWindow class in the .xaml.cs. You should have something like this:
XAML Example Copy Code<CommandBinding Command="{x:Static custom:MainWindow.FirstPageCmd}" CanExecute="CanExecuteDocAvailable" Executed="FirstPageExecuted"/> <CommandBinding Command="{x:Static custom:MainWindow.PreviousPageCmd}" CanExecute="CanExecuteDocAvailable" Executed="PreviousPageExecuted"/> <CommandBinding Command="{x:Static custom:MainWindow.NextPageCmd}" CanExecute="CanExecuteDocAvailable" Executed="NextPageExecuted"/> <CommandBinding Command="{x:Static custom:MainWindow.LastPageCmd}" CanExecute="CanExecuteDocAvailable" Executed="LastPageExecuted"/>
- Now set up the menu items. Under the View menu, add ‘First Page’, ‘Previous Page’, ‘Next Page’, ‘Last Page’ menu items.
XAML Example Copy Code<MenuItem Name="mnuViewFirstPage" Header="First Page" Command="{x:Static custom:MainWindow.FirstPageCmd}" /> <MenuItem Name="mnuViewPreviousPage" Header="Previous Page" Command="{x:Static custom:MainWindow.PreviousPageCmd}" /> <MenuItem Name="mnuViewNextPage" Header="Next Page" Command="{x:Static custom:MainWindow.NextPageCmd}" /> <MenuItem Name="mnuViewLastPage" Header="Last Page" Command="{x:Static custom:MainWindow.LastPageCmd}" />
- Add code for the page navigation executed handlers as below:
C# Example Copy Codeprivate void FirstPageExecuted(object sender, ExecutedRoutedEventArgs e) { igPage = igDocument.Pages[currPageNumber = 0]; UpdateView(); } private void PreviousPageExecuted(object sender, ExecutedRoutedEventArgs e) { if (currPageNumber - 1 >= 0) { igPage = igDocument.Pages[--currPageNumber]; UpdateView(); } } private void NextPageExecuted(object sender, ExecutedRoutedEventArgs e) { if (currPageNumber + 1 < igDocument.Pages.Count) { igPage = igDocument.Pages[++currPageNumber]; UpdateView(); } } private void LastPageExecuted(object sender, ExecutedRoutedEventArgs e) { currPageNumber = igDocument.Pages.Count - 1; igPage = igDocument.Pages[currPageNumber]; UpdateView(); }
- Declare the public static RoutedCommands required for the navigation in the .xaml.cs file. Open MainWindow.xaml.cs and add the following within the body of MainWindow class:
Now you are ready to compile and run the finished application working with Office documents.