


Once the base of the tutorial application is completed, you can extend it with Office support using the following steps:
- First, you need to add a reference to the ImageGear for .NET Office Assembly.
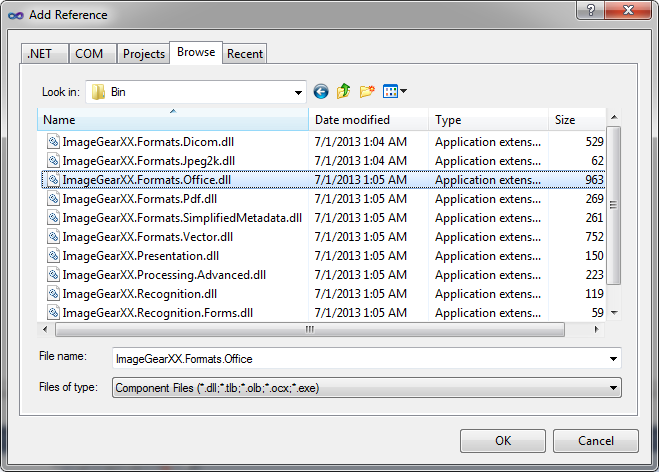
- In the Solution Explorer, right-click on References, and choose Add Reference.
-
Choose the Browse tab, navigate to "ImageGear for .NET v21\Bin" directory, select ImageGear21.Formats.Office.dll, and click OK.
You should now have the ImageGear21.Formats.Office assembly listed under References in the Solution Explorer.
- Next, add the Office using statement. Open the code for Form1.cs by right-clicking on the form and clicking View Code. At the top of the code add the following statement:
C# Example  Copy Code
using ImageGear.Formats.Office; - Add the following statements to Form1 constructor after the ImGearCommonFormats.Initialize() call:
C# Example Copy Code// Add support for Word files ImGearFileFormats.Filters.Add(ImGearOffice.CreateWordFormat()); - Under the File menu, add the Load Document menu item. Double-click it to create a handler.
- Copy the code from the Load Page menu handler for the Load Document menu handler.
- Add the following fields to Form1 class:
C# Example Copy Codeprivate ImGearDocument imGearDocument; private int currPageNumber = -1;
- Add the following method to Form1 class:
C# Example Copy Codeprivate void UpdateMainView() { imGearPageView1.Page = imGearPage; imGearPageView1.Update(); }
- In loadDocumentToolStripMenuItem_Click find the following code:
C# Example Copy CodeimGearPage = ImGearFileFormats.LoadPage(stream, 0);
and replace it with:
C# Example Copy CodeimGearDocument = ImGearFileFormats.LoadDocument(stream, 0, -1); currPageNumber = 0; imGearPage = imGearDocument.Pages[currPageNumber];
Also, replace the following code:
C# Example Copy Codeif (null != imGearPage && null != imGearPage.DIB && !imGearPage.DIB.IsEmpty()) { // create a new page display imGearPageDisplay = new ImGearPageDisplay(imGearPage); // associate the page display with the page view imGearPageView1.Display = imGearPageDisplay; // cause the page view to repaint imGearPageView1.Invalidate(); }
with:
C# Example Copy Codeif (imGearPage != null) { UpdateMainView(); }
- To enable navigation between Office document pages do the following:
- Under the View menu, add ‘First Page’, ‘Previous Page’, ‘Next Page’, ‘Last Page’ menu items. Double-click them to create handlers.
- In firstPageToolStripMenuItem_Click add the following code:
C# Example Copy CodeimGearPage = imGearDocument.Pages[currPageNumber = 0]; UpdateMainView();
- In previousPageToolStripMenuItem_Click add the following code:
C# Example Copy Codeif (currPageNumber - 1 >= 0) { imGearPage = imGearDocument.Pages[--currPageNumber]; UpdateMainView(); } - In nextPageToolStripMenuItem_Click add the following code:
C# Example Copy Codeif (currPageNumber + 1 < imGearDocument.Pages.Count) { imGearPage = imGearDocument.Pages[++currPageNumber]; UpdateMainView(); } - In lastPageToolStripMenuItem_Click add the following code:
C# Example Copy CodecurrPageNumber = imGearDocument.Pages.Count - 1; imGearPage = imGearDocument.Pages[currPageNumber]; UpdateMainView();
Now you are ready to compile and run the finished application working with Office documents.