
Accusoft.FormAssist v5.0 Application - Updated
Tips
The ScanFix Xpress "Dilate" operation is very useful when characters are be broken, such as with dot matrix or carbon print, or if a light colored pen were used. Sometimes after binarization is applied, some small pieces of a character are missing. Dilate can help "repair" these damaged characters. This could be useful when you have a consistent set of input images.
For OCR and ICR fields, be sure to choose the minimum character set that meets your needs. For instance, in a numeric field, be sure to choose character set "Digits" instead of "Alpha Numeric" or the default, "All Characters". Choosing a more restricted character set will reduce the risks of a false identification.
Turn off OCR->Detect Spaces in any field where you do not want spaces to be returned, such as in the zip code fields.
Form Dropout works better if your zones are drawn slightly larger than the boxes. Ensure your zones are constructed so that the complete box is contained, plus a little additional space on all four sides. Note that this does not apply to signatures, which should be within the box and not include the box lines.
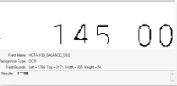
For correct OCR/ICR recognition, it is very important to ensure that the entire character area is captured during processing. For example, in this clip of FormAssist's Field Results tab, the 4 and the 5 are truncated at the bottom and are not recognized correctly in the Results area.
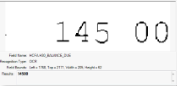
To fix this, return to the template and click the Zoom in icon (magnifier with a plus sign) on the toolbar. Expand the field so that the value is completely within the bounds of the box. Although the change may seem very slight, it makes a tremendous difference in recognition accuracy, and can be seen in the new field image.
For OMR fields, bring the field coordinates in close to the outside edges of the box. This is a bit different than ICR fields, because, in simple terms, the number of black pixels is being compared to the total number of pixels in the zone (after dropping out the form). Therefore, the larger the defined zone, the smaller the percentage of black pixels. By decreasing the size of the zone, you can increase the "Marked Bubble Threshold" and still get accurate results.
If you have a field with space(s) or and static character(s) between the filled in values, it is sometimes better to create two separate zones for each part of the field, especially when static content is between the boxes. Form Dropout may leave a little content that may result in an extra character in the results. Ensure you turn off "Detect Spaces" so that your results don't include space characters for the area between the two sets of boxes.
FormAssist has two built-in restrictions to prevent you from accidentally running out of memory. These restrictions are not a problem for most users, but some large installations find the need to go beyond them. These restrictions can be changed by simply updating some defined constants in the FormAssist program (which is provided in full source format) and rebuilding FormAssist.
For fields whose values follow a particular pattern, try using a regular expression. For example, the Canadian Postal Code has a specific pattern of characters. You want the SmartZone engine to use that pattern when it is making character decisions.
([A-Z])(\d)([A-Z])(\d)([A-Z])(\d)
For the US zip code, specify the following to return only 5 characters.
\d{5}
SmartZone will return a notification if the resulting string does not match the regular expression, so you will know immediately if the clip needs to go to a human. For example, if the US zip code only had four characters, then SmartZone would tell you that the pattern could not be matched.
The OMR fieldtype is used to model three distinct types of fields:
The following guidelines apply to these three types of OMR Usage:
If you are creating an OMR bubble, as is used in educational tests, a Threshold of 50 may be used, since the bubbles are generally more than half marked. An example of OMR bubbles are provided in the "OMR Form Template" sample in the "Assorted Forms" formset.
If you are creating a checkbox, use a much lower threshold value, such as 10. Examples of checkbox fields are shown on the "Direct Deposit Form Template" in the "Assorted Forms" formset.
If you are creating a signature field, in the OMR settings, make it a "Single Checkbox Field," and set Checkbox Recognition Method to "Shrink Area to Mark Edges". Some people make very small signatures, so you want the density analysis area to be shrunk to only the area containing significant content, not the entire field area. Regular OMR zones for checkboxes should remain without adjustment. Signature areas have to be treated differently. Also, use a much lower Threshold, since the zone is much larger than the marked content; a value of 10 is suggested.
An example of a signature field is shown on the "Direct Deposit Form Template" in the "Assorted Forms" formset.