If the docking windows are restricted by the web server logic, you will not be able to access those docking windows. The installation or web server logic can also control which docking windows are initially displayed.
 For more information on installation and configuration of the docking windows, refer to the Prizm Viewer Admin Help.
The Docking Window Default Location
The default location for the docking window is on the left side of the viewing window as shown highlighted in red below:

Modify the Docking Window(s) Location
Move All Docking Windows
You can modify the default location of all the docking windows (at one time) by using drag-and-drop capabilities:
- Left mouse-click and select the Docking Window Frame at the top where the name is (for example, Thumbnails in the screen shot above).
- Keep the left mouse button selected and drag the window to the desired location.
- Lift up on the left mouse button and the docking window attaches to the new location.
 |
Docking windows can only be moved to the sides of the viewing window. They cannot be moved to the Rebar area.
|
Move One Docking Window
You can modify the default location of one docking window by using drag-and-drop capabilities:
- Left mouse-click and select the Docking Window Tab at the bottom of the docking window where the icons are (for example, the Image Thumbnails tab in the screen shot above).
- Keep the left mouse button selected and drag the tab to the desired location.
- Lift up on the left mouse button and the docking window attaches to the new location.
|
Docking windows can only be moved to the sides of the viewing window. They cannot be moved to the Rebar area.
|
Pin/Un-Pin the Docking Windows
If you want to have more viewing area in the Main window, you can pin (or collapse/minimize) the docking windows to the side and still be able to see and use their functionality.
To pin the docking windows:
- Click on the Push Pin icon on the docking window:

- The docking windows are pinned to the side of the Main window for easy access.
- To access the docking windows, mouse-over the docking window and the full window displays.
- You can un-pin the docking windows and return them to their original position by clicking on the Push Pin icon.
Resize the Docking Windows
If you want to resize the docking windows:
- Mouse-over the edge of the docking window and a double arrow displays.
- Select and drag the window size to the desired area.
- Release the left mouse button.
|
If you make the docking window too small, the tab icons/names at the bottom do not display. If you re-size the window larger, then the tab names will display. |
Reorder the Docking Windows
If you want to reorder the way the docking windows display:
- Left-mouse click on the tab/icon at the bottom of the docking window.
- Drag-and-drop it to the location you want it to display.
Close the Docking Windows
If you want to close all of the docking windows at one time:
- Click on the X in the upper right-hand corner of the window:

- All of the docking windows close.
Re-Open - All the Docking Windows at Once
To re-open the docking windows:
- Click on the View All Docking Windows
 icon on the tool bar to open all of the docking windows at once.
Re-Open - One Docking Window at a Time
- Right-click anywhere on the image. The Right-Click Context Menu displays:
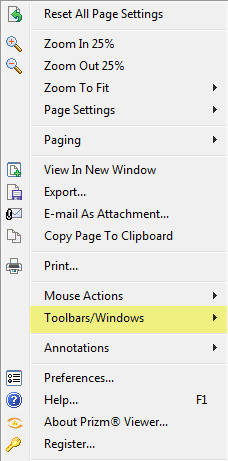
- Select Toolbars/Windows. A secondary menu displays:
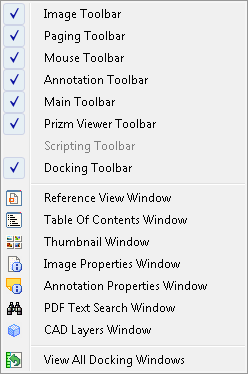
- Select the docking window you want to re-open (Reference View, Table of Contents, Thumbnail, Image Properties, Annotation Properties, PDF Text Search, or CAD Layers).
- The docking window you selected will re-open in it's previous location.
- To re-open another docking window, repeat steps 1-3.
See Also