This topic contains the steps to design a template using all of the tools on the menu:
Adding a Signature
Use the following steps to add a signature to the template:
- To add a signature, click on the Signature button.
- Scroll to the location on the template you want to add the signature and draw a box.
- The Properties Panel opens to the right of the template and displays the available options for the field.
- If the signature is read-only, click the Read-only button.
- If the signature is mandatory, click the Required button.
- Enter a Display Name to easily refer to the form field. In this example, type in Signature for Examiner.
- If you want to add additional signature fields to the template, click on the Duplicate icon and draw the signature fields as desired.
 |
You can adjust a field's position in several ways; see the section below, "Adjusting a Field's Position" for details.
|
Adding Initials
Use the following steps to add initials to the template:
- To add initials, click on the Initials button. Scroll to the location on the template you want to add the initials and draw a box.
- The Properties Panel opens to the right of the template and displays the available options for the field.
- If the initials are read-only, click the Read-only button.
- If the initials are mandatory, click the Required button.
- Enter a Display Name to easily refer to the form field. In this example, type in Initials of Reviewer.
- If you want to add additional initials fields to the template, click on the Duplicate icon and draw the initials fields as desired.
|
You can adjust a field's position in several ways; see the section below, "Adjusting a Field's Position" for details.
|
Adding a Text Box
Use the following steps to add a text box to the template:
- To add a text box, click on the Text Box button. Scroll to the location on the template you want to add the text box and draw a box.
- The Properties Panel opens to the right of the template and displays the available options for the field.
- If the text box is read-only, click the Read-only button.
- If the text box is mandatory, click the Required button.
- If you want to allow the end user to enter multiple lines of text in the Text Box, click on the Multiline checkbox. Once you select the Multiline checkbox, the Font Size drop-down displays on the Properties Panel. Select the font size for the Multiline Text Box.
- Enter a Display Name to easily refer to the form field. In this example, type in Important Text.
- For a text box, you can choose a font type, a font color and you can limit the number of characters that are entered into the text box. Note that the font type and font color default selections are "Use Global Setting".
- If you want to add additional text box fields to the template, click on the Duplicate icon and draw the text box fields as desired.
|
You can adjust a field's position in several ways; see the section below, "Adjusting a Field's Position" for details.
|
Adding a Date
Use the following steps to add a date to the template:
- To add a date box, click on the Date button. Scroll to the location on the template you want to add the date and draw a box.
- The Properties Panel opens to the right of the template and displays the available options for the field.
- If the date box is read-only, click the Read-only button.
- If the date box is mandatory, click the Required button.
- Enter a Display Name to easily refer to the form field. In this example, type in Date Received.
- For a date box, you can choose a font type and a font color. Note that the font type and font color default selections are "Use Global Setting".
- If you want to add additional date fields to the template, click on the Duplicate icon and draw the date fields as desired.
|
You can adjust a field's position in several ways; see the section below, "Adjusting a Field's Position" for details.
|
Adding a Checkbox
Use the following steps to add a checkbox to the template:
- To add a checkbox, click on the Checkbox button. Scroll to the location on the template you want to add the checkbox and draw a box.
- The Properties Panel opens to the right of the template and displays the available options for the field.
- If the checkbox is read-only, click the Read-only button.
- If the checkbox is mandatory, click the Required button. If not, leave it unchecked.
- Enter a Display Name to easily refer to the form field. In this example, type in Registration Added.
- If you want to add additional checkbox fields to the template, click on the Duplicate icon and draw the checkbox fields as desired.
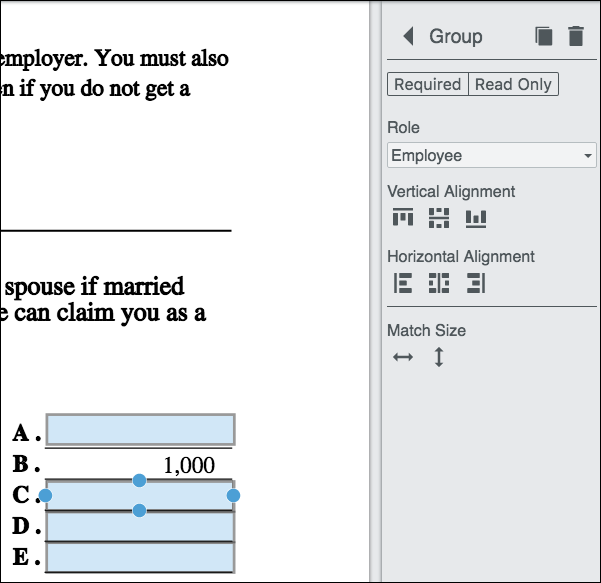
- To create a group of checkboxes, follow step 5 above and create the desired amount of checkboxes that you want the user to choose from.
- Press the Ctrl key and click on (multi-select) the checkboxes that you want to put into a group. The Group properties panel displays:
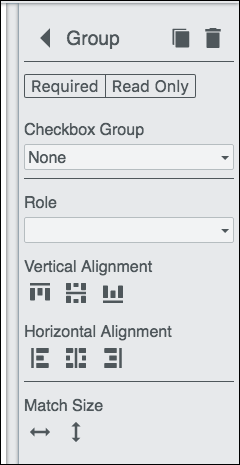
- From the Group properties panel, you can select the Required button (if desired), the Read-only button (if desired), enter a Checkbox Group name, select the alignment and match the size of all the checkboxes in the group:
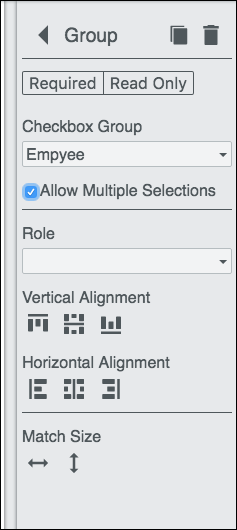
- Once you enter a Checkbox Group name, you can select Allow Multiple Selections so that the user can check multiple checkboxes within that group.
|
The group name is limited to 140 characters. |
- If you select one checkbox in the group, the properties panel will display the following:
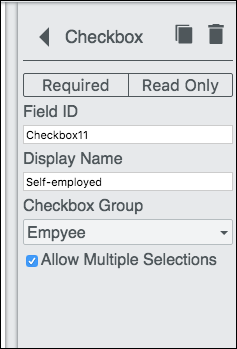
- From this example, you can see that the checkbox is required, part of a group (group name) and the group allows multiple selections. If you want to add another checkbox to the group, click on the Duplicate icon. To delete this specific checkbox from the group, click on the Trash icon.
|
You can adjust a field's position in several ways; see the section below, "Adjusting a Field's Position" for details.
|
Adding Roles
You can add Roles to a template so that multiple people can review, edit, sign and save a document. For example, roles could be created for an Employee, a Manager and a Director. Adding roles to a template helps clarify the document review process in an organization by only allowing role-based interaction within the document.
Use the following steps to add roles to the template:
- To add roles to a template, click on Settings and the Global Template Settings dialog is displayed:
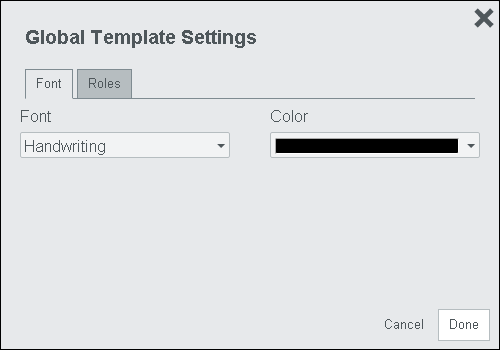
- Click the Roles tab and the roles settings are displayed:
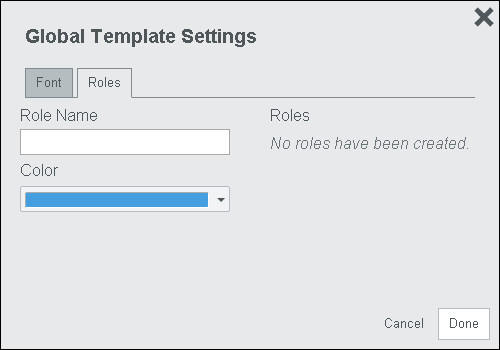
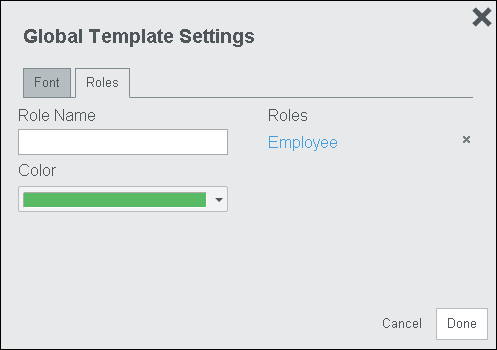
- In the Role Name field, type in Employee and click the Checkmark (or press Enter):

The new Role titled "Employee" is displayed under Roles in blue:
|
The colors apply to each role by default in the following order: blue, green, red, gold and black. If you want to select a different color for a role, you must select the color before clicking the "Checkmark" or pressing "Enter". Note the maximum number of roles you can create is five. |
- Repeat steps 1-3 and create a Manager (color green) and Director (color red) role. When you are done creating roles, click Done:

- Go to the top of the template and click Save.
Assigning Roles to Fields
This section assumes you have created roles in the section above titled, "Adding Roles".
Use the following steps to assign roles to fields in the template:
- In this example, click on the Form CA Received field and the Properties Panel is displayed:
- Click on the Role drop-down and select Employee. The field turns blue indicating the field is required for an Employee to review and fill out.
- Click on the Funds Received Date field and the Properties Panel is displayed:
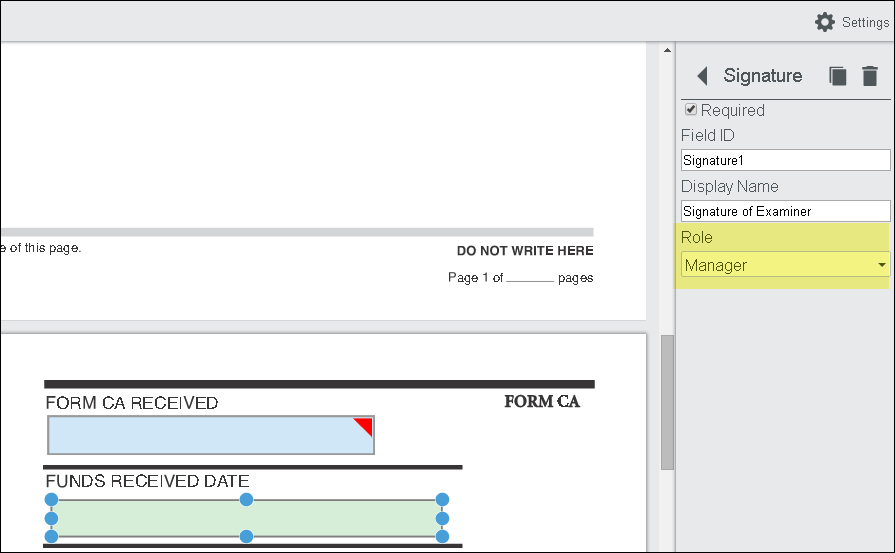
- Click on the Role drop-down and select Manager. The field turns green indicating the field is required for a Manager to review and fill out.
- Click on the Examined By field and the Properties Panel is displayed:

- Click on the Role drop-down and select Director. The field turns red indicating the field is required for a Director to review and fill out.
- Once you have assigned all of the roles to the desired fields, click Save at the top of the template.
Assigning an Input Mask to a Text Box
By adding an Input Mask to a text box, you can require a signer to fill in the text box with specific information, such as a Phone Number, Social Security Number, Date, Zip Code, or Model Number. Valid entries for the Input Mask are: # - Numeric, A - Alphabetic, and * - Alphanumeric.
Use the following steps to add an Input Mask to a field which requires a telephone number:
- Create a text box.
- In the Properties Panel, enter (###)###-#### in the Input Mask field.

- Click Save at the top of the template.